If you could combine both (with arches in the copper to support removal........
But MAN THAT THING IS HUGE!

Printable View
If you could combine both (with arches in the copper to support removal........
But MAN THAT THING IS HUGE!
Quote:
Originally Posted by licenseless
^^^^ I agree
Not given up on the idea, seemed to have gathered some motivation after doing that bottom panel :).Quote:
Originally Posted by licenseless
That is another alternative :), I think it'll look pretty normal once the hardware goes in :).Quote:
Originally Posted by AmEv
Seems a popular choice then :D, it was voigts who suggested it he has a good eye for quality :).Quote:
Originally Posted by BS Mods
I'm trying to think of a way to implement the copper curve bars but I found it was too much copper & it didn't look right to me, plus it messed up the form of the aluminium curve, fixed it now but it'll require a good bit more work on them to make them a perfect fit without it adding excess force to the main structure, I'm considering using the drill press & the milling bit I have to route a 10mm channel 1mm deep to place aluminium in there & so the mounts go through the alu, I'm not certain but I think it'll look much better than big plain copper bars.
Another alternative but requires a purchase of 1.2mm copper sheet is to do a pyramid step type form so a 25mm copper bar, then a aluminium one then a copper bar & the middle 1 being the mounting one.
Heres a concept of both.
I was going to make an alternative for the tabs that stretch across the case but everyone saying do those :D so came up with a couple of alternatives that I think would look better, so let me know what you think, cheers :).
man either way looks nice to me
the inlay of aluminium on copper is AWESOME!!!
Thanks mate :), I'll remake the stretched tabs that are currently on it & make my mind up from there, it's possible it'll look good once I change those 2 tabs, but I'll still do a small piece to see how the inlayed alu in copper looks to help make my mind up :up:.Quote:
Originally Posted by licenseless
Well rested & back on form, shame my tools aren't :facepalm: decided to give the copper bars another shot but with a strip of alu in the middle like in the concept pics I shown earlier, got 1 of the copper strips straightened back out.
Here I am getting the centre of the copper bar aligned with alu flat bars clamped in place to stop it moving around, I did clamp extra bars on top to hold it in place properly vertically too but it made it so the copper couldn't slide through :neutral:, anyway it all went wrong because of the crappy drill table moving up or the chuck letting the mill bit move down & ended up milling all the way through the flipping piece grrrr, think I'll accept I can't mill good with a drill press now :wacky:.
The main problem is getting the correct depth when doing this, takes ages to set the depth & for it to stay there, I tightened it all up good & proper but still just wasn't enough, mills are way too expensive for me so next best in line is a router.
But I can safely say the full length copper pieces will not happen on this, I tried with what I've got & failed so I'll keep working on tabs & reserve the copper for something else.
Just taking a quick time out to post this, then I'm getting back onto it :D.
under neath the clamps on the exit side of the path for the copper... place another piece of metal above that so that the copper has to ride underneath it like a bridge to hold the copper in place so it doesnt want to flex up causing it to rise and drill all the way threw...
basically make a guide... so you have two pieces of metal giving it the path and two more pieces of metal going perpendicular to those two pieces forcing the copper down.... does that make since...
and keep it lubed baby yeah hahahaahaha
hehe :D, Yeah makes sense mate :up: but it wasn't that that caused it to go deep, it was either the drill platform moved to a different higher height which is doubtful so I'll rule that possibility out, I'd say it was the milling bit came down a bit causing it to cut deeper, it went too far along to make this piece usable & the copper is too expensive to be wasting like that, so I'm not sure I'll bother with copper strips, not got deep enough pockets lol, was ok with the acrylic as it wasn't expensive but the copper :eek::D.Quote:
Originally Posted by licenseless
I'll find a solution to make it good though :):up:.
Didn't get to do any more on it today, garage got taken over :D, but was sunny again so took a couple extra pictures :D, also flipped the copper mesh around & think it's more fitting with tiny countersinks so matches the other front vents better, so will need to make a new eject button hole.
Gonna have to drill & bung a thread insert into the clamping piece inside the fretsaw, it will not tighten up so the blade is very slack so it's only any good for thin or soft materials & even then can pop out quite easy so I'll need to find out the thread size so I can maybe even make my own, the blade keeps popping out when cutting thicker metal, so irritating.
Made a few tabs out of 5mm acrylic but prefer the copper so wasn't able to make a few with the fretsaw & my hacksaw died a bit ago which just leaves the jigsaw or manual fretsaw as an option lol grrr, manual fretsaw the blades keep breaking very easily (I must just lack technique on using it like any new tool) just not as good as a powered one for me, with the powered one I could effortlessly cut how I wanted on the line & I just can't with a manual one without a heap of practice.
Finally got around to re-painting the pci/io piece with the far better copper spray :D & think that's the best news in this update lol.
And here is the vent meshes showing what it looks like with the small copper tabs & acrylic tabs but while I don't prefer the look of the full stretch tabs I just can't ignore they do what's needed which is to keep the panels at the same level all along the full length, they will be re-made so they haven't got the un-needed extra countersunk hole, might even thin them down in the middle so they don't stand out as much.
There is however another way to keep it so the window is held in place nicely & that would be to add a couple more tabs just below the vents but it would put the spacing out a bit.
Or even JB weld the internal tabs in place & just go & do full length tabs so it's easier to install & remove a full length tab.
I'm getting way too indecisive about what I'm doing regarding the tabs, it's just not fun modding, would have probably completed this by now if I chose to pass on the full length strips.
I'm sure the sudden increase of heat isn't helping neither, I tend to mod best in the cold, keeps me more alert & not slouchy, been 1 of those days where I'm lingering in the garage thinking what on earth should I do :think:.
Had a thought & it might be a good one or bad :D, since seeing JB weld getting used a bit lately, I wonder if it's possible & what would happen if I layered strips of 1mm alu & 1mm copper on top of each other if it would stay firm when removing the main curve bars & avoiding the need to use bolts, could give it a very clean look or it could just fall apart when removed, I just don't know, there is a bit of force in the window & the curve bars which is a part of what keeps it all strong so layering up while it's in this form maybe it could make it keep the form when removed, either that or the adhesive on the stuck on bits would just crack & pop off lol & I'd be gutted :D I'd put a strip of 1mm alu on the inside too.
I do think if the adhesive is up to the challenge it could work well but could use a little feedback if you think it could do it, I checked out with google to see how strong it is compared to welding & some say it's about 30% of the strength of the material while welding is just as strong & the 30% is only when the material is prepped properly, I wouldn't be able to smother it on neither, wouldn't want it to squeeze out making a mess so just enough to let it get stuck well, I'm thinking for the top layer it would be a minimal strip of the adhesive to stop it making a mess.
If that was to work well I'd be able to remove the whole lot as 1 piece by unbolting at the top rear & bottom front, but that would be putting a lot of faith into the strength of the adhesive though.
What do you guys think? is JB weld good enough for this?.
Thinking a good strong silicone might be the solution for mounting the strips :).
PCI/IO in better copper paint, plastikote brilliant metallic copper, not a perfect match but not far off at all :) & as you can see got a bunch of bolt heads painted in the process of protecting the threads :D.
With it installed back into the case & some close ups.
Now, time to work on the hdd cage platform fan wire stash pass through gaps & the little copper bar in the picture is for the optical tray :).
Took a break to get something to eat & get the log up to speed :) after posting this I’ll get back to a big filing session :D.
And thought it looked pretty cool on it's side so took a couple extra pictures lol :D.
You can likely take much of the spring out of the acrylic by heating it up to about 270-300F/132-149C (acrylic temp, not gun temp) with a heat gun while it's clamped in place. I'd start on the low side of that temp range and work your way up to avoid any drooping or bubbles. Start at the bottom and heat back and forth as you work your way to the top. Might take a few passes. When it cools it should be that shape permanently. You might be able to take those solid bars out after that.:)
Thanks for the tip mate but I feel the spring in the acrylic should work well with the alu curve bars since there is a slightly similar spring in them when released, I'll have to run some tests on adhesives & silicones before I go for it with mounting some 1mm sheet strips for the tabs but if I'm not satisfied with it I'll just use countersunk bolts :). I think the strips should hold all of it in place really well so the stretched copper tabs are temporary :).Quote:
Originally Posted by mDust
Continued until 01:20 AM :D so I'll have to get a router for future mods it was a silly amount of filing to be done & didn't have my thinking cap on as I should have drilled it a bit to make it a little easier lol.
Wow for something so simple sure took a lot of energy to do lol, sweat pouring off me too so had to get a cold one :D which made doing it less dull :D.
So now the cartoon mouse holes are done for the fan cables so I can work on the extending & then sleeving of the fans while I wait for a couple more things to arrive for a couple of extra touches, super close to the finish now I think :) also used the disc sander to shave a bit off the hdd slide mounts so the cages go in & out a little easier :).
All back together :).
Not sure if I mentioned it earlier but I ordered a 1mm sheet of copper for doing the full legth tabs :up: + ordered a mirror polished stainless steel sheet, just enough to cover the 2nd level for less than a tenner woo hoo :D.
Since I'm gonna be waiting for the extra material I started thinking about how the alu fan mount bars needed body filler to fix the miss drilled holes & knew they needed painting, don't really want any paint in this other than the pci/io piece so started coming up with alternatives & this seemed a good design, the idea was to use 2 for each fan & the slot would close up with a bolt & the 2nd half area had a helicoil installed to clamp the fan secure & then mount to the mobo panel.
But didn't work out, my filing wasn't quite good enough to get a perfect 5mm slot to where I wanted it, so the slot that the corners of the fans went into had about 1.5mm space, tried using washers but it just wasn't good looking enough, was either a poor idea or just bad filing lol.
But decided to cut 1 of the sides of the slot off & just use a lock nut on the other side, it was solid & perfect when installed in the case in all fan mount locations, so it only needs the 1 bit to fix each fan to the case, doesn't matter what orientation it is it's that strong :) but the front fans are a little too close to the window for my liking now so wouldn't work too well with the vents so I'll have to come up with a use for the unneeded holes & make new ones but only for the 2 front fans, the rest are ok :) but all the spare holes will have a good use, got some nice ideas brewing ;).
This first 1 I'll consider as a prototype test piece & I'll make nicer ones for the final version now that I know how they need to be, I especially like the way it looks like the fans are just floating when viewed from some angles :) but it really is great on how solidly in place they are when installed :up:.
Next update will be either getting 4 of these made or fan cable extending & sleeving, I'll try to combine the 2 so could be a few days until the next.
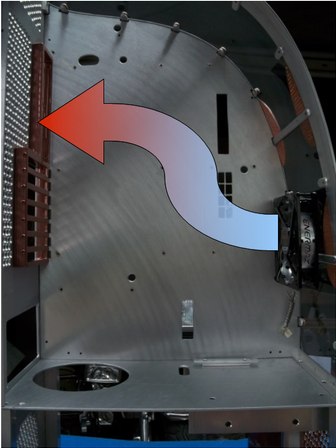
A question on cooling.
This is what you want to happen:
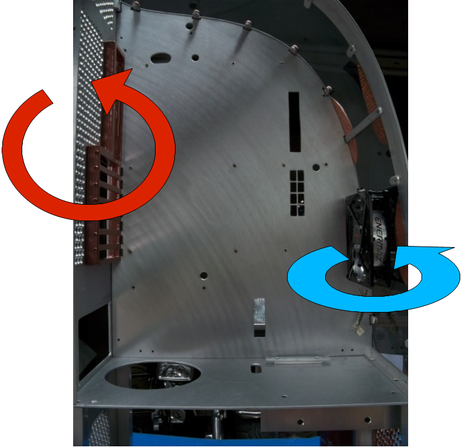
But because you've got the intake fan not directly against its vents, and those vents aren't directly lined up, I think you might end up with a loop around the intake fan.
And because this will result in negative pressure inside the case, and you have a perforated rear, I think you might end up with a loop around the exhaust too.
Between those two effects, you'd end up with very little airflow across the components. What say you?
(Not trying to pick holes here, just trying to be helpful :))
Best way to test this is grab a cigar and hot box the case then turn the fans on... Bit of a wind tunnel test...Quote:
Originally Posted by Blibbax
You should give it a shot and see how it does
Another method you could try is placing a piece of tissue over the intakes at the front and the lower section of exhaust at the back, to see whether the tissue is blown, sucked or not really acted on at all.
yeah but then there is no reason to smoke a cigar... hahahahahahQuote:
Originally Posted by Blibbax
i found that tracking the smoke visually helps to isolate problem areas... and since his case has a clear side he can see exactly what its doing...
Firstly sorry for taking forever to reply :D.
:) Thanks for raising the question, got me thinking about it :D I don't know if it could go round in circles like that but it is a bit too close to the front panel which could make it a little noisier, but I am itching to find out now :D.Quote:
Originally Posted by Blibbax
Yeah good method :).Quote:
Originally Posted by licenseless
Sounds a better method but might do both :D.Quote:
Originally Posted by Blibbax
Yeah both are good ways of indicating air flow so I'll try both :up:.Quote:
Originally Posted by licenseless
Yeah the flow is close to that except there is a fan below the mobo tray, 1 at the top angled, there will be 2 in push pull on the cpu cooler which will be fairly close to the rear panel so should all be nicely guided out, the front fans are very close to the front but I could move them more into the case by say 10mm & if I do move them that little bit I have some 3mm copper rod that I have a nice idea for to make usage of the vacant old fan mount holes :).
But yeah guys, I'll run some tests before I call it complete :), got vibration tests to do & sound tests & flow test & yes the flow test will be first in line ;) but expect it to be fine & will only put smoke to it if necessary :D I did look around the net though for a cheap tiny smoke machine type gadget but for a proper aerodynamics type 1 they are flipping expensive lol so yeah what licenseless said a cigar would be good & cheap but stinky for this :D.
Hey all :) I've not been slacking just stepped out of mod world for a mo to do a lot of contemplating & research as I come into a little money & intend to use it well :D plus I'm down on a couple of tools, sure I could do it the hard way & have a crazy hefty filing session & be flat out knackered for a few days but that doesn't help me go to the garage with a smile so can't be arsed to be honest lol, scroll saw made me a little bit lazy :D.
INCOMING BLAH ALERT SKIP PAST IF CAN'T BE BOTHERED, off on a ramble again hehe :D.
---SKIP THIS BIT IF NOT INTERESTED, IT'S MOSTLY ABOUT ME GETTING A LITTLE MONEY OUT OF THE BLUE & ME THINKING OF WHAT TO DO WITH IT BUT A PREMIUM SCROLL SAW & OTHER TOOLS ARE HIGHLY TEMPTING---
Sorry for the shouting caps :D
Been a little bit pickled the past week doing loads of research on what to spend some money on which is why I've not been posting & done very little modding.
Nearly a week ago I got news I was getting given a little money & it threw me right off course with this project as I totally wasn't expecting anything & I've been drooling over some things for a long time that were just out of reach cost wise until now & started window net shopping like crazy & looking into forums & just about everywhere to get clued up on things, it's £1000 & I usually have to save up for quite a while to raise that amount but all the same I don't want to blow it on meaningless crap.
Invest in some nice new tools which will get used each year or maybe twice a year or more if I do any bits for other people for pc cases or other, got my eye on a premium scroll saw that has a massive 762mm throat with easy change blades & no vibration (this scroll saw is an epic tool for cutting & would be capable of doing some amazingly detailed large work which could have handled doing the side panels & back panel of Stealthlow nicely with wickedly detailed patterns if I wanted :D) a better full height drill press & a router & other bits & bobs & maybe more materials to make another case, sure seems the most fun & longer life span :D.
Or a DSLR camera & save the rest, I checked out heaps of reviews to see how good I could get with the money & came to the conclusion that a canon eos 550d with normal lens & possibly a cheaper macro lens & ok tripod would be a pretty good choice but this would swallow up the money leaving me with a great camera set but same old budget tools some being nice & reliable & some very much not, I'd say my main reliable tools is my hand power drill, jigsaw, disc sander, bench grinder & files could possibly get the good camera & the premium scroll saw but would be flat broke on the little but nice windfall.
I think this bit falls into the meaningless crap section lol, sure it's awesome tech gear right now but it will be very out dated pretty fast.
The upcoming Samsung 27" 1080p 120hz monitor with built in 3d vision even though I only want this monitor for it's size & refresh rate & picture colour quality, the 120gb corsair ssd I've been drooling over since I found out about it lol & could buy a couple of ok tools with the rest but no premium scroll saw but this would be a bit like burning money really spending it all on tech that would soon outdate lol where with a excellent scroll saw I'll still be making things with it in 10 years if I'm still healthy, think it's a life time tool if looked after.
Holiday but I see that just as much a waste of dough as going on a bender lol :D even though I'm about 17 years overdue a break from Manchester so it would probably do me a lot of good but can definitely think of better uses for the money than that, in my minds eye that flipping awesome scroll saw is floating at the top of the list very clearly.
I think the tools option is the wisest & most productive although I'll not be able to capture my mods in super nice quality pictures, so instead just as good as they currently are which actually mustn't be as bad as I thought since the shots I took were accepted for publication on Air Cube in Custom PC so that was a really nice vote of confidence from all the awesome people at bit-tech & Custom PC :D, I look at some others with really nice photography either pro or near pro standard & it would be nice to match that so yeah I'm a bit frustrated on what to go for lol, I also know dslr cameras can get to really ridiculas prices but I guess those types of cameras are serious pro cameras or simply people with too much money :D in fact some prices look very very scary to me in DSLR land lol.
Computer tech moves on fast so isn't such a priority with me not being able to afford a yearly full upgrade & a high quality scroll saw to me would be better than a laser cutter but without the engraving perk, I doubt I could get both the scroll saw & camera with a G but wow I can already vision some of the stuff I could make with a scroll saw like that & it's superior to Stealthlow, I've had a little taste of what a low end scroll saw can do & I'm definitely hooked on how much better it is for cutting than any other tool I've used :D I've found how bad they are at the low end & was busy looking for anything bad being said about the particular scroll saw & couldn't find anything negative about it only nothing but how seriously good it is & read heaps from all over the internet for a couple of days, same with the camera.
Milling aluminium with a router which all points in the direction of DO NOT TRY TO ROUTE ALUMINIUM but seen others do it here so I'm a bit puzzled on that one, apparently it's extremely dangerous & can see why after seeing how fast those things spin, I came across some that said they use a speed tweaker type gadget to slow it down more than the lowest speed by default or there are palm routers that seem good but quite fiddly in setting up, think I prefer the less hassle plunge routers or could be wrong on this & the palm type would be the way to go for me on this.
---END OF BLAH BLAH :D--- & ultimately I think my mind is already made up about getting the scroll saw :hehe:.
Oh & update time but it's a tiny one & I did this a good few days ago, been highly distracted since & still need a new hack saw to make the fan holders lol so I've hit a slow patch again because of potential new options available.
Had to do this 20mm strip of copper with the jigsaw so had to clamp it up as good as possible with a 10mm gap in the work bench, cutting thin sheet metal is a reminder why I used to not like using a jigsaw as it mangles the metal up very easily, so having tried a scroll saw even though it was for a short time I can easily say that's the way to go for thin sheet metal, & that cheap scroll saw I bought had the shortest life span of any tool I ever used, my own fault though really, should have looked up some tensioning videos lol but nonetheless it was a bad scroll saw as I couldn't properly use pin less blades on it.
It was a bit of a struggle cutting a 20mm strip of 1mm copper with an overpowering jigsaw so I'm dreading doing a 10mm strip of 1mm alu with the jigsaw lol pretty sure it would mangle it up bad, this is another piece the super duper scroll saw could manage no sweat, not even sure why I'm holding out on ordering it but I seem to be but only because it's rather expensive, since my 2nd case I've enjoyed putting detailed fret work into panels but only during the past couple of months realised how awesome scroll saws actually are.
I've got awesome scroll saw imprinted on my mind after considering all the great possibilities of things I could make :D I'll go for that & try to make the most out of the kodak easyshare z950 for a while longer :D.
Heres a little bit on the scroll saw I'm looking at :) :up:.
Basic stats, few pictures & test cutting video of Excalibur EX-30 Scroll Saw £530 :eek:.
The video was of the 21" version which is the same machine but just less throat depth & £40 difference.
• Arm tilts 45° left and right, tilting the blade, not the table keeping the table level for better control & more accurate work
• 762mm Throat capacity
• 50mm Cutting thickness capacity
• Large 358 x 825mm table surface
• Quick blade changes with finger operated blade clamps, no tools required
• Easy access speed and tension controls
• Organized blade storage on base
• Onboard dust blower
• Can use 150mm lengths of 1/4" bandsaw blade, ideal for cutting thicker materials.
Only trouble I see if I got this beast of a tool is I'm not sure I could call modding a hobby or an obsession or even just a passion :think: :D I suppose some have hobbys that cost a lot to support & even compared to fishing enthusiasts this would be cheap I guess lol or some buy expensive clothes I buy no frills :D yeah, many ways to look at it that help rationalise the purchase :D & it should last a very long time if I look after it well which I will :up:.
Quote:
Originally Posted by Waynio
how well does that thing work with metal... cause if i can get something like that to do some nice cuts on aluminum and thin steel... that would be AWESOME!!!
Well I used a low end scroll saw with fine metal fret blades & managed to cut 1mm sheet alu without warpage & with ease & same with 3mm alu & copper, cut up some 5mm acrylic too but seemed whatever I had to cut through it it could manage no worries :up: the nice thing about it is it only needs a very tiny hole drilling in spots on the panel to do some really detailed internal cuts, with a scroll saw but with that kind of throat depth I could have easily done the back & side panels on this case with so little effort compared to how I did it :D.Quote:
Originally Posted by licenseless
But still I was going to order it like today or tomorrow but I think I'll leave it until I've completed this case & got more relaxed & if I still really want to go for it then I will :).
Wow I actually went through with purchasing the scroll saw lol, thought long & hard about if I'd put it to good enough use & feel quite comfortable that I will but it did feel crazy spending that much on a tool.
My dad & bro think I'm crazy for buying a tool like that unless I was making money from it lol but I can't look at it like that but if I get good enough where I could make some good stuff for others I'd probably be up for it eventually but I'll let my project logs show of what I can do with it :) there are many many many things I could make once I get up to speed on good scroll work.
Might even re-make the bottom front panel as I cut that with a knackered scroll saw when the blade was extremely loose & was the bulkier pinned bladed type.
It could come this week or early next week, it weighs about 50kg :eek:.
A few random sneaky peek pictures of the scroll saw with Stealthlow next to it for size comparison :D there was a wood blade already in but not properly fixed into the bottom holder, so with the case lay down the throat is as deep as the height of the case :eek::banana: wow I'll be able to do some good stuff with this.
And this shot shows how it is bolted to a plank of wood
Here is the first design for a table for it.
Here is the 2nd nice & cheap one :D.
I won't be making a table for it until I get Stealthlow completed ;).
Holy huge scroll saw dude!! I bought one of the tabletop ones like 2 years ago for $20 at a flee market. Best purchase ever! But this one is at least 3x bigger.
:D It is crazily huge lol, I had a small normal one but I didn't use it correct & it wouldn't take pin less blades very well had a really weak method of placing the pin less ones.Quote:
Originally Posted by Fuganater
Since starting modding I've tried a few different cutting tools but when I had a short go on a scroll saw once I figured how to do it I was hooked :D & just realised how much potential for a lot of my ideas that I won't be as limited now when designing, always designed around whatever my building capabilities are or think I could manage doing bits, so this will really open some nice new possibilities, won't be for a while before I do another but I'll be experimenting with some ideas & making a few other things so if it's things of modding interest which it probably will :D I'll post in the appropriate section of the forum :).
First DSLR camera play :D Canon EOS 1000D with Sigma 70mm f2.8 EX DG MACRO, came today but the tripod didn't turn up but I just couldn't hold back from having a play with it :D.
Did all these without a tripod, still waiting for it, the extra weight of the heavier camera & lens really helps keep it steady though & managed to do these :).
First impressions after a pretty decent play with it, it's flipping amazing :D macro close ups nice & easy, longer distance image quality really nice, shooting my pc case in crystal clear quality though takes a bit of effort as I can't take the picture close to it for a full view of the case I have to step back about 3 metres, maybe a little more but overall this lens is sweet but you may see less of the full case except for the odd occasion or the final shoot :).
Ah yes photography... My part time job... That's a nice depth of field... For only a 2.8... Nice find
U got any other work u have done... From one photographer to another... Keep it as a hobby or sell your prints only... The rest of the photography world is to big of a head ache
:) I searched a lot for a good one ;) & then looked into user reviews & everyone was really impressed with it & now I am :D, that lot was just from day 1 of getting it so I've a lot to learn with using it to it's best I think & yeah the intention is for hobby use mostly but wow I feel a new interest taking over me after that session :D, nice being able to take a picture & use it as a desktop wallpaper in nice quality, couldn't really do that with my last cam, well could do but was nowhere near as good detail :).Quote:
Originally Posted by licenseless
my new favorite thing is doing time lapse photos... then using windows7 and havint it change the background image every ten seconds and pull from a single folder containing all the orginized images .... so that my back ground image is a timelapse haahahah
it looks cool and if stuff moves thre the sky slow enough u barely notice the change
:D Sounds pretty cool, could do one of a day night cycle of various times of year so you could have the sunny feel of summer in the peak of winter 8).Quote:
Originally Posted by licenseless
someone was having fun with the camera settings.
and you could scroll saw a cow in half with that thing man... wth LOL
:D Yeah, thought it was a good idea to familiarize myself with it before taking progress shots :) & yeah it's a silly big scroll saw but had a first go on it earlier & I love it :D so nice & easy changing blades & no vibrations at all on slow speed which is what I'll mostly be using for metal & acrylic :up:.Quote:
Originally Posted by Twigsoffury
Got the scroll saw temporarily set up & ready for action in the cellar at long last, still ned to make a custom table for it's permanent usage & the tripod arrived today so took a bunch of pictures of the case :) & I think I'll manage to keep this lens as a primary lens :D, finally started to resize the pictures for easier uploading but I'll keep the original raw full res images backed up.
In extreme close up this shows why I was considering flipping it to the other side :D quite a few of the countersinking went very un-smooth.
Also I seemed to have got up to speed on taking shots without the need of taking multiple shots so that little practice play the other day really helped :).
Tomorrow I start on the full length clamp strips :).
Back in action :)
Got all the strips cut to size on the new scroll saw these are 1 metre strips, 25mm x 1mm alu, 20mm x 1mm copper, 10mm x 1mm alu, just need to add bevels on all the edges.
NICE!!!!!!Quote:
Originally Posted by Waynio
:):up:Quote:
Originally Posted by licenseless
Here is an alternative grill I designed & made today, the copper mess is sorted now I flipped it over & countersunk deep but did it on a slight angle & they all went nice & smooth, got a tip from PabloFunky & he meant something else but it worked lol :D.
Soooo glad to get this moving again :).
Wow, just had an epic session to make up for my bro hogging the garage :D so just carried on until 3:30 AM lol rather than running back & forth to the house I had a couple of beers :) & would have gone all night if I needed to to get these strips done :D.
I need to get an extra memory card for my kodak or an alternative lens that can take pics at a closer range, the kodak has enough room for 6 or 7 pictures with it's internal memory.
Anyway, the good stuff :D I straightened the strips & marked all the edges so I know they get a perfect bevel.
Gave them all a bevel.
Then took all the rough stuff off with a file as it was quicker & then gave a good sanding with 240 grit & then brushed them & also brushed the front panel.
Here I just used clamps to hold the strips in place while I drilled the mounting holes, just 1 at the top & 1 at the bottom & tapped the alu curve bar & added helicoils.
Before I called it a day I decided to add the extra holes on the copper front panel mesh so there were no blank spots behind the grill but on my last hole the drill whacked the panel right out of shape & it was double clamped tightly so not sure why this happened, but it was still hot from all the drilling & countersinking so I whacked away with a mallet against the flat piece on the vice, got it to a straightened out form but man it was way out of shape, thought I'd definitely need to redo it :eeek:.
By the way thank you voigts for suggesting full length tab strips, they are awesome & thanks to everyone else for keep on reminding me they were the way to go :D.
Need 4 hands for installing the copper curved vents so left them out for this shoot & the strip tabs still need trimming down on both ends & the internal tabs need shortening a bit but that is a tiny task compared to what I just done :).
And wow I forgot to name the pictures lol.
Now onto the good shots or as good as can be when it's the middle of the night :).
Hmmm the front panel caught a few scratches which I'll sort out & the strips will need re brushing because of the clamps.
those strips make all the difference in the world. they really give it a finished off look.
Thanks mate :) yeah much nicer than the little tabs :banana:.Quote:
Originally Posted by xr4man
This build just got even better!
Those strips were exactly what it needed. It looks so smooth and clean now. I just can't believe what a difference it made. I like it before but now I LOVE it.
Great job on this thing. Keep up the good work. :up: