did more SketchUp work :D
Stay tuned :up:

Printable View
did more SketchUp work :D
Stay tuned :up:
sorry for the lack of regular updates, got a new family member who's been taking up some free time :D
Her name is Mel, she's an 18-month old lab/pit bull mix. Shes full grown, only approx 40lbs. She's got the best personality I've ever seen in a dog like her. She'll jump on your lap and lick your face, jump on the couch next to you and watch tv, and she's very good with strangers and strange animals. She's amazing. The wife found her on Craigslist, a woman had 4 dogs and the place she was moving to would only let her have 3, and no pit bull anything, so by default this adorable girl had to go. Best of all she was free! :banana:
well onto the imprtant stuff :D
ok so as you know, last time I left off I had this:
a peanut-brittle-like sheet of carbon and fiberglass, thanks to too much hardener
well after a LOT of sanding and a fresh coat of resin, we have this: :banana:
much better :D looks bumpy still, but its just the carbon reflecting the light.
anyhow, I got another roll of carbon finally and proceeded to cut and lay it:
I wanted to put full concentration into this so I decided to work rather than stop to take pics. It came out great, just needs a final coat of resin and some wet sanding, then to cut it out!
Heres the template I made on cardboard that will be the size/shape of the carbon backplate:
thats it for now, should get the resin all done by this weekend and hopefully get it cut out soon thereafter
on to another part of the mod: the "strings"
I got a 10-pack of acrylic rods to use as "strings" for the guitar, and I'm planning on lighting them at either end with LEDs for HDD, power, CD, etc. Well a shiny polished rod does nothing to reflect light outwards, so I took a piece of scotchbrite to it, scuffed it good. Here you can see the difference. I'm holding it to the power LED on my computer
You can see where I stopped sanding it
and with the lights off:
this should work out nicely. I'm going to experiment with different grits of sandpaper as well to see what kind of effects they give, and what will work/look best.
thats it for now, hopefully more updates soon, but for now, I leave you with some more angles of my render :D
thanks! :DQuote:
Originally Posted by DonT-FeaR
thanks :DQuote:
Originally Posted by ContraptionMaker
I like the idea of the clear UV paint...I was indeed worried about the LED light traveling the distance of the rod without looking dark in the middle. I'll do up a complete rod, and throw an LED @ each end and see how it turns out.
I should have the carbon done today and cut out tomorrow. If you're making structural parts like supports or the like, then the pressure is a must to get a nice tight layering.
Hand-laying is how most fiberglass parts are made, car bodywork and the like. You can use carbon for cosmetic and light structural duty in the same way.
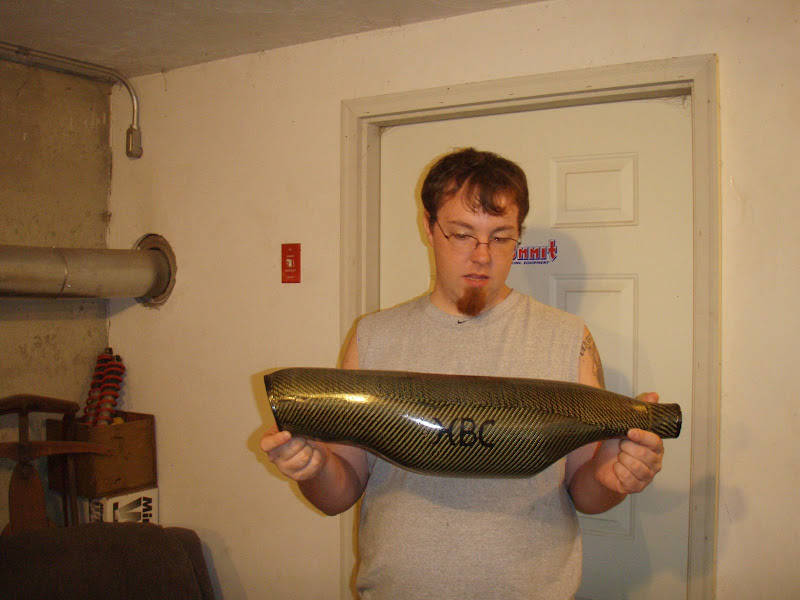
My friend tought me how to work with it, he hand-made this pipe for his jet ski out of carbon fiber and carbon/kevlar :bowdown:
small update, got a coat of resin on it, looks much better :D will sand it tomorrow, and depending on how much sanding I have to do I'll either put one more coat of resin or just cut it out and clear coat it.
mmmm tasty :D
more to come tomorrow night :up:
small update, carbon is 90% done
after a good sanding from yesterdays 2 fresh coats of resin:
and after the dust is wiped off - you can see where it needs more sanding:
so after another round of sanding you can see the dark (unsanded) spots getting smaller
at this point I was scared about going through and sanding into the carbon, so I did up another batch of resin. I used a different method this time that I guy I know in teh carbon industry told me to do. He said to mix up the resin, then pour it into the center of the peice like so:
then cover with thick plastic sheet (like the kind used in gardens for water control) like so:
and use a hard squegee to push the resin outwards from the center like so:
this didnt work out like he showed, my plastic started to curl and wrinkle for some odd reason, so I peeled it off before it start to set up to the point where I'd ruin it, and just brushed the rest on like normal:
then while it was setting up I went and did laudry, mowed the lawn, walked the dog, etc. then I came back and I trimmed the ratty edges off with my trusty die grinder
heres the cardboard template with the mobo on it, for sizing
a look at the size of the baseplate, theres plenty of carbon left for other goodies, like the pickguard, and possibly a part or 2 for my computer :D
I then went to town with the sander again (its now dark as you can see):
its now almost perfectly flat, but also almost into the carbon. I could do up another layer of resin, but I dont feel like sanding anymore :D I got some nice triple-thick clearcoat spary paint at walmart that I'm going to use, so between wet sanding and that it'll be perfect.
this is the original side, first sheet of carbon (the sheet that was laid directly onto the plexi) and came out the best. a nice wet sanding and the clear coat will have this side perfect.
thats it for now, I'm holding off wet sanding and clearcoating until I get it cut out, which hopefully I can do on my luch break tomorrow :D
ok so it cut out! :D
here it is in the garage, its was cold and rainy tonight, so I decided to work in there
I borrowed a dremel as mines broken, and used his side-cutting bit
I used an arctic cat track marker to outline on the carbon, its usually used to mark snowmobile tracks for drilling to install studs
and heres the outline
and its cut :D
Heres the other side, looks damn good :smokin:
and the extra, now to figure out what to make from it, maybe coasters or somethin
and with the mobo sitting on it
looks good methinks. the edges are rough as hell, I'll hopefully get to hit it with the belt sander tomorrow and clean it up nice
minor update :D
got my free sample hardware from RAF Electronics. 1 Aluminum handle, dont know what I'm going to use it for yet but I'll find somethin. 5 brass standoffs, 5 aluminum standoffs, 5 aluminum thumb screws and 5 stainless thumbscrews. I would have liked all matching hardware, but the max qty for a sample order is 5, so I made it work :D
hmmm whaddaya know...10 standoffs and thumbscrews...and 10 mounting holes in the mobo! what a coincidence! Ok not really, had this in mind all along :D
as soon as I can find some proper-sized belts for my tabletop belt sander I'll have the carbon's shape finished, then I can wet sand/clearcoat it and it'll be done.
ok I'm back on this one again!
with Christmas coming and cash flow tight right now, we decided to do home-made gifts for Christmas. Well I know what I'm doing....I'm going to finish this for her! I'm also trying to finish Monster for Christmas for my brother as well, but we'll see what happens.
Ok spent a couple hours after work tonight workin on it. I got my plexi and traced the shape of the carbon guitar with a pen, then cut it with my dremel and rotary bit.
then I clamped them together and hit the belt sander
and after a few mins we've got two matching pieces
and a few pics of the rough layout for the components. I'm still trying to decide whether or not to use the CD drive. If I dont it saves a lot of space and some weight. Its not a huge deal, she's got a 250GB WD Passport, so she can always put stuff on that and burn them on my computer :think:
and a shot w/o the CD drive. The HDD will be on a holder or rack of some sort for airflow and cooling. anyone know if you can trim the unused part of an IDE cable off? :?
another update! forgot the camera, so you'll have to deal with cell phone pics lol
another shot with the components layed out
holes drilled for mobo, mobo temporarily mounted here:
holes drilled and mounts set up for HDD
main neck piece cut out
and the part for the "string" mount
I didnt get any pics of that part finished unfortunately.
now, on the neck, I've set up the measurements for the head and base mounts, and figured I have a 1" x 13.5" strip to cut some kind of decoration out of each side of the neck. now to do up some drawings and figure it out!
well it comes as a kit, so I dont need to put that switch in to begin with :up:
I like the idea on a remote switch though thanks!
anywho, small update.
I cut a small square out of the red plexi then cut in half to make two triangles. I then marked out a pattern on one side.
I then proceeded to sand away the profile
and the rough shape is done
mmm dusty lol
and another shot of the basic shape
and after some sandinge with 600 grit paper, there seems to be some high spots
so I hit it with a flexible sanding disc on the dremel. much better.
after I got it mostly smooth with the sand paper I put a buffing wheel on the dremel and used plastic polish in conjunction with the buffing wheel to shine it up
and these will be mounted on the neck as shown here, they will be the "supports" for the neck