Those corner caps look amazing, really nice work mate.

Printable View
Those corner caps look amazing, really nice work mate.
I think the natural angle iron looks GREAT! I can't wait to see this mod in full swing!
Nice work blue.
looks great man!
That's awesome! I love the gear train in motion and the acrylic cubes with the rust are incredible. I wouldn't have guessed that they were acrylic.
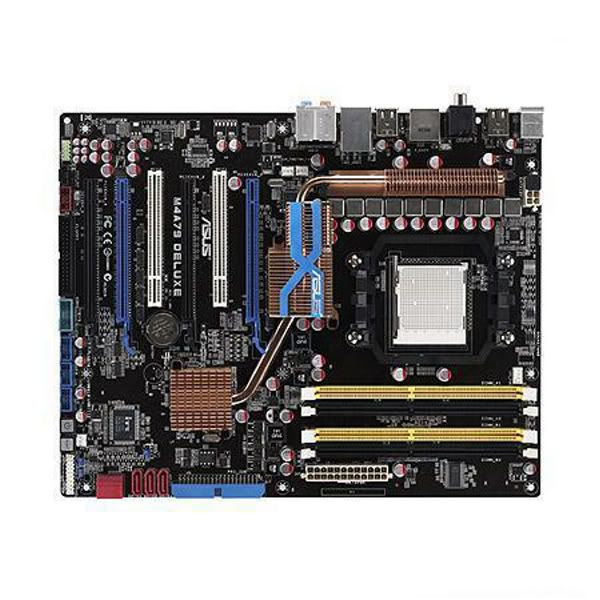
I'd like to build a cover for my motherboard, but I'm concerned about heat. I plan to make cutouts for the heat sinks already in place, but I honestly don't know enough about how much heat the rest of the components put out to know if I should be worried. I want the cover as close to the board as possible, and there will be exactly zero air flow behind it, so I don't know. Here's my board:
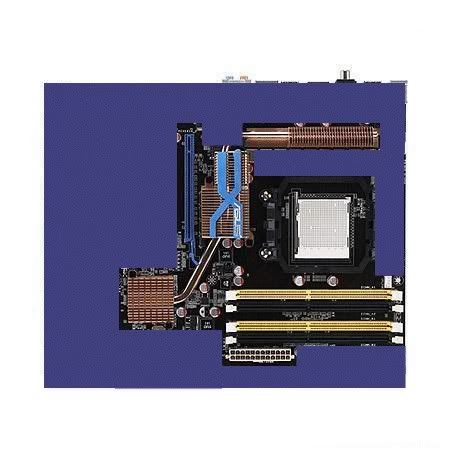
And here are the areas I plan to cover (I forgot to leave a hole for the 8-pin power connector but it'll be there):
That leaves the heat sinks uncovered, and a slot for the video card, but I plan to make a cover for that as well. I could upgrade the stock heatsinks for the chipsets and MOSFETS if needed, but obviously I'd rather not. Remember also that there will be a 250mm side fan blowing on the board, and a 120mm also, with a blowhole in the top of the case.
Anyone have on opinion on heat being an issue here? Thanks!
awesome looking mod so far! I love the aged copper and wood look, and I've used that Rustoleum paint before, it's good stuff, especially the texture it adds. For your mobo, I have mixed feelings on the cover. I doubt you'd run into any real issues, and with both those big fans blowing, some air movement will probably happen between the board and cover. Best thing I can think of is test it: if you've got some kind of temp measuring program, fire the machine up with the cover on (maybe make it out of a cheap/easy material first, like a thin MDF or something, before you potentially waste time making it out of the final material), and run whatever you can throw at it, see what happens.
In my own experience building my sandcrawler case, I'm on version 3, and I left a lot less room inside this one for airflow, so I'm constantly having to adjust it to try and improve things. the main lesson I've learned is there's no such thing as too much airflow room.
Here's one other idea: what about cutting a fan opening in the cover over the PCI slots, and putting in a similar-looking fan to the ones on the outside of the case? That'd provide plenty of airflow directly onto the board, you'd have nothing to worry about, and it'd be in keeping with the design of the rest of the case.
Check out the spotlight here.
I would definitely advise against using a 110 with dimmer inside the case. Dimmers create tons of noise, both audible and RF, and could cause other problems within the case.Quote:
Originally Posted by blueonblack
If you really want that same sort of warmth you get from an incandescent bulb, why not use 12v automotive bulbs? Interior lights, signal lights, etc?
If I'm not mistaken, you can just run less voltage to them to dim them.. like a fan controller maybe?
Spotlight!!!! Thanks guys. :banana:
@ Luke: I was planning on the 110 lights because I found some the right size with very cool filaments that look perfect when the voltage is dropped. If I can find some 12-volts as good, then great. I was able to find a potentiometer that's supposed to be used as a volume control, would that be better than a dimmer? I wouldn't think they would use something that causes noise in a sound system?
@ arto: Thanks very much, it's finally starting to come together to look like a case. :) I don't have a problem testing a cover on the system, and may yet do that, but I hand't thought of putting a fan into the cover itself. That's a good thought, I'll look into it, thanks!! That has also gotten me thinking about a simple vent in the cover, in front of the big side fan. That may be all I need.
If you are keeping the heatsinks and all that uncovered then you shouldn't have a problem with heat. You could even cover up the heatsinks and have 40 or 60mm fans built into the cover with a rustified cog grill :D. The downside of this is that you do get slightly more noise and the cover has to be slightly thicker.
Check out Defyant's work, he made a mobo cover for practically every mod lol.
As long as you find a POT rated at 120 volts or so and a few amps then it should work fine to drop the voltage. I saw a rotary dimmer at Homedepot the other week for like $7 IIRC.
This is looking great! Looking forward to the finsished thing.
-gaz
*low whistle* grats on the front page.. there seems to be more electronics than an E&E retard like me can handle here xD
Looks really great ! kuddoos and rep +1
Quick update, I got the holes cut for the newly bottom-mounted PSU:
And the lovely 1000-watt monster in place with its wires tucked neatly away out of sight. (The purpose of the plexi taped to the top of the PSU will come clear in time.)
I made a cover for it from three sheets of plexi and gave it the first step of the rust treatment.
Got some small angle iron and gave it the real rust treatment. I love the way this stuff looks!
And again with some holes carefully measured and drilled:
I don't like the smooth look of the angle iron, so here we have a brass spiral nail with convenient round head:
I took a bunch of these and drove them into a board in rows. Obviously I can't have any shiny brass in here, so I hit them with a mapp gas torch until they were glowing.
To get the shine off of the heads:
Not so shiny now, are ya?? :)
Not content with mistreating them like this, I cut their heads off.
Gruesome, ain't it?
But it was for a good cause. I think stage 1 of the PSU cover came out very well:
I know, I am going to have to raise the whole machine up a little bit to allow the PSU to breathe. I'm still pondering something that will serve as feet.
Next update may be a while coming, but it will be worth it.
Opinions?
that came out awesome! :bowdown: +rep
wow thats sweet! lovin the rust look! it came out really good :up:
The PSU looks amazing, fantastic work mate, can't wait for more :D.
Awesome blue! Coming together fantastically. Watching...
On the bottom, what if you set it up like a boiler with a flickering flame effect? The entire case would be lifted up 2 inches or so and vertical slots cut all the way around.
Ineresting. Not sure I care for the flickering flame, but the elevation with the vertical slots sounds excellent. I'll ponder on that, thanks!Quote:
Originally Posted by Mach
VERY inventive! I'm gonna have to get out my steampunk project yet, you know...
It's looking great Blue!
Good to see it coming along. I like the PSU cover; makes wire management a snap.
Lots of pics in this update, be warned. :) I have *finally* managed to get just the finish I've been chasing after all this time!! New finish on the PSU cover:
I am SO glad I finally got the formula sorted out. I've got other things to paint and now at least I know I can make anything look like real rusted iron. The formula turned out to be:
Primer (for plexi I used Krylon Fusion)
Spray-on base coat of American Accents rust paint (this gives it rusted iron texture also)
Wash-on-and-dab off diluted coat of American Accents rust paint (they come together in a package)
Use a solvent brush to splatter on two shades of blue-green paint: Lost Atlantis and Hanging Vine. Apply sparingly and immediately dab off with a paper towel. Do not wipe, dab. Get as much of it off as you can just a few seconds after you put it on. This part should be subtle.
Dab on large blobs of Modern Masters Metal Effects iron paint. Just large random blobs, keep the edges clean but not sharp like tape.
In an hour spray those area with Modern Masters rust activator. Again, randomly. Do it again in another pattern in other places in half an hour.
Done. Looks good, no?
Anyway, to the real work of the night. I wanted to give this thing a few more modern elements, as mentioned previously. I'm going for a Jules Verne feel, old but advanced. When I started planning this build I wasn't going to use any lights. It's old, we don't want CCFL tubes in it! But I thought of a way to bring light to the box. Vacuum tubes. :D
I lucked into two large boxes of vacuum tubes of various sizes and configurations, over 200 of them, and all in their original boxes.
I love these things. They convey a sense of the old, and the insides are just very cool to look at. The plan originally was to light them from underneath with red LEDs. That looked OK, but I really wanted the filaments themselves to glow.
I bought some small 120-volt halogen bulbs that I found that had very loosely-wrapped filaments, planning to insert them into the body of a vacuum tube and turn them down with a dimmer switch. Those looked excellent, but I was forcefully reminded of one aspect of halogen lights: they get HOT. I might as well put a fire inside my computer. :facepalm: Needless to say I felt stupid.
So here's the answer. First off, check these out:
These are very cool, but I needed to light them from the inside. Take a look at these examples of what you can find in these little jewels:
Just amazingly complex assemblies in these things. I wanted the inside to glow but I couldn't get the light source into the tube with the insides there. So I hollowed some of them out:
I'll tell you, getting the insides out of a 50-year-old piece of thin glass that's wrapped around a vacuum without shattering it is not easy. I'd say I had a success rate of about 10%. Glad I had a lot of them!
So I hollowed them out, then I took some other, smaller tubes and just broke the glass and took out the interesting insides, whittled the glass base down enough to fit, and put the hollow shell of the first tube over the insides from the second:
Now they look cool but they still don't light up. I got to play with EL wire for the first time tonight. This stuff is awesome. Anyway, finished pics:
Woo hoo!!! And to top it all off, I found this awesome plaque on an old piece of electronics I got at my local flea market for $8:
"Department of the Navy - Office of Naval Research" "Special Devices Center". I couldn't have ordered a better sign. I added the stamped plate in the middle, a nice name for my fictitous power source.
All in all I think it came out great. I'm not entirely sold on the large EL wire on the front, around the plaque, but it's in there in such a way that I can take it out easily if I decide I don't like it.
Damn man that looks awesome, the vacuum tubes add an amazing piece of detail to the build, I envy your luck in getting hold of so many that were intact. And that plaque, that plaque is so cool, I wish I had one.
A word of warning though, EL wire tends to burn out very quickly but before it dies completely it will keep getting duller until eventually there is no light source. Also is the purple your final colour choice? I would have thought an orange, a red or a white would have suited the theme better. Have you tried experimenting with LEDs? By the looks of things the center of some of those tubes is just large enough to hold a single amber LED :D.
Amazing work so far mate, keep it up, it is looking beautiful.
Appreciate the info on the EL wire, I knew it died eventually. No big deal. And yes purple is my final color choice. I actually started with orange, but I thought the purple gave it more of the Jules Verne feel I'm looking for. I can tell you I'm *not* taking it all apart any time soon. When that EL wire dies it will stay dead. :)
that EL wire looks awesome! +rep
Ah ok. The purple reminds me of the new Wolfenstein game is all haha.
I'm sorry blue, tbcs rules clearly state that this much awesome is not allowed in single post.:)
The rusts effects were amazing enough but the el wire tubes are insane! The plate had me grinning too.
If I might offer a suggestion on the el wire on the side of the psu, run it insde of polyethylene tubing (ice maker tubing) for a neon / plumbing look, maybe even rust effect it too?
Love the watermark btw.
Thanks guys! :D Getting this part of this thing done has gotten a HUGE load off my mind. It's starting to keep me awake at night again. (Or during the day in my case.)
That is an interesting idea. As I mentioned, I'm not sold on it myself, it's not as straight as I would have liked, but the tubing never occurred to me. I'm working with limited space there due to the side fan, but I'll definitely look into it, thanks!Quote:
Originally Posted by Mach
Simply Amazing work! Can't wait to see more!
I need to change my shorts...Quote:
Originally Posted by blueonblack
Awesome :banana::banana::banana:.
I sure didn't see that coming, the rust paint job looks perfect, the bulbs with el wire inside and the awesome plaque (good find) is the cherry on the cake, nice work mate :), going to be an epic mod when you're done, just keeps getting better woohoo :up::):up:.
Just beautiful. I love the vacuum tubes...if you could get a mini-jacob's-ladder-ish thing going between those two ears on the center one, it would be perfect :D
Funny you should mention that. I was actually planning a jacob's ladder somewhere in or on the thing, but I decided the voltages involved were probably not a good idea that close to my hardware. :)
That's not to say I've entirely written the idea off as an accessory...
after looking this over (and believe me, it's SO hard to nitpick on such an amazing build), I would advise sticking the EL wire you have around the plaque into tubing like you have on top of the PSU cover. (did someone else already suggest this? I feel like I read something similar earlier...but I'm tired and I don't feel like going back and checking :D ) anyway. I think if you do that, it'll straighten it out nicely, and it'll meld better with the rest of the cover. looks sweet though, love the purple!
How soon can you build me one? :rolleyes:
Man that looks awesome i love the el wire and old tubes i know i get kinda sick thinking about all the cool stuff like that i had access to before i heard of modding . +rep dude loosk great
Congrats on that work dude!! I liked a lot when the little gears started moving XD didn't think your plans included that!!
And those old tubes with EL wire are simply awesome!!!
I want moreee!!!!
I can't believe I missed this update until now! Simply awesome!
The other thing I can't believe, is that we haven't moved this to the Featured section!
Well I can fix that right now! :D
Congratz!
Congrats BoB!!! I missed that too, very cool effect with the EL wire. I just love clever solutions :freakedout: