BTW, love the new addition of side blow holes and rings!

Printable View
BTW, love the new addition of side blow holes and rings!
Cheers for the great replys guys :)
DaveW, the rings i brought (cut to size) from my local plex shop in syd.
Thyr glued into place using Weldon Glue. ( i decided not to run the rings, leaving the blow hole open actually suited the mod better in the end)
Tech-Daddy, Cheers mate thank you very much mate :)
BOSS is still my favourite mod and makes for the most wicked Wall paper :)
gobygoby, ty :) i usually use use a compressor and 2pack paint for my mods.
This time i thought i'd give good old acrylic rattle spray cans a go!
The shine and paint tuffness is no where near that of 2pack but with some elbow grease as you will see the end result came up not to bad :)
MDCS, no jig for me soz mate, just hand/eye stuff. a better way (for perfect lines) would have been to just score them.
Thanx again guys for the support :)
I procrastenated for days over wether to paint the chassis in 2pack or get it powder coated...
In the end i had a better idea!
A qik trip to my favourite place to pick up some pre-cut plex!
The plan was to buy some SILVER coloured plex....unfortunatly they don't stock a metalic silver... i had to improvise!!!
Crack the chassis open
abit of metal work
With the tab gone the back wall is flat and i can line it with plex sheeting.
The new back wall can be slid in.
a new base or floor panel is added
The back of the case is fitted back on and the motherboard is placed in for marking.
This mod will also have a motherbord cover! so a clear piece is used to transfer markings.
A cover is bentup to fit over the HDD bays *****im not happy with this and will redo the mod again******
The motherbord cover is marked and cut.
And fit tested.
The new panels are all taken out again and preped for and painted~
Because i could not buy silver plex the idea is to paint the back of the plex this will give the same effect as if the plex was silver.
For the silver im using cheep can enamel.
The painted panels are slid back into the partly painted chassis and the back of the case is pop rivoted back on.
Paper peeled off and board is place in.
With the motherboard in place it was time to work on the new style motherboard cover.
To keep in theme with the mod ive decided to add some contrast flames! the choice was to you cut plex flames, a soft yet classy aqua blue plex was opted for.
The edges are given a light sand
And then flame polished for a gloss shine.
@ Hex head bolts will be used to attach the flames, the original thought was to glue these one! but i plan on making a second set in smoked and have 2 sets for interchangable or overlayed flames!
Some mesh is glued onto the back for the north bridge
To hold the motherboard in place the old brass post is used.
At this point i need to move onto the PSU cover!
Again the original thought was to powdercoat chrome or paint the psu! i didnt want to goto the extreme of making a plex psu as i had done with hp3 so i thought a matching cover would be the way to go!
As i will show later, i needed a specific psu for this mod,
the pic of psu's wasnt the best of the bunch but it was the configuration for this mod.
The cover is basic in idea and design, so ive decided to add some fins!
i'd decided that the gold grill wouldnt work with all the silver in this mod, so some scrap hex mesh was added.
Next is to glue the cover togther.
The next step as with the other panels is to paint the inside of the psu cover.
The cover is plain! So to add some shape ive had 5mm strips cut in smoked plex.
These will be cut evenely placed and glued.
Some extra glue is added for strength.
Next is to repeat the same process across the Fan hole.
To add to the effect the edges are flamed to get them nice ans shiny
a test fit.
With the cover done the psu can now be fitted into the case and the other panels also added.
and the motherboard cover and flames can be checked out!
Fun shots!
that psu cover is slick
I love it, Defyant. Covering the mobo like that really adds a lot of cleanliness to the computer.
Keep them coming!
____________You_____________
____________vvv_____________
^^^^^^^^^^^^^^^^^^^^^
__________All of us___________
well proms comin up next month and i was looking for a real beauty to ask... whats this case doin on the 2nd weekend of april? in all seriousness its another amazing case by u defyant. im impressed.
Thanx heeeeps again guys :)
bcampbell91 hehehehe cheers mate :) she's got 2 sisters aswell your welcome to take ")
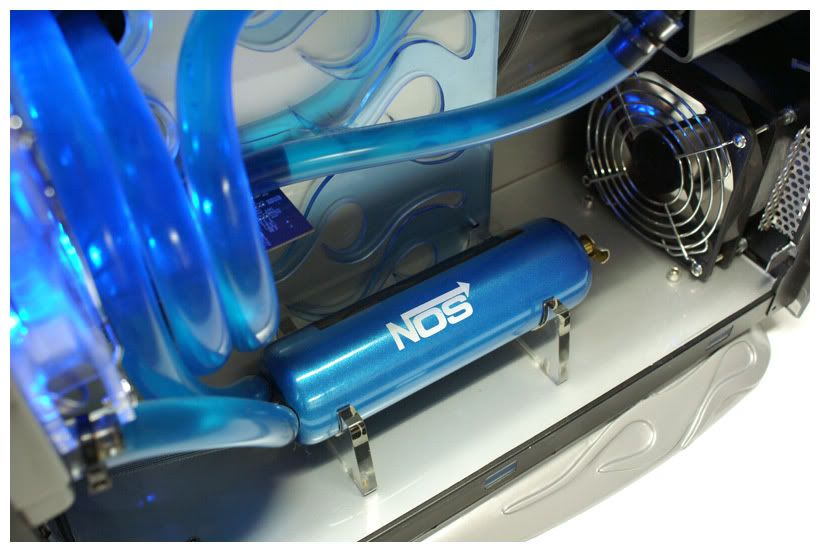
Not wanting to do just throw another Custom RES with Green plex inside :rolleyes:
i decided to come up with a res that might actually be practical and look cool!
The rest of the mod Revolves around "hot rod" "fast looks" so i thought what woould be more appropriate than a NOS bottle RES!
Pretty much just made from scraps the NOS res starts.
Ruff bases are cut and glued glued togther to douvle thyr thickness
To help hide the bards a lil the ends are are counyersunk and threaded
I thought to add to the nitros oxcide look this cool tap like bleeder filler would work well.
the ends are glued to the clear 50mm tube
The res is taped right from the beginning this will be shown why later.
And a very very ruff grind is started
Time to hit the "BELT SANDER"!!!!!!
after a bit of muscle work! the NOS tank takes shape!
In for some freeand wet rubbing
The wet rubbing is needed to hold the spray putty
As you can see in the above piccy some extra filling is needed
While the putty dries a quick colour paint test on some scrap!
Next is to sand!
Some more spray putty
and after another sand some blue metalic is applied
another final wetrub and four coats of clear is applied.
that tape can now be removed to reveal the water level window :)
Theres a bit of clean up work to be done , this will be completed when the paint is harder.
A quik looksee in the case!
To cover the paint edges of the RES's Water level window some good old black pinstriping is layed and cut,
i also decidied to have a go @ my own NOS sticker! theres still plans to add some indicator lines on the water level window and a some smaller fine print around the top and sides and base :)
Then to add some NOS
Heh...nice! Like the nos. Looks sweet.
-Dave
Is it done yet is it done yet???:D
Damn i'm getting ahead of yourself. I always look forward to your mods and what you have cookin in that brain of yours. Definately at the top of the list of greats. Your wife must be so proud (or mad as hell that your buying all this:p). My girl supports me 100% until it cuts in to our time together... but that's a different story for another time...
Keep up the AWE-some work!!!
Excellent bottle, bro! Wow!
Love how that all came together!
I've seen you refer to this stuff before, but could you sen me some info on what you call "spray putty"?
Want to try and find some here on my side of the pond! ;)
Cheers guys tyvm )
TD cheers mate :) , umm it could be called "high fill"? but it's basically just spray on putty! it won't fill deep holes, i use it to hold down edges and as a quick filler for sanding scratches.
All paints WILL sink back! give your work a few weeks and you will see your sand paper scratches in the paint! all the spray putty does is help fill these!!then you rub the excess off and it leaves you with filled edges etc,
It's always recomended to let any coats settle for a few days, spray putty.. if i have the time, i'll let it settle for a week then rub back.
It may just be called Highfill primer? primer filler.....
BOSS is still my fav mod atm mate :) and makes a great wallpaper :)
NIce, the nos symbols is a little corny, but the color is just so damn beautiful.
Ahhhhh... ok! I have *that*!!!! Hehehe, thank you for the spoon feeding... I'll be expecting a bib in the mail in a few days time from you! ;)Quote:
Originally Posted by Defyant
That does me good! Glad I could give a little enjoyment back to you, with as much as you have given to me! Cheers mate! Keep up the INCREDIBLE work!Quote:
Originally Posted by Defyant
:D
Note: If you would like a higher res shot, I'll be more than happy to provide you with one. PM me...
A change of colour!
Today was a day of paint! and a lot of it and a change of colour, i decided to go one shade darker on the silver , basically from a light to a medium range platinum silver.
I liked the orig colour vey much! it's just under some lights the case simply looked white! and white is the colour i want for HP-3!
Theres 8 panels in all that make a HP case, and ive thrown in a second front panel for the heck of it, all the panels were highfilled 800 wet a dry rubbed prepsoled, tackrag'd dust coated and given @ least 4 coats of acrylic platinum silver.
Unfortunatly i ran out of clear! so the top and far side and spare front penels are yet to be cleared.
Ive given the front and base are given 4 very very wet coats of acylic clear over the new colour and have a pretty good shine even before buffing!
the RAD is painted and cleared as well to colour match and blend in better.
The fingys show the best part of 40+ coats of paint :P
All thats left to decide is weather to leave the side vents black! or paint them platinum silver to match ?
Off to the shop early this morn to PU some more Clear to finsih the last 3 panels.
The Can paint i'm using for this mod! is just a generic type can acrylic, being acrylic it will not dry shiny and will have to be chopped and buffed.
I still manage to get some shine becuase i put the paint on very thick and wet. Not somthing i'd recomend doing with heat lamps and a clean spray area.
With the last of the painting out of the way for now , time to move onto some wire management!
Like all the HP's i want this one to also to look clean!
for wire cover matching silver tech flex is used, i cant buy this unfortunatly so i wil plastic prime and then paint my own.
What you see is pretty much the basic wiring you will see in the case! bugger all :)
All that will be added will be IDE and Power later.
At this stage the paper can now be removed to show the matching silver floor.
Next was to install the motherboard cover, as you can see ive cheeted and added a few new extra's to it with out posting :) i thought adding active cooling would look "cooler" then the mesh grill and added a lil flame grill with a accent around the CPU tube hole.
After a few new mounting holes are drilled to the floor and pump mounts i can actually move onto the plumbing (always my fav part)
I love a plumbing challange! and wanted to try and come up with a new design for the water tubes!
The rad is a tight fit! and i usually fit them externally! but wanted the challenge of making everthing fit inside this mod :)
The Good old NOS res is mounted and installed.
All hoses are tie clamped!
The pump was a tight fit! and i may swap it over for a MPC-350.
I like this LOOP! the coil effect works in well and stil has a clean flowing look to it.
The res lifts up easily for filling.
And she's full! and blue! :) i think my green water days are long gone!
Better add the first of the lighting effect for this mod.
and of course some mandatory night shots :P
More chop & shine!
Every one of these flames have to be hand chopped and hand buffed! it was @ about this stage i was thinking that maybe i should have stuck with a 2pak paint job!
The Vent panel was done using a block! this will sand qiker and flatter.
It was @ this stage i was thinking "2pak" aint all that! :P
With the chop and shine session now over! i can start hanging these panels on the case :)
First panel to go on will of course be the base! SS hex heads replace the orig crap plastick bolts.
With the base one next is to wire and bolt in the front fan assembly
Mesh grills are added to the side vents
and the front panel is test fitted.
Next on the agenda is to fit the Matix orbital LCD HDD and cdrom
Now that the rest of the hardware is installed the front panel can be heated shaped cut and fitted.
A simple solution for the CDROM is the same as used on HP1
Something i wanted to do to the last HP's but couldn't due to the external RADS was install the "backpanel"
YES! THE STICKER IS UPSIDE DOWN! AND HAS BEEN RIGHTED.
This is such a cool looking addition to the over all complete look of the case.
Just for the sake of being "quirky" i glued back on the original sticker :)
The rest of the wires are covered and connected.
The light wire for the NOS res is now routed from the back of the case
the marks for the Side vents are added and the vents are stuck into place
For the SIDE flame window i brought 2 peices of plex! Dark and light tint.
for now i will go with the lighter of the 2 windows
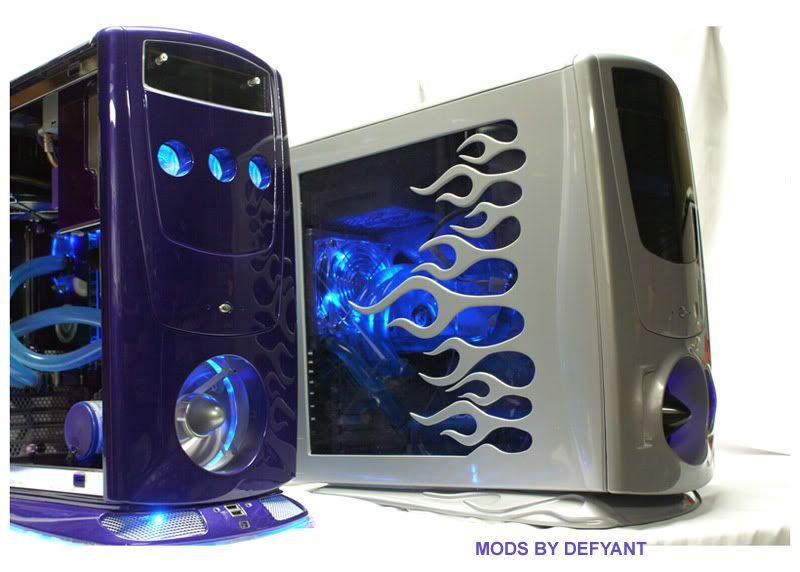
All that was left to do was fit the panels on and hang the white sheet for some final'e shots!
Ive photochoped a selection together.
:eek: :eek: :eek: :eek: :eek: WOW that is amazing nice job Defyant you are a mod god!!8)
WOW!!!! As usual AMAZING work. I really like the pop of the black vents on the sides, and as I have said before I am a sucker for flames. They came out incredible. Just curious but how many hours would you say you have into that case?
I can't put into words how much I like your work..
Totally fantastic.
The reservoir is so coooooool. Next one, I'd like to see a back cover for the drive bays. I was hoping for some color on the base flames. But still looks great.
One question though ... what do you do with all these PCs once finished?
And you have out done yourself yet again Dfynat... Bravo. It turned out so much better than what i expected it to look like (following your work and style). Can't wait till your next mod...
BRAVO...
DAMN!:eek:
Amazing work.....Your craftsmanship is top notch!
very VERY nice!
So when can you build my 'puter? :D
Very nice work, love the flames and NOS bottle:)
This thing is so pretty.... it hurts.....
Honestly.
Trademark Defyant... "Make it custom, add excellent acrylic accents, make it glossy...."
And *that* is a winning formula that you have there my friend.
Breathtakingly beautiful, you have done it again.
Simplistic, yet totally amazing
oh.
my.
wow.