-
Re: Tips for working with plexi/acrylic
Quote:
Originally Posted by jdbnsn
Saw your pics, well done! As for the cutting, great question! I originally tried a table saw which didn't seem to work well, but might work better with a different blade. I use a band saw now and my cuts are much like the ones you describe and require lots of sanding. Maybe someone could throw us a bone on cutting techniques or proper blades?
Hey guys,
More tips and what-not. The edge sraping in your log was great, thats what I forgot to mention. Really, any type of metal with a nice edge will work, but pros use a small rectangular prism of cobalt, since it holds it's edge very nicely. You'll want to edge scrape after cutting.
For jigsaw and bandsaw cutting, you will want to use a metal blade, one with very high teeth. These tools aren't really ideal for plexi, but with a metal blade they do pretty good.
Always remember to never flame polish an edge that is to be glued, it screws everything up.
And finally, you will want to cut all acrylic that you can on a table saw. This is what the pros use. You will want a blade with the following specs:
- "Triple Chip" format, this helps IMMENSELY
- Carbide tips
- Atleast 80 tooth
- 0 degree rake/offset
Blades like this tend to be pricey, but trust me, are very well worth it. They do not melth the plexi and make nice, almost finished cuts. After they are cut you will just want to scrape them, glue what you need to, and then polish.
-
Re: Tips for working with plexi/acrylic
awesome I love this guide my new window is now complete. tahnks
-
Re: Tips for working with plexi/acrylic
******** heat bending into tricky spots.
if you have been worried in the past about not cutting through the handle on your side panel because you would need to bend the plex to make a new handle here is how to do it.
take the paper off the plex
fasten your sheet of plex to an uncut side panel that matches the one you are going to or already have cut through. soak a clean cloth in water. it dosent have to be freezing cold but a lil chilly. place that on a part of your plex that your not bending as you will need to get your hands on it quickly. heat up the area to be bent with a heat gun at close range. you should heat it enough that you see it start to deform a a bit. remember to keep moveing the heat gun arround or you will get bubbles. once its hot enough all you have to do is take the wet cloth and wipe it with a little pressure (enough to bend the plex) where you want it to be molded. this allows you to hand mold some tricky spots without burning your fingers. the fact that the soaked cloth is a lil chilly should help to freeze the plex in the exact position that you were pressing it into.
i used this method 2 days ago and i am very happy with the results. hope that helps someone
-
Re: Tips for working with plexi/acrylic
Hi guys,
I've been surfing; trying to find as much info about flame polishing as possible, when I came upon this site and noticed the "butchering" that you've been doing on Perspex [I'm not sure if you're familiar with this name - it's what we call it in Australia].
I make display cases out of Perspex for customers [something to fund my numerous hobbies].
The BEST thing to cut Perspex with is a table saw; properly set up - with a dedicated blade that you use ONLY for Perspex. I would suggest the blade have at least 80 teeth [less works OK, but you have to move the sheet through VERY slowly].
Another thing you need is a zero clearance throat plate. If you're not sure what this is; where the blade comes through the table, there is an insert that sits in a rather large opening in the table top which can be removed [for access to the saw - for blade changing, etc]. The gap for the blade in this factory plate is quite wide [to allow you to tilt the blade for angle cuts] - make a new one out of wood - with no gap and start the saw with the blade fully lowered; then all you need to do is slowly wind the saw blade up to make a zero clearance plate [be sure that the new plate is held down safely [ie. NOT by hand!!] as you raise the blade [perhaps a few pieces of wood and clamps strategically placed]. The new plate also need a "splitter" - something to stop the material closing together after having been cut, behind the blade [this is very dangerous as the blade will grab the material and throw it with gteat force at the operator]. All this is; is a thin piece of wood [the same thickness as the blade] glued into the back of the saw groove that has been extended so that it won't get ripped out by the blade if it is fully raised.
Lastly, raise the blade only slightly higher than what is needed to cut through the Perspex sheet.
Just one more point; a jigsaw blade moves much too fast and will inevitably melt the Perspex [as described by another] - if you have no other choice of tool, try using a variable speed controller [available from most woodworking suppliers].
All the best - let me know how you go.
-
Re: Tips for working with plexi/acrylic
if you have the bottle of glue with the flexible needle on it and your glue is very watery.
you should have all of that.
get our edges as flat as possible and set them up. take your bottle and fill it 1/4 of the way to the top. squeeze out most of the air and turn it upside-down. release the bottle from your fingertips slowly and the liquid should stay in there.
when you get good at this practice, glue your piece. take the bottle using the same technique you just tried and put it along the edge where the two peices meet. though capillary action, the glue is sucked into the joint and you havent spilled a drop thanks to that technique.
for those who have gotten glue on your case or may in the future, my good friend jamaul (works at eagle plastics where i interned for a summer) taught me that one.
oh and if you use petrolium jelly on your bit while drilling it makes an opaque hole, or so im told.
and with a scroll saw , as long as it has a speed controller, is great for detail work, but i wouldnt use it to cut anyhing big, nor straight lines.
-
Re: Tips for working with plexi/acrylic
thanks for the contributions guys.
-
Re: Tips for working with plexi/acrylic
A note about flame polishing.
you CAN use a propane torch. just find a way to plug the holes on the side of the nossle so oxygen cannot enter. (I used Aluminum foil) this is what makes the flame really hot. just go over the edge as if you were painting it and you should have a really nice edge after a few passes. it it looks good, stop. you dont want to overdo it.
Erwin could you post a pic of one of your cases? that is pretty much all i did for 3 weeks straight. well that, and clean.
-
Re: Tips for working with plexi/acrylic
I've been doing a bit of work with plexi lately..mostly screwing around to see what works and what doesn't..and I've figured out a few things others might find helpful.
I've found the easiest way for me to cut designs in plexi is by using my dremel at low speed with a 1/8 inch drill bit and the line guide attachment. I've tried thicker bits, but they tend to chew up the plexi instead of making a nice cut and cause it to vibrate so much I was worried it might break the plexi. A smaller bit works well for finer lines and detail work, but tends to melt the plexi which builds up on the bit. The smaller bits also break much more easily (I've snapped 2) if you aren't careful or try to cut too quickly.
For smoothing out edges in a cut design and adjusting the shape of cuts, I've found that a metal emory board (basically an oversized nail file with a fine grit) works really well. You should be able to pick one up for about a buck at someplace like CVS. Follow it with 2000 grit wet sandpaper to get the edges really smooth.
I also saw someone ask about using paint on plexi and saying they were having trouble making it stick. I've had really good luck with the Krylon Fusion spray paint. It's designed to bind well with plastics. If they don't have a color you like you can also try using a medium grit sandpaper, around 200 grit, to scuff the plexi first. It makes the plexi rough enough for the paint to stick and the paint will fill in the scuffs making the plexi look smooth again.
-
Re: Tips for working with plexi/acrylic
if you must paint it remember to paint on the inside part so if it gets a ding in the side of it that the paint wont chip off. my mom used to do signs to look like stone with an airbrush some plex and i think the paint was acryic paint
-
Re: Tips for working with plexi/acrylic
i would also suggest possibly some e6000 or similar glue its basically clear Silicon sealant in a scweeze tube. Also polycarbonate would probably be the lightest if weight is an issue, for carrying to lanparies etc. some one should do an all polycarbonate / carbon fiber mod!
-
Re: Tips for working with plexi/acrylic
For gluing acrylic you will want to use a solvent glue, such as a weld-on from a brand like IPS. I personally just use methylene chloride, this is my favorite solvent for gluing most plastics. It works great on styrene, acrylic, polycarbonate, PVC, and more. I do not recomend trying to glue acrylic with an epoxy or silicon, this is a bad idea.
-
Re: Tips for working with plexi/acrylic
For what it's worth, I've read (never tried) that others have had success drilling holes in plexi in reverse. I don't think drill presses can be made to turn in reverse, but corless drills and other electric hand drills can be switched to turn in reverse. It prevents the drill from taking out a chunk when you drill thru the back.
-BennyRux
-
Re: Tips for working with plexi/acrylic
when i drill mine i just use a drill press with sharp cobalt bits. wich is probably a little over kill but it works well for me. typicaly i cut the design out of the side panel first and get it prepaired and then duct tape the paper coverd plex to the underside of the panel. then i drill the holes in the metal and the plex at the same time so i know they will match up for sure. i dont use the rubber window trim, i just bolt the window onto the inside of the panel wich works out pretty good. if you pick good places for your bolts then you dont need to worry about the edges of the metal sticking out a little and cutting you. this also makes it more convieniant for cleaning if the window gets dirty you just unbolt it and wash it
-
Re: Tips for working with plexi/acrylic
I've been lurking for a week or two, decided to toss in a little information i found on working with plexiglas - the "official" plexiglas website has a couple of pretty decent manuals on fabrication and forming:
fabrication:
http://www.plexiglas.com/literature/pdf/134.pdf
forming:
http://www.plexiglas.com/literature/pdf/135.pdf
i haven't worked with any of it yet but there's lots of charts and pictures and whatnot.
-
Re: Tips for working with plexi/acrylic
I havnt read all the replys but I thought I might mention the methods my old school used to use to bend acrylic. Both methods we were told to allow the acrylic to heat till it was flimsyish (experiment), and then bend it slowly, once we have our angle, we had to ether manually hold it there or use a vice, or scrap wood to hold it till it cooled down (Took about 5 minutes), also, Acrylic is a soft plastic, that is you can reheat it till your content.
Sharp Bends
They used a strip heater which is basically a heater that heats about 30cmx2cm, and told us to use metal to block off the heat we didnt need (of course, we used gloves) this was capable of just about any angle I tried,
Round Bends
The second method seemed to be custom made for the tech room, they had another wall mountable thin heater (30cmx2cm) and two pieces of wood about 15cm above it on rails so they could move in and out as below
______...______ <-Wood
..-----...------ <-Rails
...\________/ <--Heater
(Excuse the crappy ascii art, the forums clear out all unneeded spaces :( (.'s are imaginary spaces :))
so basically you heat up whatevers hanging between the wood pieces, which move in and out to allow you to control your design
Hope this helps somebody,
-Fragged
-
Re: Tips for working with plexi/acrylic
I used jigsaw on acrylic/plexi coupled with Black & Decker's Piranha blades. Forgot the full code but there's 2 blades with 1xx-1 (finer) and 1xx-2 that gives clean cuts while the other 3 remaining blades are for wood work.
-
Re: Tips for working with plexi/acrylic
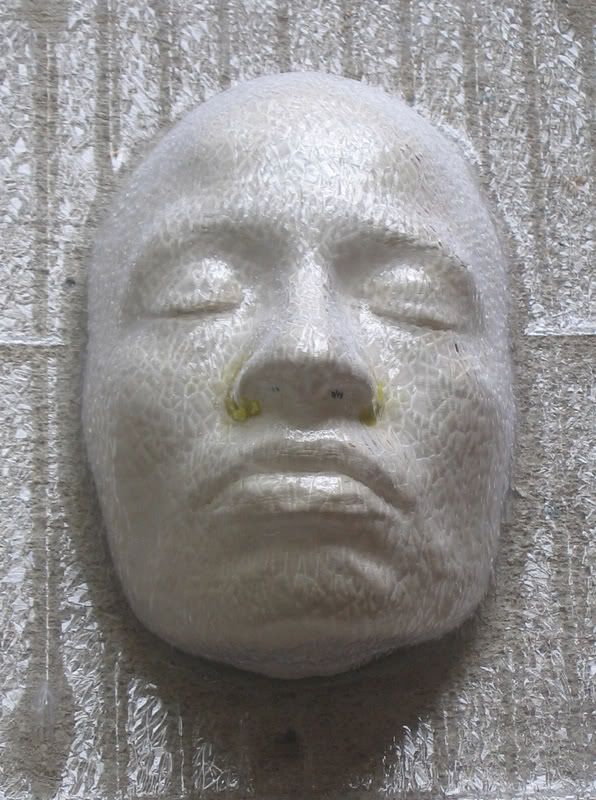
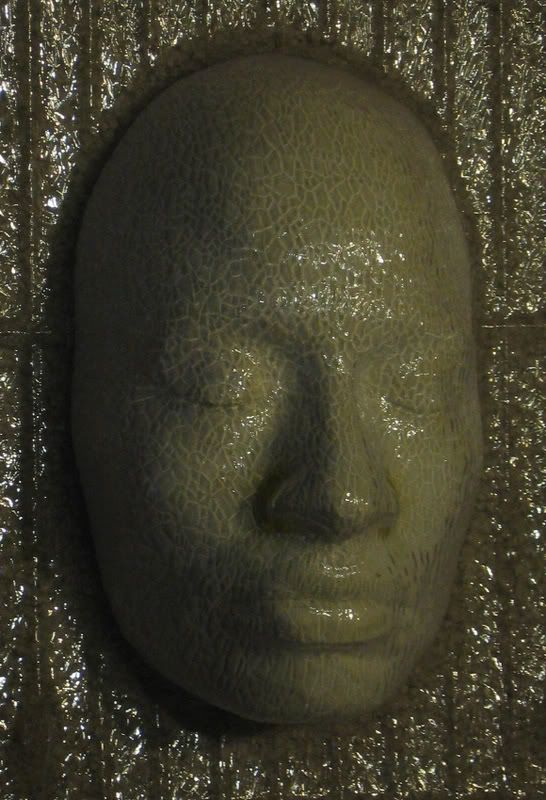
You can vacuum form acrylics into all kinds of shapes, on a homemade machine that's not expensive or difficult to make.
Here's a shape I did recently, using a piece of acrylic fluorescent diffuser panel from the hardware store, because I like the funky texture:
In the pictures, the acrylic is around the plaster life cast I molded it around.
(The yellow stuff around the nostrils is modeling clay I packed there to keep the acrylic from pulling in too much to get it off. The green cast in the second picture comes from taking it under fluorescent light and not color-correcting it.)
-
Re: Tips for working with plexi/acrylic
That looks like it would be perfect for a mars mod! Put it on top of your case and make your case look like mars. Since you know how the rumors and pictures go about the face on mars. ^^
-SF
-
Re: Tips for working with plexi/acrylic
as far as cutting goes, a jigsaw's vibration will crack the plexi and melt it from the friction. a hacksaw will only work if the peice is small, or it will become stuck, the way i did it successfully was by scoring it multiple times and breaking it. although it was time consimong and messy, it worked
-
Re: Tips for working with plexi/acrylic
That is not true intergalactic man. Acrylic is cut well with a hacksaw using a metal blade. I don't know what happened to you, but generally hacksaw are decent for cutting intricate designs.
Also, you can only use the score and snap method for acrylic 1/8" and thinner.
Also, using the proper blade with the acrylic correctly set up for cutting, a jigsaw will not break it as long as you take the necessary precautions. Also, acrylic will not melt if the jig saw is at the right speed. Any faster with the wrong blade would hook the acrylic, shake it, and snap it (probably what you did).
-
Re: Tips for working with plexi/acrylic
about the hacksaw, i dont know, but, a jigsaw isnt the best way to go, a finer blade will melt the plexi, and a slower speed will shake it. i would know this because i cut plexiglass frequently. as far as gluing though, i agree, but dont use a glue gun or other stuff like that, but i use gorilla glue, and that seems to be mighty stable
Quote:
Originally Posted by
tybrenis

That is not true intergalactic man. Acrylic is cut well with a hacksaw using a metal blade. I don't know what happened to you, but generally hacksaw are decent for cutting intricate designs.
Also, you can only use the score and snap method for acrylic 1/8" and thinner.
Also, using the proper blade with the acrylic correctly set up for cutting, a jigsaw will not break it as long as you take the necessary precautions. Also, acrylic will not melt if the jig saw is at the right speed. Any faster with the wrong blade would hook the acrylic, shake it, and snap it (probably what you did).
-
Re: Tips for working with plexi/acrylic
Another method of cutting is Laser Cutting. It is extremely accurate and gives a good finish. It also takes much less time.
My workplace has a cutter which can fit up to 1100 x 1100 (mm) sheets. This is large enough to cut most things that I need to. You can get larger ones although obviously the price increases with size. The cheapest decent one that I've seen is around £14000 (I believe that is about $27000).
You can plug your computer into them and they'll cut whatever you design with a beam of light. I wouldn't expect many people to want to spend that much money themselves, but it may be possible to persuade your work/school to make the investment for you ;)
-
Re: Tips for working with plexi/acrylic
I am currently building a CNC machine - it will be a CNC router. Eventually, I will use to it to cut out a new CNC machine for myself: this one will use a laser, probably CO2.
-
Re: Tips for working with plexi/acrylic
So your making a CNC machine so it can make you a CNC machine? ...my god... thats brilliant!
-
Re: Tips for working with plexi/acrylic
Quote:
Originally Posted by
SnowFire
So your making a CNC machine so it can make you a CNC machine? ...my god... thats brilliant!
Hehe... yup. As soon as my machine is done, it will be used to cut and drill higher precision parts that will be used to replace the hand made ones in the machine. Eventually, I plan on building a CO2 laser and then making a second machine that uses a laser to cut patterns in metal.
-
Re: Tips for working with plexi/acrylic
duno if anyone already posted this but heres somin for gluing plexi together
http://guides.pcapex.com/modding/diy_acrylic_cement.php
-
Re: Tips for working with plexi/acrylic
Man, a laser cutter sounds great. All I need to do now is sell my house. I might need to run that one by the wife.
-
Re: Tips for working with plexi/acrylic
Hehe. Just build you own. My router is costing less than $400 to build, everything included. Add a laser to that and its still probably less than $1200.
-
Re: Tips for working with plexi/acrylic
Ok, so from reading the information in this thread, I can pretty much cut acryllic to my hearts content just like the pros...
But what about painting? Specifically I had a mod idea that went something like this:
Sparing lots of details, I want a plexiglass side window that is transparent, but not so much that you can actually see the PC parts inside. Thats easy enough and could be acheived by using the methods to make a 'frosted' look.
Heres the kicker, I want it to look something like an early night sky, that is, I want a light blue that fades to almost black towards the top. (the idea being to kit-bash a model of a moon and mod it into the upper part of the plexiglass, and wanting perhaps to set a smattering of white LEDs for stars).
How to do this? I was thinking of sandpapering the plexi, to give it the frosted look, then attempting to spraypaint this side (it should stick since its roughed up?). I've heard there are some 'transparent' paints, dont know as im not really an artist.
-
Re: Tips for working with plexi/acrylic
That would be a bit tricky to do, but achievable. Yes, you would have to "rough it up" a bit before you sprayed it. They do indeed make transparent paints, but I have only seen them for airbrushes, never in spray paint form (that doesn't mean they don't exist, I just haven't seen them!).
Some transparent paints:
http://www.pearlpaint.com/shop~paren...oryID~5484.htm
http://www.pearlpaint.com/shop~ocID~...oryID~5477.htm
-
Re: Tips for working with plexi/acrylic
Yeah lol, airbrushing is out I think. The paints not bad at all cost wise, but I would need a compressor/airbrush as I dont know anyone with all that stuff, and I dont plan on spending that much money for something I would only use for this project.
Maybe a blue tinted acryllic panel..sanded to get that frosted look, then use a dark blue/black spraypaint on it, spraying it so its denser towards the top/lighter at the bottom.
and of course, it would be lighted with a CCFL at the bottom... I might test this idea if nobody comes up with a definate answer. Have to order that acryllic online tho, no places around here sell it.
-
Re: Tips for working with plexi/acrylic
Hey, I just did some work with some Plexi, and I know when I asked about it no one really told me if it was possible or not. And if this was previousely stated in this thread I am sorry.. I only had enough time to read through half of it.
If the advise that I am about to post is already posted, please PM, and I will edit or remove it if possible. Or any Admin is welcome to move it. My feelings wont be hurt.
A laser cutter works very well one plexi glass (they told me Acrylic specifically) which it did do the best. this device is alot easier and faster than any other device. the problem is having it accessible to you. Luckly I am fortunate enough to where my major has a full scale shope with paint booth vaccum formers metal and wood shop. and a laser cutter. basibly it super heats a laser onto a material to eitehr score it or cut through the material.
it works with any materal (metal, wood, or plastic) but certain types of clear plastics will burn to a nice brown instead of staying smooth and clear. The laser cutter is very accurate, and makes every cut smooth. working for cutting out, etching and engravings. Just have to know how to set it up.
best used with Illistrator to make your designs on.
Hope this was of help to anyone who needs it. Later.
-
Re: Tips for working with plexi/acrylic
Yes, CNC controlled lasers work best to cut acrylic as when your piece is done, it requires virtually no finishing work. Not only do they have the accuracy of a CNC and a laser, but the laser's intense heat leaves a beautiful edge that can otherwise only be attained through the use of flame polishing.
-
Re: Tips for working with plexi/acrylic
Just saw this topic, and maybe someone has mentioned it before, but acrylic wont melt while sawing it when you put masking tape (that tape looks like paper) on top of it. Don't know why, but it works :D
You can also draw the cutting line on it, and it prevents scratching.
-
Re: Tips for working with plexi/acrylic
Just one on the cutting of Plexi.
I have just started doing some work with it (only small bits) but had a real nightmare cutting with the Jigsaw and dremmel (too much melting, to the point with a jigsaw fine blade that it welded itself back together behind the blade!!). So using a bit of ingenuity and a limited tool set I found that a tennon saw cuts the stuff blilliantly. The teeth are fine enough and the cut is not too rough, so a rasp and file and sandpaper does a fine job!! It is also very accurate on the straight cuts, and for the curves I use a coping saw.
-
Re: Tips for working with plexi/acrylic
And if you have troubles with cracks in your acrylic while making threating in it, for example with a m3 bolt in the side of a 5mm panel. Just rotate your screw quickly from left to right, and combine that with screwing it into the acrylic.
When you do this, the bolt gets hot due to the resistance, and it heats up. The plexi will melt a little araound the screw because to that, and plexi which melts wont break....
-
Re: Tips for working with plexi/acrylic
wow who would have thought that my little wenie post about some tips with pmma would get 14000 views... thats insane but at least its makeing someones life easier. :-)
-
Re: Tips for working with plexi/acrylic
Anyone have any suggestions on frosting plexi with sandpaper?
-
Re: Tips for working with plexi/acrylic
For frosting acrylic, you'll want to wetsand the whole way. This will eliminate swirl and scratch marks.
Start with 120 grit, then 220, then 300 or 400, and you can go higher if you wish. However, I've found that 400 to 600 is generally a very nice look.
-
Re: Tips for working with plexi/acrylic
Only advice I can had: make it uniform. dont go circles in one area, then straight on others. I'm thinking of something; maybe a polisher can make a good job on this... I will have to try it.