It's an interesting build to say the least, but not something I would consider getting.
The build quality is great, but it doesn't appeal to me due to the fact I'm not really a car person. Although I still gotta love the air filter for the Hyper48!!

Printable View
It's an interesting build to say the least, but not something I would consider getting.
The build quality is great, but it doesn't appeal to me due to the fact I'm not really a car person. Although I still gotta love the air filter for the Hyper48!!
Thanks all!
Yeah, you really gotta be a gearhead, or a closet gearhead to like this one.
I've always been a huge sucker for old hot rods. I *will* have an old '51 Merc someday... and I will turn that lead sled into a looker!
Cant wait!
;)
Thanks again everyone!
....can you translate that into something that anyone who isn't very car worthy?
I'm going to get me one of these eventually and chop it, paint it, and hot rod it...
MMmmmmmmm
;)
Hope this helps!
:D
Yep, that helps :D
Have you found out anything more about overriding PWM?
http://www.coolermaster.com/phpBB2/v...yper+48+jumper
Go down to the bottom, you will see a rudimentary diagram explaining the process. Read the entire thread for a good discussion of the process...
HTH!!
Ok, thanks for that, I'll be working on my quick 'full speed connector' which will involve a switch so when I play DVDs etc, I can have it on low speed but when I start playing games, I can turn the fan to full speed so my CPU doesn't overheat.... but this is once I repair my motherboard. I'm going to be looking at about $10-20 for all mods and new tools!!
Although I'm going need help creating another fan connector.....
Woah! Featured project here! Moving up in the world Tech Daddy :D
;)
Wait till I get the power cabling done and the front emblem mounted.
It's the details that drive me crazy!!!!
;)
Thanks for the acknowledgement!
interesting mod
Thanks Hasbois!
And something that just happened:
http://www.slizone.com/object/slizone_rotm_march06.html
Woot! Gotta T-shirt and bragging rights!
;)
nice...
Good on you TD!
They know imagination and style 8) when they see it. WTG!
Great build... Awesome!!!
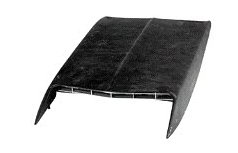
but.. I hate that word... not trynig to beat a horse here (har har).. but the hood scoop doesnt seem to fit in correctly with the theme.
2 things caught my eye about it.
1 - I swear most boss's with hood scoops the scoop is black. Maybe a result of the hood stripe, but still, it caught my eye.
2 - Your scoop's ending form seems too rounded, like the scoop off a modern car not an early mustang.
here are some pics...
http://www.mustangsource.com/Wallpap...ss302_1024.jpg
AHHH ha found really good site with hood scoop/shaker pics...
http://www.fordramair.com/products/boss_302_pics.htm
But I swear there was both a shaker and a version that was a pure scoop.... hmmmm more research is needed... Regardless I love your mod!
I was right there is also a scoop version.. Here is apic of the scoop as a part.
from..
Linkie
:) Love it regardless of the scoop.
And another.. http://johnsmustang.com/Catalog/493/
First off, thank you for replying to the thread! I always like talking about this, especially when it involves design decisions!Quote:
Originally Posted by Thallion
I'm not a Boss afficienado (spelling?), so I won't feign complete knowledge of the painting schemes. But what all I had seen, you are right about the scoops being black. Ive seen them with either the entire hood matte black, or the black of the center stripe being continued on to the scoop. So, "yes", you are correct in the coloring of the scoop being off. I was actually considering continuing the "charcoal black" treatment that I had on the front, but if you notice, that stripe is too narrow for the scoop. Effectively, the black would not have been symetrical to the front. If I wanted to black the scoop, I would have had to black out the entire front of the bezel, which I did not want to do (for the sake of color diversity). Alternatively,just putting the stripe the same width as the front bezel strip did not look right either. So, ultimately, I left it as I thought it would look best on this machine. You are right though, it is not accurate with regards to proper color scheme and layout on the BOSS line. Nice catch!
Another good catch! The back taper of my scoop was my own decision, as well as the slight top rounding. The scoops you show I actually did consider (and they would have actually been easier), but I had this stubborn vision in my mind's eye, and like a splinter.. I could not get it out of my head until lafter I built it! ;)Quote:
Originally Posted by Thallion
My initial mock ups of the scoop, I did not like the "ski slope effect" on the computer. Just a personal preference, so it was done with heavy influence from the Boss scoops that I did see, but in my own style.
I'm very glad you like the mod! Thanks for the enthusiasm!!
and it does! don't ever change it pls!Quote:
I left it as I thought it would look best on this machine
HUGE Grats on the SLI rig of the month mate!!!!! awsome front page score and very well deserved :D
Yeah It might have been to rakish with a blockier scoop. And you're right the size of the scoop in relation to the top and black front strip precludes using that to recolor it as well. It's always a tough decision when you try to use something as a source and have to make decisons along the way as to what you will replicate in detail and what you jsut get a feel for. But thatis also what makes the creation all yours! which is the fun of modding. It is a great mod, and very well executed. Can you image it sitting next to a sit down dedicated race sim cockpit.. AWESOME!!!!
Thanks Thallion! Much appreciate your chiming in!
It's all about the details....
I felt it necessary to pull out some of the little things left undone on BOSS, and here are two of the things I have picked up on to complete this weekend.
This was one of those little things that I did not do in the end... the chrome will be smoked with the MetalCast smoke that I used on the middle stripe, and the red color will be painted over with the OSHA orange. There is a little fan inside the unit, as well as a blue LED that I need to replace with a white one to keep it inline with the rest of the mod. Guess I could go orange on the LED too... might esperiment a bit on that route:
While I work on the case build out on DST, since I am out there... figured I'd quit slacking off and get these little ones worked out too!
;)
Pulling that mouse apart was a PITA!!!!
The top over the IC is the blue LED that lights through the vents and the fan. That will be what I replace with a white or orange one.
6 screws holding the internals together.... cripes...
Finally... broken down:
These parts will be OSHA orange:
and these are with the first layer of smoke paint:
I plan on 2-3 more layers of paint on these parts.
Oh My! I'm a muscle car junky and that badboy me likes! I just saw a pack of those steel woven hoses at O'reilly's the other day and wondered if anyone had used them or done a spuercharger setup. Nicely done by the way! Even the mouse is off the hook!
after 2 more coats of "Smoke" and the 2-3 coats of clear:
the top pieces:
Pulled the blue LED out of this beastie, and replaced it with a white 5000mcd light. I then sprayed it with a glass frosting so that the light would disperse and not just spotlight. These pics were prior to me spraying the frost.
Is it just me or does that scroll wheel just scream "MAKE ME INTO A TIRE"!?!?
Oh hell yeah!Quote:
Originally Posted by Thallion
All you need now is a little BossFX-57 decal on it. Or a small Mustang emblem decal. :)
Rock guys! Thanks for the suggestions! Excellent ones!
Daaaaamn!!
The wheel is easily removable while in it's current state.
Vinyl dye the rubber tire black, and chrome the center hub! Genius! Thanks guys! And that fixes another issue that I was trying to figure out how to resolve, the red sensor light was bleeding through the transparent material of the rubber compound.... this will solve that and keep the mouse mod on theme!
Good job guys!
And I *may* do a BOSS logo and put it on the mouse... we'll see!
:D
I like that mouse,what brand of mouse is that, im sure youve said , i must have missed it.. Once again i must say one of the cooler mods on the board:)
http://www.xoxide.com/logisys-optica...mouse-red.html
Logisys, I believe...
Threw the packaging away a while ago, but I purchased it from Xoxide...
HTH!
Thanks for all of the comments guys!
Test fit...
couple of take aways on the pics....
Mice have pretty tight clearance tollerances on the buttons, and a thicker paint causes these to stick due to the gaps being tighter.
*SO*
I am forced to file down the gaps to allow for more space, then repaint the buttons and such to fit properly together... but this should let you know where this baby is going...
;)
That is looking damn nice!
Hawt.
YAY!!!
The mouse is done!
Here is a little trick I pulled tonight. The Rubber surround on the wheel was a clear rubber, and I wanted the opaqueness of a "tire"... so I took the rubber piece off of the plastic center. I then boiled some water in a glass dish, then poured in 1/2 a package of RIT black dye. Mixed it up good, then dropped the rubber piece into the dye. Let it sit there for about 30 minutes, essentially letting the water cool with the rubber in it. I let the boiling water cool for about 2 minutes prior to adding in the rubber piece for fear that I was going to melt it and mis-shape it.
But the piece came out PERFECT! Opaque black, and still fits the original dimensions!
I need to buy some mouse skates for the oval patches that I took off the bottom, but otherwise it is done!
That is quite the sex.
That came out very nice, great job. how did you know the rubber in boiling water trick, geesh sometimes it's amazing the little tricks people have stashed away in their noggins....
I knew that mouthpieces (from my old football days) became pliable and could be molded after a hot water bath. I also assumed that this "state change" would "open up" the rubber.
So I took an educated guess.... ;)
That was all. I had *no* clue if it would actually work! But... it did!
It looks great. Any chance of a shot of it next to the case?
I still have a keyboard to get matched up into the mix... *then* I will have a family portrait! ;)
Family portrait ... funny. :DQuote:
Originally Posted by Tech-Daddy
Going for the speakers too? How about the monitor?
I've been meaning to ask you. Where did you get the decals for the case? Or did you paint in the Boss FX name and stripes?
I bought a decal set on the web that lets you print out any graphic on their special paper, then you cover it with their clear paint (not sure if it's the same clear we use on our paint jobs or not) then just dunk it in water like regular decals.
BTW ... starting to love that little compressor. Now that I've used it more, it seems to work great. And seems to have plenty of power to paint whatever I need it for.
I custom built the stickers in Photoshop, created vector files and then took them to a sign shop and had them cut out of black vinyl.
You have a link to this paper system that you bought?
Was that expensive?Quote:
Originally Posted by Tech-Daddy
Here is the one I bought.
http://www.decalfactory.com/u-make.php
And another one I had marked off for the future.
http://www.kustomrides.com/xcart/Pre...per-p-266.html

.jpg)