Awesome! Great to see this wasn't abandoned!

Printable View
Awesome! Great to see this wasn't abandoned!
wheres the update!!!? it's been a few days and then some! lol
Forget a few days, it's been a few months! 3, to be exact (well, in 5 days).
Well things came up and I had to backburner it again. One big hang up has been electronics. Makerbot had released some affordable electronics that worked quite well with non makerbot printers. Unfortunately they discontinued them and the latest set runs close to $400.
So I began saving up to just buy a MakerBot Cupcake CNC. It was only $800 and was way more accurate than my McWire. I had enough to make my purchase 2 weeks ago and logged on to buy my cupcake.... Turns out Makerbot discontinued the affordable Cupcake for the more expensive Thing O Matic.
Very heartbroken and somewhat depressed I mulled over what to do for a few days. I had seen an accurate Makerbot in my near future and my dreams were crushed. I could save up several hundred more and just buy the new larger machine, or I could buy the $400 electronics and deal with a lot of new coding to get things to work.
I decided to check out the reprap site and see what was new over there, and to my astonishment a completely new set of electronics had been created and named RAMPS. A quick search landed me at a site that sold the electronics. So I decided to just forget about Makerbot forever and buy the new RAMPS electronics, and the parts to make an extruder from MakerGear.com and Ebay. So for less than $400 I have a full set of electronics, 5lbs of 3mm blue PLA filament, parts for an extruder, and spare parts on the way! So who's in for the first set of RepRap Prusa Mendel printed parts?
I will type a more informative post later. But rest assured that this project is back in full swing and you should start seeing updated post within 2 weeks. (electronics have a 2 week lead time)
Awesome! I'd call dibs on those first printed parts, but I can't finance the electronics atm. :( Oh well, at least I can watch. :D
So lets discuss the Electronics I have chosen to use.
RAMPS
http://reprap.org/wiki/RAMPS
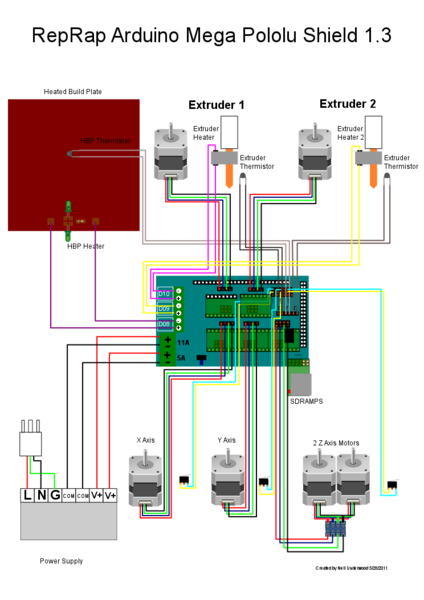
Note that I will be using RAMPS V1.3
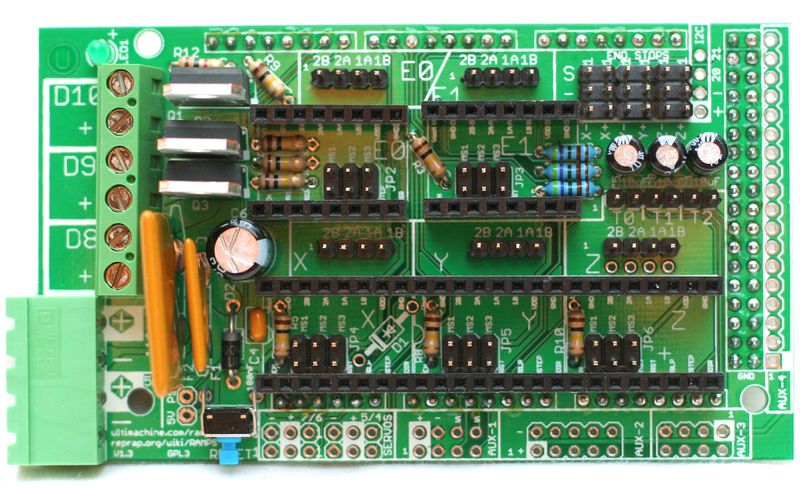
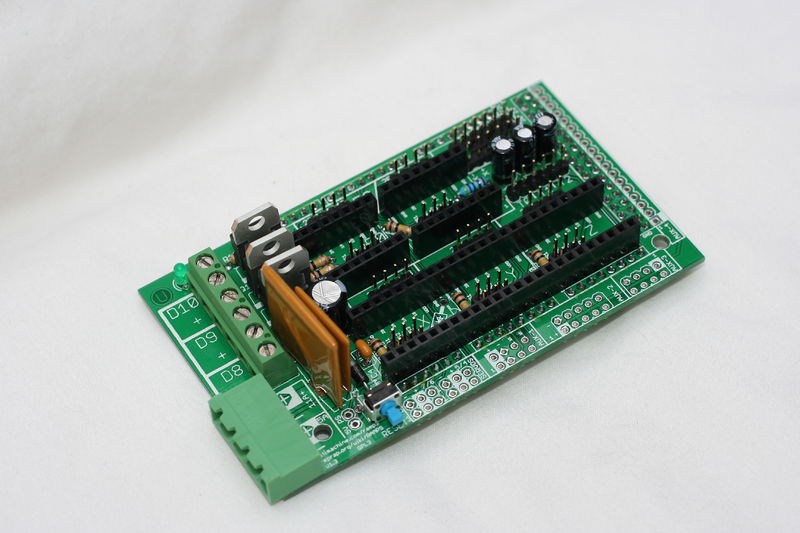
RepRap Arduino Mega Pololu Shield, or RAMPS for short. It is designed to fit the entire electronics needed for a RepRap in one small package for low cost. RAMPS interfaces an Arduino MEGA with the powerful Arduino MEGA platform and has plenty room for expansion. The modular design includes plug in stepper drivers and extruder control electronics on an Arduino MEGA shield for easy service, part replacement, upgrade-ability and expansion. Additionally as long as the main RAMPS board is kept to the top of the stack a number of Arduino expansion boards can be added to the system.
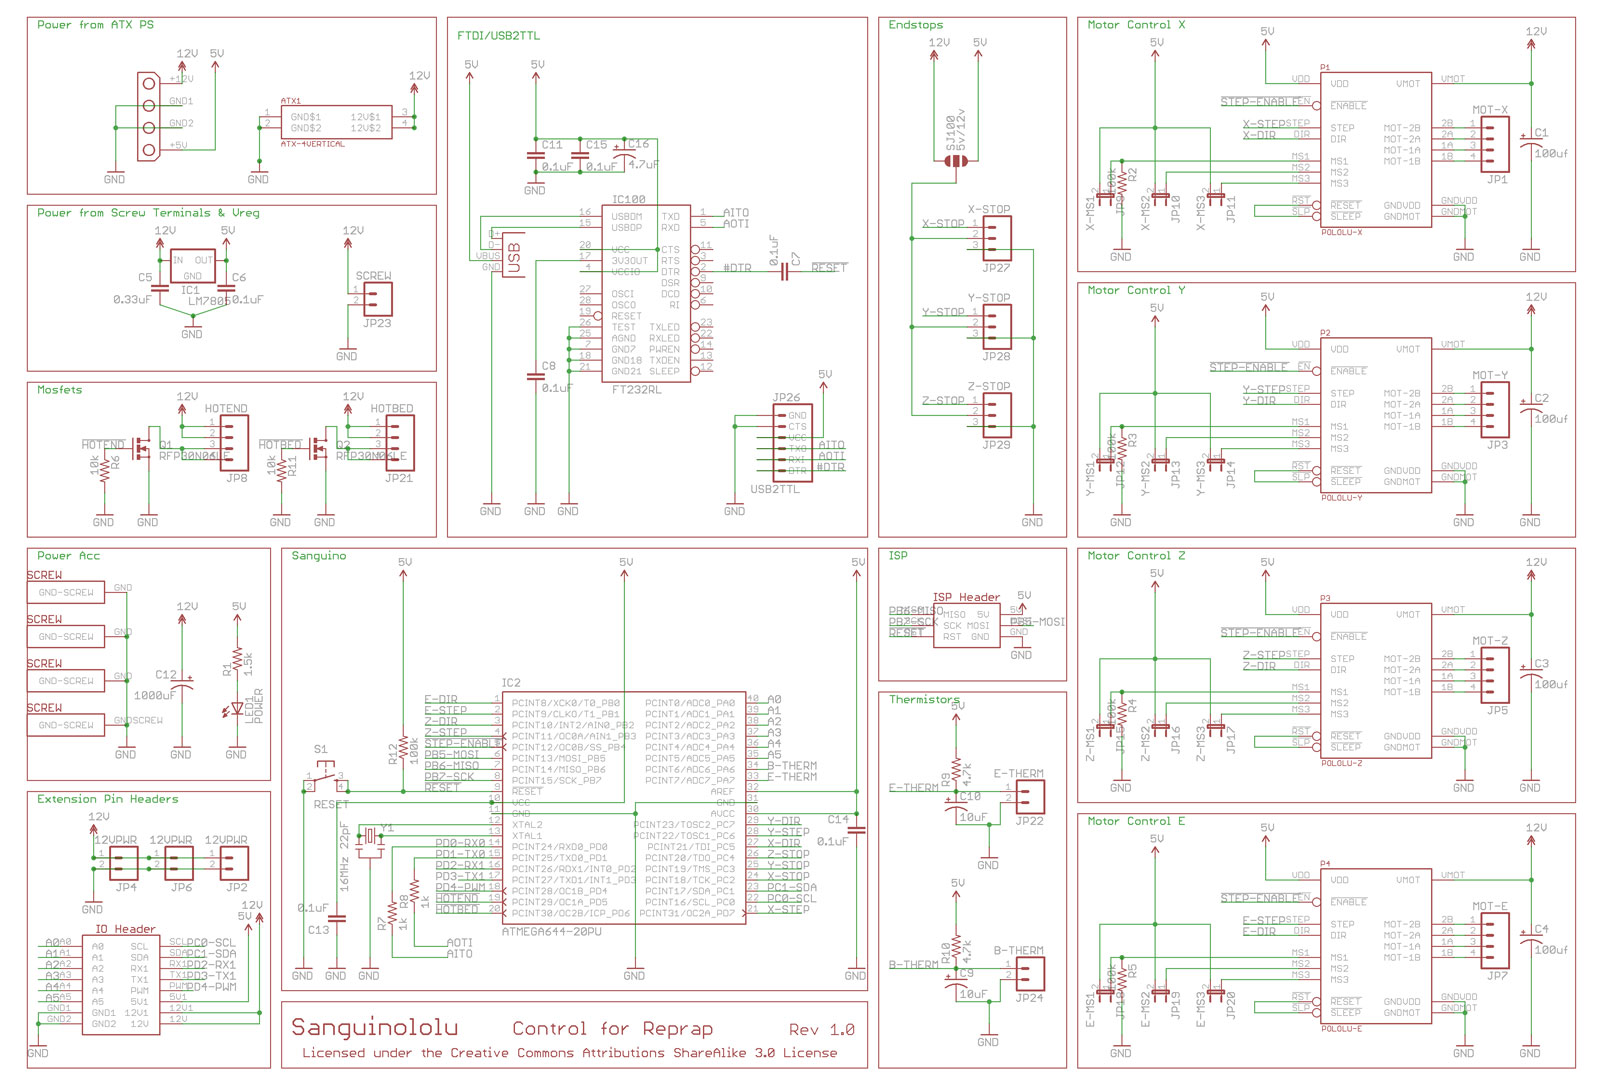
Schematic Click to enlarge.
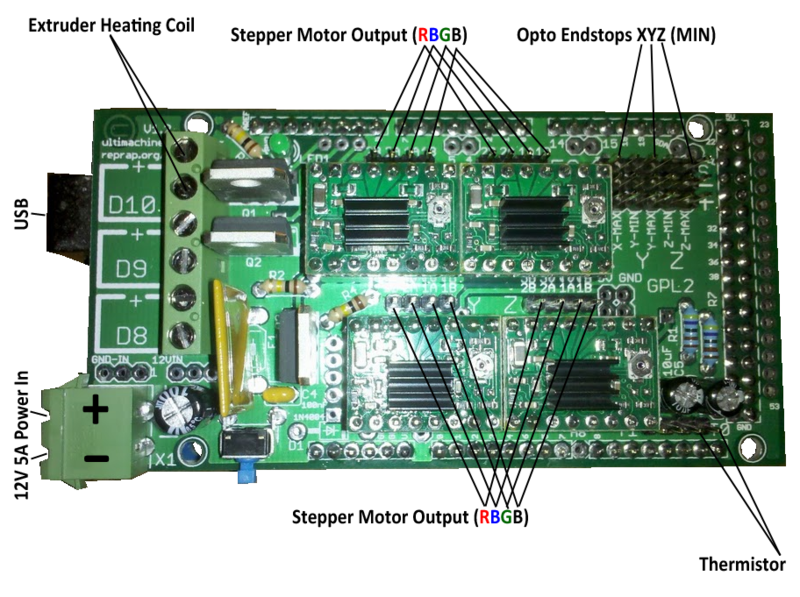
So basically RAMPS is a shield designed to fit the Arduino Mega 2560. It has 3 MOSfet control circuits which are controlled by PWM pins on the Arduino for the extruder hot end and a heated print bed and fan control. Fits 5 Pololu A4983 stepper drivers, and has additional pin-outs for servo control for projects like print bed conveyor belts and the like. Servo style connectors are used to connect to the endstops, motors, and leds. These connectors are gold plated, rated for 3A, very compact, and globally available. It can be powered with a 12v 5 amp (if no heated bed is used) wall wart or power brick, or one can use a 300w PC PSU. I will be using a spare 500W I have laying around. Maybe I will step it up to a spare 800w Modular that's collecting dust!
This is the kit I purchased. http://ultimachine.com/content/ramps-diy-kit-complete I decided to go with the optical end-stops over the mechanical just out of personal preference
Pololu A4983 Stepper Driver Stepper Drivers
http://ultimachine.com/content/polol...r-heatsink-kit
The A4983 stepper motor driver carrier is a breakout board for Allegro’s easy-to-use A4983 microstepping bipolar stepper motor driver. The driver features adjustable current limiting and five different microstep resolutions. The driver operates from 8 – 35 V and can deliver up to 2 A per coil.
Simple step and direction control interface
Five different step resolutions: full-step, half-step, quarter-step, eighth-step, and sixteenth-step
Adjustable current control lets you set the maximum current output with a potentiometer
Intelligent chopping control that automatically selects the correct current decay mode (fast decay or slow decay)
Over-temperature thermal shutdown, under-voltage lockout, and crossover-current protection
The A4983 stepper motor driver carrier comes with one 1x16-pin breakaway 0.1" male header. The headers can be soldered in for use with solderless breadboards or 0.1" female connectors.
:stupid: :whistler: :DQuote:
Originally Posted by SXRguyinMA
Nice! That's actually quite a reasonable price for that kit.
Hey x88x did you get any huge power resistors when you got those surprise boxes? Like the ones that come epoxied into their own heat sink?
Nope. Though I did get several large 2k1 resistors. IDK what the power rating is, but they're quite large (~1"x~1/4"dia), so either they're fairly high power rated or just old. I do still have 6 of these left though, that I could sell for $2.50 each shipped if you like.
http://www.mouser.com/ProductDetail/...F2%252bdhpU%3d
Got in some parts for my extruder today. Mostly hotend stuff. Here is a teaser pic. I will post a better one and more information tonight or tomorrow.
:pics:
Small update before I get my ass back to work.
All of the parts needed to finish my RepRap are here, I decided after a few delays to cancel my RAMPS 1.4 order and bought a Sanguinololu PCB and ordered all of the components from DigiKey to build it. In fact I ordered enough of everything to build 3 boards total. I plan on building 2 extras and selling them to fund some cool colored plastic. I have all 5 steppers, 5 pololu stepper drivers and every connector and wire I may need. The only think thing that I do not yet have in hand is the 6 micro switches I ordered from china to use as mechanical endstops.
I have everything in for my extruder, including printed parts, hardware, hot end and nozzle. I have everything to finish the bot construction itself. I also have some experimental stuff I will be debuting on here in a few weeks.
I am still ordering a RAMPS 1.4 PCB and will use it for my experiments using it with the new chipKIT boards. So it will be entirely for experimental use. Also in the works is a SD Shield for Sanguinololu and an LCD. THis will allow me to see critical temps by just looking at the printer and not the host software. The SD card will allow me to upload the Gcode file to it and print from the card. This greatly improves print quality because there is almost 0 delay over the connection. When I get home tonight I am going to tidy up my workbench and will take some photos.
So for those of you who are curious here is some info on Sanguinololu 1.3A. Some of this info is copied from the RepRap Wiki and some I filled in. One important number I want to go ahead and put out there is the cost. The PCB's run $11 from the designer Joe Mosfet (yea his real name). The components run about $41 total putting the total cost at $52. They do the same thing as RAMPS, but do not have nearly as many extra I/O pins for further expansion. I will be able to add a LCD and a SD card but not a keypad. This is a bit of a bummer but I can live with it until I get my custom electronics up and running.
Sanguinololu 1.3A
Sanguinololu is a low-cost all-in-one electronics solution for Reprap and other CNC devices. It features an onboard Sanguino clone using the ATMEGA644P though a ATMEGA1284 is easily dropped in. Its four axes are powered by Pololu pin compatible stepper drivers.
The board features a developer friendly expansion port supporting I2C, SPI, UART, as well as a few ADC pins. All 14 expansion pins can be used as GPIO as well.
The board is designed to be flexible in the user's power source availability, allowing for an ATX power supply to power the board, or the user can chose to install the voltage regulator kit for use with any power supply 7V-30V.
Small design - board is 100mm x 50mm (4" x 2") - barely an inch longer than a business card!
Sanguino clone, Atmel's ATmega644P - ATmega1284 drop-in compatible!!
Up to 4 Pololu (or Pololu compatible) on-board (X,Y,Z,Extruder) (A4983 without voltage regulator)
Supports multiple power configurations
-- Logic & Motors supplied by ATX power supply (needs molex harddrive connector, and optional 4pin atx connector for additional 12v/supply voltage)
-- Motors supplied by 5mm screw terminal 7-35V
-- Logic supplied by USB bus
-- Logic supplied by optional on-board voltage regulator (molex harddrive connector cannot be installed at the same time)
Supports multiple communication configurations
-- FT232RL on-board for USB connectivity
-- USB2TTL header is available for FTDI cable, or BlueSMIRF bluetooth module
2 thermistor connectors with circuitry
2 N-MOSFETs for extruder/bed, or whatever
Selectable 12v(or supply voltage)/5v endstop voltage
Edge connectors enabling right-angle connections
Silkscreen for connectors on both sides of the board, facilitating bottom cable connections
13 Extra pins available for expansion and development - 6 analog and 8 digital, with the following capabilities
-- UART1 (RX and TX)
-- I2C (SDA and SCL)
-- SPI (MOSI, MISO, SCK)
-- PWM pin (1)
-- Analog I/O (5)
All through-hole components (except FTDI chip) for easy DIY soldering
Click for larger image
Click for larger image
Click for larger image
Sanguinololu is OSHW (open source hardware) and you can download all of the files from Joe's Git here.
I created this Mouser BoM (bill of materials) in case anyone wants to build one.
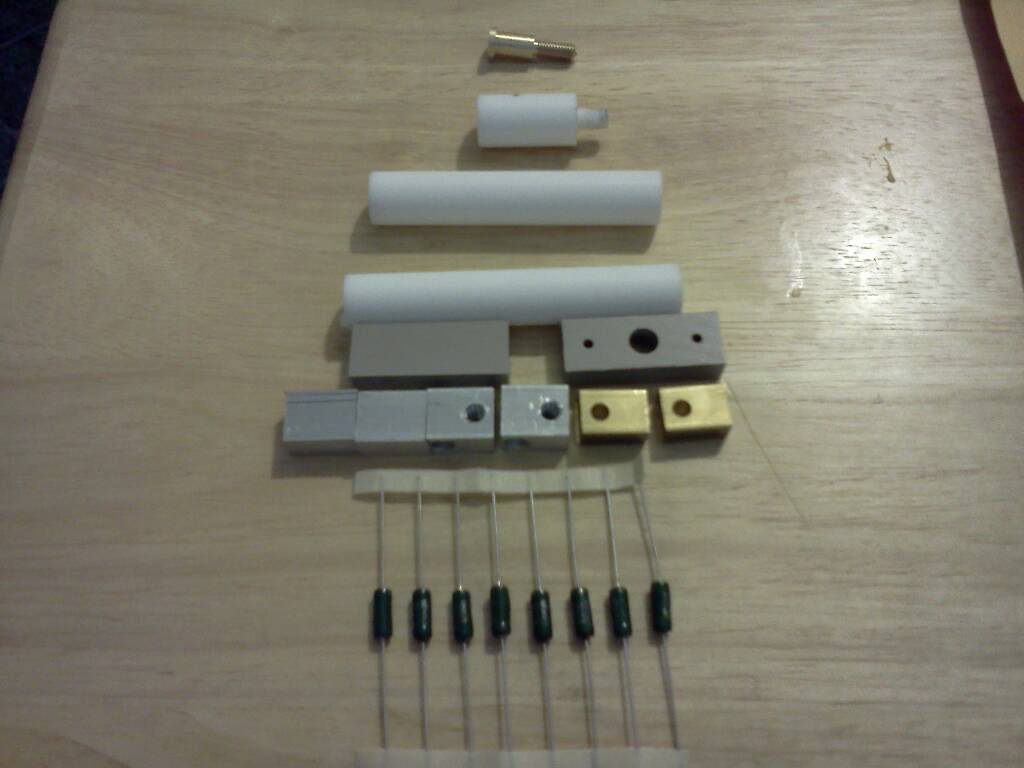
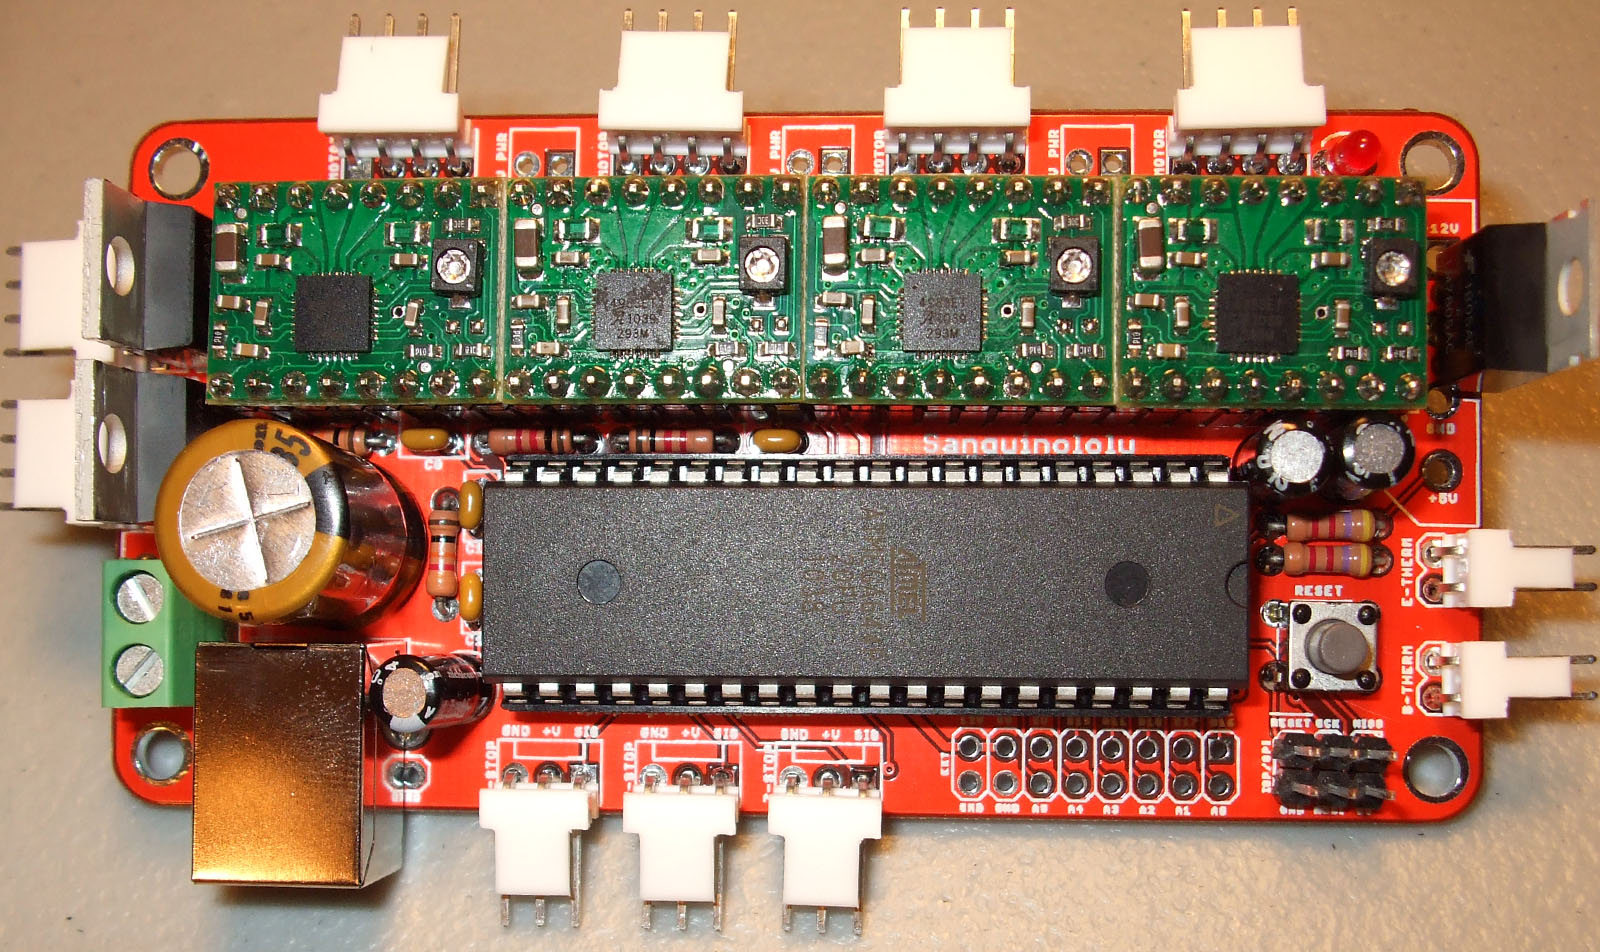
Here is one of the photos from the wiki that shows how many parts go into a sanguinololu. This looks like a double order of parts but the photo still gives you an idea of how packed that little business card sized PCB will be. Below it is a shot with out the Pololu drivers plugged in.
I am going to leave you with a video of the SMD FTDI chip being soldered on. I believe the video was shot by Joe Mosfet himself. It's not hard to solder these chips with a simi decent iron, some flux and .5mm or .6mm solder. Oh that reminds me, My Sparkfun branded soldering station (hakko 636 knock off) arrived too! 0c to 400c in less than 30 seconds is cool!
[center][center]
nice!
Sorry I have not been updating this. Work is killing me. I will try and write up some build logs soon but in the mean time here are some photos.
Glad to hear you have made progress on this!
Did you see my thread in the Chatterbox by chance?