-
Re: Cherry wood Case with water cooling
Quote:
Originally Posted by
Tale Gunner

ViewSonic 22":D VX2235
Have you thought about making some trim to go on the outside frame of the LCD? Something like corner bead you can buy in a store?
Side note: I work at an airport which has some old hangers that are being demolished. All wood construction, some of the beams have to be 8" x 36" BC fir. Don't know why, but it pains me to see them being ripped down without a thought being put into salvaging anything. I see diver's that are bring up old logs from the bottom of rivers, why can't the salvage this stuff makes me shake my head.
-
Re: Cherry wood Case with water cooling
Quote:
Originally Posted by
moon111
Have you thought about making some trim to go on the outside frame of the LCD? Something like corner bead you can buy in a store?
Side note: I work at an airport which has some old hangers that are being demolished. All wood construction, some of the beams have to be 8" x 36" BC fir. Don't know why, but it pains me to see them being ripped down without a thought being put into salvaging anything. I see diver's that are bring up old logs from the bottom of rivers, why can't the salvage this stuff makes me shake my head.
Not a bad suggestion. I will look into that after I finish the case. Thanks for your feedback. I'll take a stab with the cad files later.
As for the hangers I feel your pain too. I wish I could live close enough to get some of that wood. You never know what it can be turned into.
-
Re: Cherry wood Case with water cooling
Today I had some extra time so it was to the wood shop for me. I started out to attach the motherboard tray to the rear of the case.
I used my router table to remove some of the wood to allow my tray to recess into the back. I needed to be careful as not to prevent access to the screws to hold my video cards, sound card and any peripheral cards.
Next I had to devise a way to lock the motherboard in place and allow for the plexiglass side cover. This was a challenge. After several prototypes I came up with this one.
It was routed to allow the different moldings on the tray to sit flush. It also allowed me to have the 1/4" plexiglass side cover without causing problems. Cutting that board was a little challenging and the blade scorched the board a slight bit but I can sand it clean.
Now I had to attach the tray to the back board so I used brass inserts to hold my motherboard tray. I drilled 2 holes in the rear board on the lip I created earlier.
I used the tool to insert the brass "nut" into the wood.
This allows me to use a machine screw to hold the motherboard tray in place with 8-32 screws.
On the back side where the screws show through I will be putting trim, so I wasn't worried about looks yet. But I did not want the screws to extend beyond the wood.
Next I adjusted the router bit to only cut 1/16" of wood 5/16" wide to route for the drive cage. I needed to make the card cage flush.
Got to do some more work to keep this project moving.
-
Re: Cherry wood Case with water cooling
Before I can consider assembly of the case I have to make sure that all penetrations are finished. The fan in the front panel is one. To cut a hole 3" you can either cut it with a hole saw and drill or you can use a drill press and a hole cutter like I did.
Its adjustable and can cut a very clean hole. I will need to locate and punch a starter location on the front panel.
Then its time to cut the hole. Because of the danger while the bit is spinning I could not take any photos. I made 2 passes with the hole cutter, one from the front and one from the rear. This device is so accurate that its difficult to see where they connected (other then the color difference).
The grill on the fan will be replaced with a custom grill made from .....Wood!
-
Re: Cherry wood Case with water cooling
Well here are the pieces parts to this thing I call fun. This marks 1/3 finish, so theres so much more to come. Tomorrow I plan to drill the 3 holes for the hinges then its the top for a 120 MM fan. After that I open the bottom of the case to the pump housing. That should get me to routing the boards for a interlocking mitre and glue up.
:up: :D
-
Re: Cherry wood Case with water cooling
Wow you accomplished a lot. Your woodworking skills are great. Good luck.
-
Re: Cherry wood Case with water cooling
Quote:
Originally Posted by
chaksq
Wow you accomplished a lot. Your woodworking skills are great. Good luck.
Thank you. I love wood working and computers. It just seemed natural that I get them together. I have completed the barrel hinges and will post the pics later.
-
Re: Cherry wood Case with water cooling
Not much accomplished today, my counter tops were measured for my office so most of the day I spent making sure the guys had everything they needed. But I did get the barrel hinges drilled and installed. Finding a 14 mm forstner bit proved unsuccessful so I converted to standard. (14mm = .055118) From there I looked for a close conversion. (9/16 in = .5625) That was about as close as I was going to get in this town so I ran over to the nearest hardware store and picked up a 9/16" drill bit. Even though the 9/16" bit was larger then I needed I knew that I could wrap the hinge with plumbers tape to make up the difference. It worked!
Then just for fun I put everything back on the front to see how everything was going to fit.
The door will swing to the right because of its location in my office. That's why you see all 3 hinges on the right hand side of the front. Now I have to make 2 more cuts to finish the major cutting prior to completing the routed locking mitre cuts to join the boards.
Update I just found out that the counter top installers cut several of my cat 5e lines in my office. :pics:
-
Re: Cherry wood Case with water cooling
Quick update the counter top installers cut 2 of my cat 5e cables.:devious: :dead: :mad:
Now I find out that the network com is blown in my wifes computer.
-
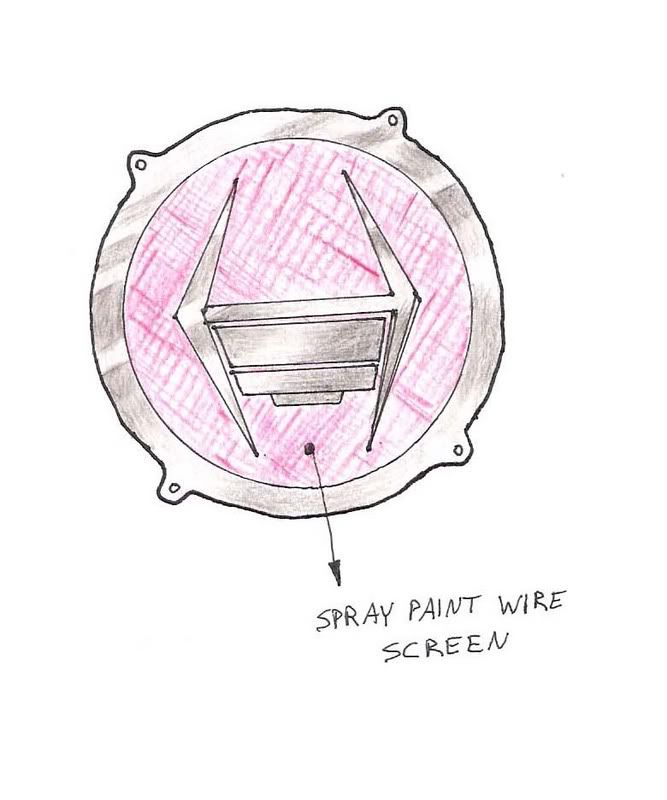
Re: Cherry wood Case with water cooling
I plan to make this grill from wood and brass. The emblem will be back lit with blue led's
-
Re: Cherry wood Case with water cooling
Nice! will be the first TBCS fan grill ;) cool router work! I like the recessed metal parts.
-
Re: Cherry wood Case with water cooling
Well I have my counter tops in the basement and I wasnt able to make any progress on the case today. This weekend is the big car show that I go to every year. I may not be able to make any more progress this weekend but I assure you that I will not stop until the project gets finished.
-
Re: Cherry wood Case with water cooling
Great looking case and some very professional looking wood working skills there dude!:D
You can build my kitchen cabinets anytime!
Looking forward to seeing the end results.
Charles
-
Re: Cherry wood Case with water cooling
Quote:
Originally Posted by
Wannabeamodder
Great looking case and some very professional looking wood working skills there dude!:D
You can build my kitchen cabinets anytime!
Looking forward to seeing the end results.
Charles
I would love to have the chance to build your kitchen cabinets. I love the wood shop. ;)
-
Re: Cherry wood Case with water cooling
Your TBCS is a great idea, it may look a little nicer if you kept the proportions and mounted the center piece on something like screen.
-
Re: Cherry wood Case with water cooling
I guess the B&O-Designerboys are going nuts if they´ll see your Work, TG. Nice details and the look of the cut-out´s, respect......
Rince...
-
Re: Cherry wood Case with water cooling
Quote:
Originally Posted by
jdbnsn
Your TBCS is a great idea, it may look a little nicer if you kept the proportions and mounted the center piece on something like screen.
Great idea. I will give it some work to see just how I can develope the grill. I had wanted to go with the dark stained wood and brass. I will see what I can do.
-
Re: Cherry wood Case with water cooling
Quote:
Originally Posted by
Rincewind
I guess the B&O-Designerboys are going nuts if they´ll see your Work, TG. Nice details and the look of the cut-out´s, respect......
Rince...
Thanks Rincewind...
-
Re: Cherry wood Case with water cooling
Just doing some test fitting here and wanted to share the picture. I really like the black power supply and I'm thinking of painting the mother board tray black also. What's everyone think?
-
Re: Cherry wood Case with water cooling
I agree, that black sets off the color of the wood nicely.
-
Re: Cherry wood Case with water cooling
Quote:
Originally Posted by
jdbnsn
I agree, that black sets off the color of the wood nicely.
I agree with you. I really getting excited here and soon more is going to fall in place.
-
Re: Cherry wood Case with water cooling
It's an excellent contrast. I say go for it.
+Rep!
-
Re: Cherry wood Case with water cooling
Quote:
Originally Posted by
DrumThumper
It's an excellent contrast. I say go for it.
+Rep!
Then thats what we will do thank you for your feedback.
-
Re: Cherry wood Case with water cooling
In a mock up of the finished product I wanted to see how everything was working out. I was very pleased to see this layout was working very well. Yes it is large but it is supposed to look like a cabinet in my new office. It will blend in perfectly after I build the raised panel door.
:banana: :banana:
-
Re: Cherry wood Case with water cooling
this looks soooooooooo cool, banana time
:banana:
-
Re: Cherry wood Case with water cooling
Quote:
Originally Posted by
FrooP
this looks soooooooooo cool, banana time
:banana:
Thanks today I should be cutting in the top fan (120mm) and the opening in the bottom to the pump housing. Then if time permits I want to do the mitre joint to glue it up.
-
Re: Cherry wood Case with water cooling
The top fan is a 1225 from Thermaltake. Larger then the 120 for max air flow.
This is what I need to accomplish this time.
Then the next step will involve 3 different hole sizes at one location. The first step will be to drill a 1/16" pilot hole to maintain the center of the hole.
Then to drill the top of the case to inlay the fill port for the water cooling.
Turning the fill port upside down and placing it in the hole tells me if there needs to be any adjustment.
All is good here so now to flip the board over and work from the bottom side of the case top.
-
Re: Cherry wood Case with water cooling
Drilling a test hole in a piece of scrap will let me know if it is large enough for the nut to the fill port.
Just right. Now to drill the actual board deep enough to get threads from the fill port. Then its time to drill the 3rd hole that allows the fill port to penetrate the top board.
My daughter was excited that I took a picture of her hand to be on the Internet.
An here is the final picture of the fill port (a DangerDen product) inlaid on the top board to fill the water cooling.
-
Re: Cherry wood Case with water cooling
Here is the mounting holes for the fan and just laid on the board for fitting. You can see the fill port hole on the bottom and a little more detail as to the shoulder cut that would allow the unit to be attached to the case.
The bottom of the case was opened to match the pump housing. This for connecting the computer to the water pump rig with the hoses and electrical connections and most important, air flow. (that cut was done free hand and no fences to keep the blade straight)
-
Re: Cherry wood Case with water cooling
I took a break and went to the pool with my kids. They were hot and so was I. After I got back I had the router all set up for the final mitre interlocking cuts and whipped them out.
Now things are really beginning to come together.
-
Re: Cherry wood Case with water cooling
One last pic for the night. I wanted to show you just how much easier it is to use a interlocking mitre router bit. The corners look great but look at how accurate they are.
Its important to keep 90 degree corners and this bit does just that with ease.
-
Re: Cherry wood Case with water cooling
Damn,... I cant see the pics beause I'm at work. I'll check this out later;)
-
Re: Cherry wood Case with water cooling
Then disaster strikes. The bottom of the case hit the floor and broke. I can't believe this but all is not lost. Since I was in the middle of the glue up then maybe I could add a couple of clamps and glue the crack. And the good news is that it is the bottom and the crack won't show all is ok.
I wanted to give you a idea with this type of glue the process it requires. You have to wet down both sides of the wood to activate the glue.
I was trying to take more pics but when the bottom broke I quit with the camera and worked as quickly as I could to get the parts together before the glue activated.
Sorry...
-
Re: Cherry wood Case with water cooling
I took the case out of the clamps this morning. Every looks great. Now some removal of the glue and sanding and this thing is ready for some more action.
The bottom glued up nicely. I am happy with the results. Here is a pic of the repair on the bottom board.
:thumbsup:
Things are coming together nicely. I am beginning to see the fruits of my labor. I have to make the trim for the unit. All the molding will be homemade. I have several bits to chose from for the design of the molding. The case will be modular to remove it from the pump housing for any repairs necessary. That will require me to put 4 of the brass inserts to screw the case to the pump housing. I will be cutting a rabbet cut on the sides. This will allow a shoulder to put Plexiglas covers on the sides. The door will be a raised panel door with the 3 barrel hinges to access the drives. I plan several custom grills for the fan openings. So this is the beginning of lots of fun.
-
Re: Cherry wood Case with water cooling
I wanted to get back to you with the rig I used for some of this work.
Here is the router bit in the router / lift combo. The dial to the right allows for adjusting the bit height. The throat plate is zero clearance for best cutting without tear out
The router below the table is the Porter Cable 7815 3.25 horse power with the speed adjustments. Its a real work horse.
The fence is a Freud with micro adjustments for correct positioning of the fences. They can be adjusted together or independent of each other.
And this is the entire setup. There is a remote on off switch wired to the router for ease of power control, and its on locking casters to move it around when needed.
-
Re: Cherry wood Case with water cooling
friggin awesome job dude. I need a better a router. Mine is crap. The actual blades have a wobble to then when they spin:( Router is messed up or something,...
-
Re: Cherry wood Case with water cooling
The next set of router bits are the raised panel for the door. I have a great collection of bits. The router tends to be one of the most versatile tools in the wood shop.
-
Re: Cherry wood Case with water cooling
Quote:
Originally Posted by
tribaloverkill
friggin awesome job dude. I need a better a router. Mine is crap. The actual blades have a wobble to then when they spin:( Router is messed up or something,...
These things can cut plastics too. I can't imagine working without one. Thank you Tribaloverkill. I have been following your post closely.
-
Re: Cherry wood Case with water cooling
Did some sanding today to get this unit ready for the next phase of the work. I am really pleased as to how this is turning out.
-
Re: Cherry wood Case with water cooling
I had told you of other projects I have done in wood working. New Yankee Workshop is my favorite show. I did 4 of Norms jewelry cases. Here is a picture with 2 of them.
(All 4 are in this picture you just can't see them very plainly! They are behind the one with the lid open) LOL
All of the drawers are dovetailed. All 4 cases are alike and difficult to tell apart. It was the first time I ever tried dovetails. But after 3 years they still are not stained. My wife insisted that she stain them. I have to wait to put the mirrors on the tops inside of home made trim.