This looks great.

Printable View
This looks great.
Tonight I added a cover over the glow wire in the front, although its hard to see being white, the flash kind of washed it out.
Then I laid out the shape of the tube window:
and using a dremel, I cut it out:
here is the final window:
Here is the piece of plexi I heated and bent to match the tube:
and here it is taped to the tube:
Just for fun I installed the blue CC lights and tested the cover for the bottom.
I think it is alittle too bright. I might have to come up with something a little less intense for the bottom light.
I then traced the shape of the window onto the plexi and covered it in tape to protect it.
Cut it out:
So my final thoughts on the window were to "MAYBE" laser etch something in the plexi. lets say TBCS? or logo or something. I'm not sure yet.
happy modding, later!
Hey you used my idea...kinda. Looks great.
freekin sweet +rep
i love the idea
i have the exact same res btw its really nice isnt it im surprised more people dont use the xspc gear
any pics?Quote:
Originally Posted by yakyb
Looking great can't wait to see it done.
what is the color of the tube?
cool stuff you are teh maan
ive been following this worklog for awhile and i have to say...its is BEAST!!!!....such a cool idea....
Thanks, I'm assuming you mean when its done? Basically I'm going to paint it black and then come back with silver and grey and maybe drybrush it or air brush it. Not really sure about the finish. I have to make up some mockups for testing the finish before I start on the actuall pieces.Quote:
Originally Posted by FrooP
Right now I'm just concentrating on gettting it built. however I think I'm going to be forced to start painting sooner because of the clear plexi parts and the panels that will cover the edges.
wow this is so cool, i love what you have been doing at the moment, i dont think there are menyworks to discribe but wow...
I say keep it, it looks cool. very bright on the bottom and then the less bright on top and in side. iv got this image that its a glow from a generator or something connected wih the turbine and its this ultra bright glow xDQuote:
...I think it is alittle too bright. I might have to come up with something a little less intense for the bottom light.
also a cool point to make is to try and get the light to fade in and out.
well, to play off your idea of having it fade in and out, what about motion?
maybe I could use a pair of these:
http://www.xoxide.com/sunbeam-meteor-light-blue.html
that way I won't get the heat buildup with cc tubes.
don't forget to paint the edge where your sticking the window, wouldn't want to see any of that brown tube.
You are correct, Spawn, I don't wan't to see any brown tubing. I'm trying to figure out how to install the window and still paint it. Like I said earlier, I may be forced into painting sooner than I had hoped.
Just as small update tonight.
I started to trim the underside of the front. You won't see it much, but in my opinion, attention to detail everwhere counts!
Here is what started with, I added a few trim pieces around the edges:
Then I simply added a few layers of board down cut to random shapes. Note: this area will not have any glow wire.
The only other thing I got done was to rough up the surface for the other side of the tube:
Like I said, just a small update tonight, I'm waiting on the extra glow wire that should be here Thursday.
and an update on doing the laser etching. I will have to wait on that. they guy that I know that has access to it teaches at a local high school and he informed me that he won't have access untill school starts, which is at the end of august.
later,
I'm really impressed with this project, it's original and turning out quite nicely. If I were you, I would go for a more subtle interior lighting scheme than a cathode tube or that meteor thing. I think it would look better with a dim, soft glow of a couple LED's. But that's just my opinion. Any plans on how you are going to paint it? A nice weathered metal would look good like the technique illustrated by Commando in his Tips, Tricks, & Tutorial series.
jbdnsn, I agree, I have to find someting not so bright that does not give off much heat. I thought about wiring up some led's myself, not sure exactly what I'm going to do yet.
As for painting, thanks for pointing me toward Commando's tips, I have access to an airbrush, but I don't have an air compressor, so I have to figure that one out. But Yes, I will be air brushing it to make it look liked weathered metal. I really like the paint look on Crimson's Doom 3 case, but I dont' want to copy it exactly. and I want it to look more like the insides of a futuristick turbine.
Thanks again!
This just keeps getting beter and beter.
I just had an idea, but I"m not sure how to go about doing it.
Basically I want to add some led's under the tube instead of the cc tubes that are too bright. I found these 2 color leds: http://www.frozencpu.com/products/18...l?tl=g6c77s665
my idea would be to have several of these wired up below the tube and would start out as blue when the liquid is cool. they would be hooked up to a controller that would slowly change them over to the red as the water temperature went up. then as needed if the water temp went down, they would return to blue.
anyone know how to accomplish this. I'm not very good at creating ic circuits. I can do basic soldering, but circuit design is not my fortay!
well i'm not great with ICs either but i'd say you might be able to do it with just thermistors and resistors
well don't waste your money there go to ls diode 0.45 for 3mm red and blue. as far as hooking them up you can use onf of those calculators. if your wanting to hook it up so it changes to the temp of the water i'm not sure how good that would work becuase its only 2 colours. for the power i would grab it from the 5v molex connector running to the fans.
Thanks Spawn, +Rep you just saved me a boat load of money!!! I ordered 15 blue leds and resistors. I'll skip the idea about color changing for now. and I'm not sure I'll use all 15, I just figured I'd get some extras while I was placing the order. Thanks again.
i would look more into the colour changing thing bcoz that would be rele cool.
im pretty sure you could do it with a thermistor and just have an extra resistor on 1 colour.
there must be someone here that would know how to do it
I would need someway to measure the temp of the water also. Preferable measure it right after it leaves the cpu block.
np. so you got 15 eh, thats good then you get the 1 free 5mm Blue LED. they even through them in coloured bags so you know what colour right off the bat.
you could get this and make a T line right from the cpu (in or out). you would need some kind of micro controller (i think is what you want but not sure) and have it change the number/colour of led's on at one time.
on a side note what program did you use at the start of this log to make rendering (right word?) of this project. i started making a sketchup to show what i was going to suggest. so now i'm just building it for fun.
Thanks again for the head up on that company, and they only charge $2 for shipping. Excellent!
I've been doing all the 3d modeling in Autodesk Architecture 2008
none at the moment its going into my case mod that i have delayed whilst i play around with a couple of ideas. (possible involving a complete rebuild as there isnt enough room in the two cases)Quote:
Originally Posted by rendermandan
for the idea with the color changing leds.. this is an NTC right, so ntcs are like:
temp up, res down use a switcher relay, if the water is cold the relay is not forced (dunno how it called but its "off") because the resisor is 2 high = blue led is connectes in circuit. secound circuit on relay activates when the water is getting warmer, the resistance(?) is sinking and the relay can switch to the blue led.. bad thing on this is you just know that the water is hot or cold. not how and youll hear the click of the relay... im looking for a IC circuit somewhen and try to translate it :)
wow, that would be great!
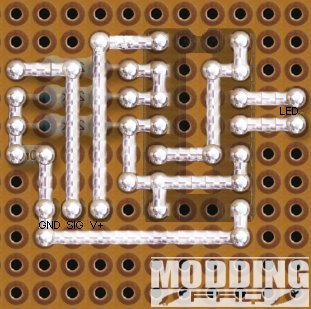
first off i want to know if you think you can solder something like this.. its the basic version, fades a bicolor led from 1.2 to 12V, we would manage that with a ntc and some stuff more.
Yeah, I think I could solder something like that. as long as it was clearly labled out where things go in the breadboard and what needed to be soldered to what. +rep for your help!
i think this would take some more time, so are there bipole leds avaiable? cuz this circuit works like this i think
0V= led got power from the upper pin.
power rising to 12V= power fades to the lower pin(upper pin goes ground)
so i think youll need a bipolar led which is pin 1 red and pin 2 green or sumething
dunno yet, gonna find that out 4 ya
I just got my order of the tygon tubign and more glow wire delivered.
I have to say, I'm not exacly thrilled with the tygon tubing. It is very soft and flexible and it does kink! the tubing that came with the switech kit doesn't kink as much as this stuff! I think I wasted $18!
I just don't understand it. everyone talks this tubing up and says it so great, but from the looks of it, if I put my fingers about 5" apart, and bend its ok, but If I move them closer like 4", then it kinks hard and completly shuts off. I'll try it out when I get home and maybe take some pics.
thats sucks, i will be sure to stear clear of that stuff then, once i start to w/c anyway. i think i would just go to a hardware store and pick up w/e is there.
on a side note my frist time using and somewhat understanding sketchup i tried to make a model of you project to show you how i would have placed the lights. my idea didn't work out on sketchup or at all so since my internet was out i messed around and came up with this haha,
http://inlinethumb48.webshots.com/52...600x600Q85.jpg
http://inlinethumb36.webshots.com/47...600x600Q85.jpg
http://inlinethumb60.webshots.com/51...600x600Q85.jpg
http://inlinethumb34.webshots.com/59...600x600Q85.jpg
i call it a steath "JET" bomber.
back to the project though. i was thinking about changing the voltages for the leds to make it fade in and out better. i would have no clue on how to do it though. i tend to think mechanically so i would have made some wheel wire different voltaged wires. anyway hope you get it working!
Spawn, Those are some pretty cool ideas and sketchup models.
Here is tonights update. I started to layout the framework for the recessed glow wire lighting on the back side of the tube:
Then I taped the glow wire along next to it just temporarily.
Here is the framework all finished: -note: wire has been removed.
and here it is at night:
Then I proceded to layer the covers over the top of the wire:
and her is the effect it gives. The picture really does not show how bright it its. you can see how the glow lights up the other "layers".
I am going to finish the covers and add more layers as I see fit. but the wire will be removed for painting. After its painted, I can run the wire back around the path and tuck it in between the tube and the first layer of cover. but the entire thing will be hidden. all you will see will be the glow radiating out from behind the multiple different layers.
What do you think?
for the EL/glow wire what does it hook up to? does it need resistors, cheap, volts?
Mate this is great. What colour are you gonna paint it?
Awesome work man! On one hand, I can't wait to see this completed, but at the same time, I'm having fun watching you build it.
BTW, LSDiodes FTW! RWKY.
Thanks everyone!, I'm glad you are liking how this is turning out.
Spawn, It comes with a transformer that has a 4 pin molex connnector on it. Thats it! I've read that you can cut its length to whatever you want, but I've also read that if you try and hook it up to both cut pieces, then it becomes half as bright. -I can't verify that, but its just what I've read.
Boy, I'm going to start with a base coat of black, then do some drybrushing and air brushing on it. -Overall its going to have lots of depth. I still have alot more layers to add and detail to add. -I've only begun.
Sgtm, about LSDiodes, "FTW! RWKY" sorry, but I'm a little rusyt on my e337 or whaterver its called. LOL
RWKY.. It's the sticker that LS Diodes gives out with every order.. Robots Will Kill You. IMO, they're awesome.