It not me!!! It ferry! He's the weird ass! But then again Im weird too. Did I mention I want the gurl?Quote:
Originally Posted by Eclecticos

Printable View
It not me!!! It ferry! He's the weird ass! But then again Im weird too. Did I mention I want the gurl?Quote:
Originally Posted by Eclecticos
Umm.. how bout THIS thread!?!? ;) http://www.thebestcasescenario.com/f...9&postcount=87Quote:
Originally Posted by Eclecticos
Anywho.. project is looking really cool!! I can't wait to see whats next..
Exactly! GAWD! Lets stop bringing up the pic of the chick! Need to get that off my mind.Quote:
Originally Posted by OvRiDe
*Pretends to be the alien. I am the alien. Uhhhhhhhhh yeaaaaa.*
That girl just ripped of that alien's piercing.
So, now you can stop thinking about it :D
I'll be using the "omikron" font:
example text
Why this one? Because the letters don't look like normal letters, the shape is complete different. But once you recognize them you can read the text, so it's still usable for the name of this mod and on a display etc. There are many sci-fi fonts, but most of them look to much like normal letters do, and i don't think aliens would write like we do ;)
Yea. That looks good! You can read it to. What are you gonna make a stencil or are you gonna light the letters up?
David Bowie did music from the game that font is from. :D
Always a bit of useless info.
-Dave
Reminds me of Omicron Persei 8
Futurama?
-Dave
You know it! My fav cartoon.
Depens on where i need to use it. For small logo's i'll print it out, add clear plastic on top and fit it in the mod. Almost like crimpson did with the doom 3 airlock. But I could also use it at the description of buttons (engraving/cutting out of acryl) or a nametag on the case etc. Well, that's for later times. Lets finish the alien first :)Quote:
Originally Posted by Eclecticos
Gotcha! No update today. ;) :P
But i do made some progress, the instrument above is finished (well, only wiring up the led's). And i've bondo'ed The arms :D
But I'll show some pictures of it next sunday, hoping to have a big update, including sanding the bondo in the right shape.
Still waiting to see that aliens head. I'm makin' one to. A blue one.
I'm not coping you. Just kinda doing the same thing. :D
Just making the alien. Not the case mod.
Ok, cool :) also with sculpey clay etc? It can be fun, having a large alien head on a base, standing in your room :)
Yea, I got a block of the sculpey. The Foil saves your clay, Im glad I saw that.
Kinda Practicing with the stuff. . Only thing I dont like is if it stays in the oven to long it gets all bubbled up and crappy lookin.
I'll Shut up now. . as not to Interrupt your worklog. :up:
No problem, a worklog is to share ideas and help others. Yeah, don't put it in too long, but after some sanding and maybe a good primer the skin can be smoothened?Quote:
Originally Posted by Eclecticos
It has been a while since the last update, but the good news is that the alien is 99% finished :D
I've been sanding down a lot to get the right shape into his shoulders. Too bad i dropped my airbrush, so i have to wait for some spare parts before i can start painting.
While bondo'ing
After sanding.
This was the hardest point, still there are some tiny gaps/holes, but the paint will fill them, or i might sand them away later this week.
In the meanwhile i received a lot of hardware from sponsors:
Very attractive memory from Corsair, i decided to go for 4GB because Vista and Adobe Lightroom both loves Gig's
For the time being i'm using it in my normal system, so i can use the previously installed hardware to measure the alien's case.
The Motherbord is sponsored by ECS and Videocard by sapphire. I received more, but that's for another upcoming casemod ;)
And also a great new tool:
I've been thinking a long time if i did better choose this one or a x-y table for a normall drilling station (we have 2 of them). But finally i went for this one, because it's specially designed for small and detailed work. I think he will be very usefull when making frontplates etc. with switches. They will be perfectly aligned.
Currently i'm looking for a set of steppers+controllers to make a CNC machine of it. imaging yourself nameplates, waterblocks etc. engraved and cutted by this thing ;) A upgrade would cost as much as the machine itself but well worth it, a standard CNC machine would still cost a lot more than that.
Nice hook up man!!! That memory looks hot! Very sweet! +REP
WTF,
I was checking out my topic to see if someone had replied on my update... But it seems that i've forgotten to click on the post reply button. So here it is again (but with a little shorter text):
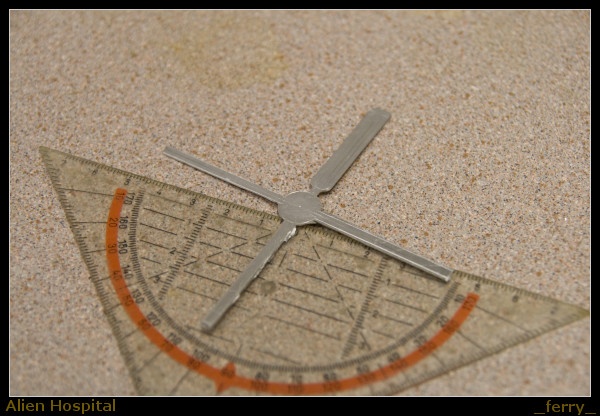
I Decided to start building a siccor, a real operation room needs operation tools offcourse, like siccors, tweezers, a sharp knife etc. It's also a good test to see how my proxxon tool works. And i have to waith for replacement parts for the airbrush anyway, and i should buy a sheet of aluminium to build the case itself.
First i dutted the rough shape, the inside of the handles were done with the proxxon mill. The rest was done with a electric saw. The material is 3mm aluminum from a old 19" front panel.
Size comparision
Another comparision. I copied the siccor at 50% and used that as a template. Note i removed some aluminium to make the blades of the siccor. That was the hardest part. The mill was working very slow (or i have the wrong bits), a dremel was inaccurate, and a sanding belt was going slow as well and made my fingers almost burn by the heat ;) But finally i combined it all, and i removed the aluminum.
After sanding and polishing.
The bolt is no the final one, but it was a taptite to create the treath. I'm shure i'll find a smaller one to replace this one. Total building time was +/- 5,5 hours. But it's worth the time.
I'l have to build them all anyway, but which one should be nr2? I was thinking about a knife or siccor, so i can try how the mill works when engraving.
What tool to build next? You can decide!
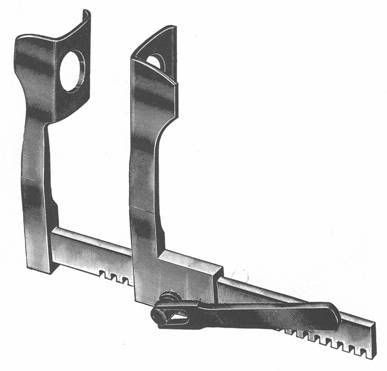
Damn ferry, those scissors look incredible!!! Now you need a rib spreader...
I agree, the Scissors Look Great!
Extraction Forcepts?
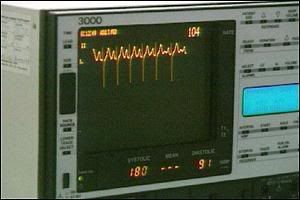
One of these would look good bedside...
Yes offcourse there should be display's, buttons, blinking led's etc. To make it look like a instrument. But then i need my aluminium sheet. So for now i first want to make the hand tools :)
sooo nice! I really like what I see. One of the best theme cases I've seen. Keep it up!
Yet another tool has been made, the tweezer:
We start with these 2 sides which will be glued together once finished. The one at the front had already some polishing.
After more polishing and gluing the 2 parts together. I don't think it's realy necessary to polish them to the max. It should look like RVS, not chrome. The case itself won't be shiny as well. It's the industrial look ;)
The engraving has been done with the proxxon. Offcourse, cause doing this by hand is impossible. The actual size is +/- 7CM
Both sides have a little difference in height, you can only see that at the point where they are glued together.....
...But once the glue was hardened i sanded the sides down and gave the rear edge a nice round finish.
Building time: 4 hours.
Next? I think 2 grips, 1 for organic stuff, and 1 for the metal screws as used in the alien's knee. After that i think i have enough skills and ideas to build a replacement leg, existing of aluminum and other sci-fi stuff.
Some images aren't showimg up man! I need to see them!! AHHHHHHH.
That's strange, i've got a good host, but they moved to a new data center today, maybe that's the problem. Well, i think they'll be fine within a few hours.
The pics are working fine on my computer. Oh and if a surgeon saw you call those "tweezers" he would scream at you "Those are foreceps!"
Some other cool instruments could be an antique syringe:
scalpels:
and of course, electrodes:
Thanks for the input! :)
I thought tweezers would bve right, because electro technicians use that word too afaik? Well, glad i'm not a surgeon. I noticed that i wrote scissor on the wrong way as well :P
Scalpel is important too yeah, i've forgotten to name it, but i have one at my work (very useful when repairing PCB's) and that made me think of maikng one.
Instead of electrodes i'm considering nails with fibers connected to it. Got that from a Matrix scene (where neo has just entered the matrix).
Syringe is a must have, ill make one :)
Quote:
Originally Posted by _ferry_
LOL great job. I love what youre doing. I also work in the medical field and get a kick out of some of the names people give to the instruments they use. What about a catheter? Easy to make with some tubing and run it into a artery! LOL
The syringe would look great. I think using antique medical tools on an alien body would give it a darker look.Quote:
Originally Posted by jdbnsn
you never cease to amaze me. Very nice work.
Agree, antique tools can look good.
Omg I Love The Scissors Man!!! Holy Shiznit They Are Cool!!!
Next part is the syringe:
A 0,5mm thin sheet of aluminum was used to cut this part out.
This is the level indicator, a small cutout with 5 lines.
After a lot of detailed sanding and some quick ploshing it looks like this.
Offcourse there must be a reservoir, it's made of a old CCFL tube. I glued a piece of 3mm acrylic on top of it. But i decided 3mm was too much, so i milled it off:
Now the end is much smaller, and the junction is hardly noticable after polishing.
And after folding the aluminum it looks like this.
The rough design of the grip.
And after polishing.
The indicator cut doesn't seems to be 100% straight, IRL it's hardly noticable (note that this thing is really small) But i'll try to sand it away. Shouldn't bee too difficult :)
Next thing to do is to build the thing i don't know the name for ;) I mean the rear part which you push into the syringe. But i need to find the right diameter(+/-3mm) of aluminum tube for that. I might have to buy some when buying aluminum for the case itself.
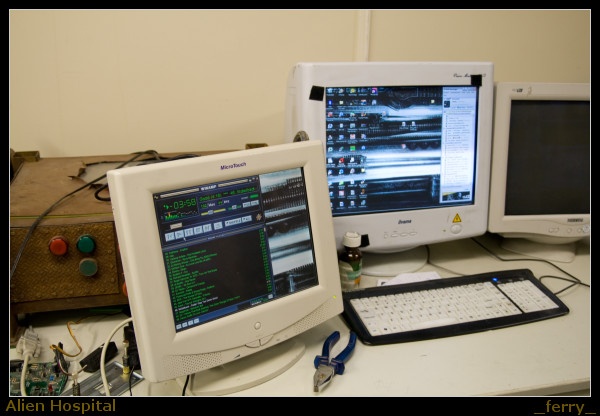
I bought this LCD recently, it's a 800x600 Touchscreen :D Should be very usefull for this project!
Dude, your the man. Straight up.
Cool.
As.
Hell.
-Dave
Only one word: f... !!!!!! :eek:
Quote:
Originally Posted by slytherock
what he said :fdotdotdot
....Ferry? ;) That's my name :PQuote:
Originally Posted by slytherock
_ferry_ , Good work :) . Yeah, your a dutch guy :P LOL . What I patience, I like this project. Hm, to bad I can't follow it at any other forums. Dutch ones for example. Anyway, this is my first post here, I like this forum. It's cool, lot's of good mods. Including this one ;) . Not sure if I'll be posting my project here.
Keep going, that's all I can say!
Thanks!
The reason for not posting it anywhere els is is that is saves me a lot of time, no useless discussions about sponsors, n00b questions, and last but not least: People get bored in Holland when following a worklog for 2 years or so.
So that's why it's on TBCS :) Once i've made a lot of progress i'll post it somewhere else.
Tomorrow more progress on the thing above, if i can find some aluminum
PS: Just a led project in my room:
A illuminated desk, or whatever they'll call it in english.