Looking good....

Printable View
Looking good....
Damn man, I love that case! The green really looks different from anything I have ever seen before, and that is by NO means a bad thing. + Rep for trying something new!
Thanks mate. When I started this mod I kinda abandoned my ideas and adapted as I needed to, I am very happy with the progress. If you like this mod have a look at Xperiment's Project Reality, has given me quite a bit of inspiration.
Wow this case has really come on leaps and bounds from the last time I saw it. Some great uses of plexi - and of course a very nice colour theme ;)
Keep it up +rep
Thank you all for your +rep and comments, I think it is time for another update ;).
Well Guys it is now time for a....well a mini update I guess you could call it.
I didn't get any actual modding done today. I visited a mate that just got out of hospital, nasty burns, damn coolant. Before you ask it wasn't PC coolant, his car's radiator blew up in his face.
If you read back a few posts you will find that I am looking to add a 240mm radiator to my existent 120mm loop. I was intending to mount it on the under side of my case and was looking to get an Black Ice stealth 240mm but after starting a thread about this topic (Check post in "The Ice Box", "Pump and Radiator Question") I found that they drastically reduce the flow rate of the loop. I was recommended to use a Black Ice Xtreme 240 (my 120mm radiator is also an Xtreme) and after some measurements this poses some problems. The thickness of a Black Ice Xtreme radiator is roughly 5.6cm, the distance from the stands to the base of my case is about 4.2cm. This immediately rules out using the Xtreme radiator, even if I mount the fans on the inside of the case. I may just end up going with the Stealth because the extra cooling will be worth the slight flow restriction in my books. The Black Ice Stealth is only 2.960cm thick so it will fit without any problems and I will just mount the fans on the inside of my case and lose the access of the last motherboard slot (3rd PCI-e slot, won't use it lol). The fans I was looking for this radiator are the Scythe Slip Stream 1200rpm fans pushing 68.54CFM at 24.0dBA.
Here is a link to the fans:
http://www.pccasegear.com.au/prod6026.htm
last Night I sent a few E-mails to some good PC retailers with regards to sponsorship. when I got home from school today I had received a response to my E-mail. The company in question admired my initiative in sending an email and after viewing my worklog greatly liked what I had already done. Sadly the business is a bit tied up at the moment and physically can not provide any assistance for me at the moment but they said they had saved my E-mail and if their conditions change in the near future they would be able to offer assistance. I am still waiting on a response from my other E-mail.
Well that's it for tonight guys, tomorrow I will try to get some more plastic mounted or do a bit more mesh work. I have exams next week so I really should be studying but that's what school is for ;). Until then...
Happy Modding.
I am using the Black Ice GT Stealth II and have had no problems whatsoever with it. Also flow rate seems more than acceptable, given there is quite a large whirlpool in my res :)
I also have it mounted the exact same way, and the 'thinness' of the rad itself was of great help allowing the rad and fans to both be mounted inside the case. The only drawback I have found from this mounting position is that it acts as a 240mm hoover sucking in a large amount of dust from the desk area. That's nothing a quick clean once every 2 weeks doesn't fix.
But going by my experience with the Stealth I would definately recommend it as a mid range radiator, with its main benefit being the compact size and very high build quality.
Hope you have the same joy with it as I have had.
Thanks for your input, I noticed that you had your fans sucking from the bottom of the case. If I end up going down this road I would mount the fans so they suck air from the inside of the case and blow it through the radiator and out the bottom of the case. This will allow my other radiator to draw in a minimal amount of hot air and also keep my other components cooler.
Fans should always be mounted so that they suck air through the radiator, not blow air onto it. Also the air inside your case is going to be hotter than that outside the case, so sucking air from inside your case through your rad will perform less well than usin the cool air outside.
Thats why I mounted mine the way round I did, get the coldest air moving across the rad, which is then removed straight out the back of the case.
I guess but you have a 120mm fan on your PSU plus the 120mm rear fan. I have a 80mm fan on my PSU and my rear 120mm fan has another radiator attached to it plus another 80mm fan on the top of the case. Hmmm, you do have a valid point, even on my 120mm radiator it is mounted on the outside of the case with a fan pushing air through it. I know what you are saying is true, this just sounded right at the time of the post lol, my mistake.
Although airflow matters, it isn't vital. Especially not with watercooling. Everyone with a good 240. rad of even more can cool his rig. What really matters is, that you have enough outtakes.
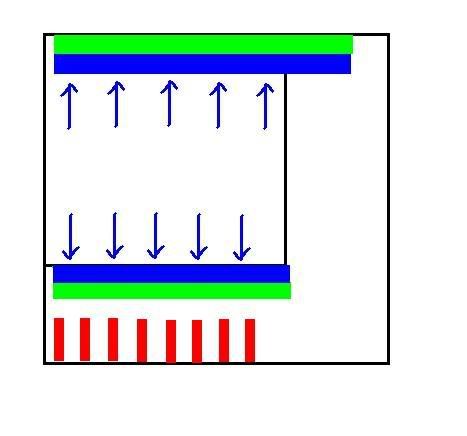
My case has 7 fans and the are all outtake. Here's a little sketch of it.
Green = radiator
Blue = fans
red = HD's
It hasn't any intake! Still I can run passive with my watercool setup. My E6300 never runs hotter than 33 gr. Celcious (?). Only with gaming I'll turn the fans on (Noctua's: Quiet and little airflow) and still then it won't run hot. And they suck up ''hot'' air from the mainboard area!
If I were you, I woulnd't be so worried ;) Same for the flow. If you have a good pump it can handle the resistance. That's were they are made for! You woulnd't buy a 8800ultra to play Age Of empires, right ;)
Good job on detail btw ;)
Thanks for the input. This is my first water cooled rig and I want to get it right the first time to save me trouble later. You and Xperiment both have valid points about fan placement but now after thinking about it I am leaning towards Xperiments rad set up. This also allows me to more effectively cool my RAM and Mosphet sinks on my 8800GTX.
Well guys I have decided to go for the Black Ice Stealth 240mm radiator with or without a sponsor, at only $95.00AUD it is cheaper than my 120mm Black Ice Xtreme.
Today I wanted to see if the radiator would actually fit in my case but first I had to re-attach the case feet back onto the case.
Pic of the re-attached case feet:
Next I drew up the exact measurements of the radiator on a sheet of paper and cut it out so I can use it as a template.
Pic of the template:
I know the template looks a bit big but this is the exact dimensions, the fans I drew on are a bit small and throws you off a bit.
Fitting the template on the floor of the case:
As you can see the template fits with about a 1cm gap at the PCI slits which needs to stay there due to the way the case feet are mounted.
The template with a fan on it:
Two fans fit comfortably in this space but this may lead to another problem that I will elaborate a bit more on in a minute.
The only downside of mounting the fans like this is as follows:
The pump doesn't fit where I intended to mount it. Damn you say? I say challenge ;).
Here is my solution.
I will make a small platform out of the plexi that the pump will sit on, this elevates it off the case floor and above those fans.
Here is a mock up I did quickly with some scrap plexi I had:
That's not all of my problems though lol.
Take a look at this pic:
This is a pic of the rear case feet. See the curve of the plastic? This may make mounting the radiator a bit more difficult. It actually won't fit unless I cut part of the feet away. This will also mean strengthening what is left of the plastic case feet because this computer will be heavy once the water loop is filled and the hardware is installed. That's all for now guys, I have to work tomorrow after school and Friday I have a driving lesson (woohoo almost have my license) so probably no update until Saturday night or Sunday. Until then...
Happy Modding.
Make new custom feets! Stronger and they will fit the case even better then. I like it how you put everything in such a little space.
I want to keep the feet because it keeps with the contour of the original design. If you have a look at a LEXA side on the front and rear molding curves so it is "perfectly symmetrical", this includes the case feet. If I remove or destroy the original feet the case just wouldn't look right.
here is a pic of what I mean:
http://images.google.com.au/imgres?i...3Doff%26sa%3DG
This makes it easier to understand what I am saying lol.
I can sympathise with the problems you are having. I had to cross the exact same obsicle fitting mine. In the end I made my own feet for the case.
Here is how my rad fitted in, and Here is how the feet ended up.
EDIT: Posted at the same time! - Ahh I see what you mean with the feet and how they fit in with the case shape. Hmm not really an option to remove then. Is there no room to move the rad away from them by a few mm?
I would mount my rad the same way but it means I will lose access to 2 PCI slots which I don't want to do. I don't mind losing access to one (3rd PCI-E slot) but the slot above that is a standard PCI slot (I only have 2which I can really use due to water cooling). Those case feet look awesome mate, haven't seen them yet lol.
Thats the main problem, loosing expansion slots. I have had to loose 1 x PCI-E and 2 x PCI slots in order to get the rad in.
Would it be possible to mount the rad underneath the case with only the fans inside so you only loose 1 (if that) expansion slot. Then make a kind of stand to hide the rad and raise it off the ground. Could look kinda cool.
I always intended to mount the radiator on the underside of the case with the fans inside (minimal loss of expansion slots).Quote:
Originally Posted by Xperiment
As for moving the res forward, that's impossible. If I move it forward I will be going under the HDD bays with the barbs and I don't want to hack that up nor do I want the barbs coming up right in front of the expansion slots. I will have to take about a half inch of plastic away from the rear case feet so the radiator will slip in between them rather than the feet needing to be replaced. The only down side to this is the lack of strength in the case feet but that's nothing some metal strip can't take care of.
Well guys I hopefully intend to order my radiator over the weekend so I can hopefully have it installed by next weekend. I also need to buy two more fans and fan grills plus dust traps and more cable sleeving.
Well guys a very minor update for this weekend. I have had a few problems which I will elaborate on later this post.
Well I have finally rebuilt the front of the case after fixing up the majority of the cabling a few months back. everything went back together as it should and it all works great, looks cool with the cable sleeving also ;).
Here is a pic of the assembled case front:
And here is the rear of it with as much cable sleeved as I can:
Ok so now on to my problem.
The rear of the NZXT LEXA has a plastic plate which looks like this:
This plastic plate is meant to make the rear of the case perfectly symmetrical with the front case fascia. Due to the way I have mounted my radiator the plate doesn't fit as it should.
Pic:
As you can see in this picture one of the support bars is in the way of the radiator.
This is your problem you say! Oh no no no, this is a simple problem to rectify, my problem lies with my tools.
I measured and marked what parts of this plastic plate needed to be cut:
I then proceeded to go to the shed to cut of the troublesome support bar with a cutting disk and my Sontax rotary tool. I power up the tool and nothing happens. Hmm, I check that the power at the socket in on and try again, still nothing. I try spinning the cutting disk with my fingers and it bursts into life but only for a second before I smell this weird smell and the rpm's of the tool gradually drop to nothing. I tried everything to get this crappy thing working again. I blew out the vents with the air compressor, this made it better but it still died eventually.
So it looks like I have to go see if I can go get it replaced under warranty but I doubt that. Dad being the efficient man he is sent the receipt to the tax agency along with other stuff so he could get his tax return tallied. This a real problem because this thing didn't come with any warranty slip so looks like I am stuck. I can't do any work on the case with out this tool so the mod will be on hold for a while. Unless the place I bought it from will swap it for a genuine Dremel ;), but I highly doubt this :(.
There is some good news in this though. I have ordered my HWLabs Black Ice GT Stealth along with another 2 metres of tubing and should have them by the end of the week. I'll keep you guys posted. Until then...
Happy Modding.
Bad news :( But I'm sure you'll fix it! In the meantime you can do other things.
Well in the mean time the only thing I can do is some cable sleeving, which I don't want to do just yet cos I want to see how all the plastic panels fit in the case first. I could try a hack saw on that plastic but my guess is that it will warp and snap, safer bet is to wait for a replacement rotary tool.
I got a confirmation E-mail regarding the status of my radiator and tubing, they received my order and will ship anytime tomorrow after they receive payment. God bless Visa lol.
Well bad news guys. Firstly the place I ordered the radiator hasn't responded to my payment so I need to give them a call and see what's up. Secondly the place I brought my Dremel knock off from won't replace it due to them not stocking them any more and the fact I don't have a receipt. The receipt would have cost $120AUD to get back from the tax accountant. There is good news now though;). Dad brought me a brand new genuine Dremel 300 series and I also had my last exam today so I intend to spend tomorrow modding :).
Now it's time for pics of my new toy ;).
Here is the nice a new box:
Here is the case, the blue box on the side holds the accessories:
A close up of the box, not a lot in it but I have all of the attachments from my broken knock off:
And finally here is the Dremel 300:
A close up shot:
I hope to get a lot of work done tomorrow guys, in between my driving lesson. Until then...
Happy Modding.
Nice one! for accesoires I always go to the cheap shops. Sometimes they have those boxes with loads of accesoires for only €5,- or something like that. Quality is good enough.
Yeah the Dremel stuff is really expensive. I am just using the stuff from my broken knock off.
Hope you did well on your tests...I agree, use a real Dremel tool and cheap attachments...(It has worked for me )
Thanks mate, so do I.Quote:
Originally Posted by Darth Dad
Well guys I have a driving lesson in just under an hour so when I get home it's modding time.
Ok guys, a small update of what I did today.
Lets rewind a bit. You remember the rear plastic plate of the case?
Well Today I cut it to accommodate my radiator:
Here it is installed:
And a side view:
Perfect fit, will look even better without the finger prints ;)
Well that's all for now, may have an update tomorrow. Until then...
Happy Modding.
nice.... ill wish for a dremel for christmas too:D
They are great things Dremels but make sure you don't make the same mistake I did, knock offs are crap, it's a genuine Dremel or it's nuthn.
A small update on my 240mm radiator. I called the retailer today but couldn't get through. I will try again tomorrow.
Ok time for a picture update. Officially all oh my schooling for this year has finished so after school I got right into modding.
I started by removing my plastic panels and dismantled my drive bays.
Here is a picture of the process.
Un-riveted:
Dismantled:
From here I removed the front intake fan housing because I needed to do a bit of work on it.
Here is the removed housing:
Due to me using a 3-pin power header on this fan I decided to drill a hole in the housing to make the routing of the cables easier.
Here is the fan (just a stock Cooler Master one my friend gave me):
And because I had some rubber grommets laying around I thought I may use one.
Pic of the housing and grommet:
Now to find the correct drill bit. This one fits perfectly on the inside of the grommet so I will use this as a base and step up the bit size if need be.
Pic of the drill bit and grommet:
Hole drilled (I needed to go a few bits larger for the correct hole size):
Grommet installed, perfect fit:
Now to have a look with the fan installed:
Fits perfectly and makes cable routing just a little bit easier.
On to the painting.
First coat of primer:
And the final coat of black with the grommet installed:
Looks pretty good if I don't say so myself.
That's it for today, with this part of the case dismantled I can finally finish the rest of my plastic mounting, tomorrow perhaps. Until then...
Happy Modding.
Well guys I am having a hell of a time trying to contact the place that sells the HW Labs radiators here in Australia. Every time I call the phone just rings out and they aren't returning my emails. I figure they may be on holidays or moving store, they may even have closed down.
Well enough of the sad stuff, on to the modding :).
I completed my disk drive cover today and I am quite proud of how it turned out, nothing went wrong haha.
Here is the piece of plastic I started with, I had already cut it to size and just had to add indents for rivets and extrusions on the case.
Here is a pic:
Same piece of plastic but with the protective plastic removed:
Pay no attention to the top left corner of the plexi, I slipped with the Dremel but it's ok, this part is covered by the top of the case anyway.
Now installed on to the window side of the drive bays:
It fits perfectly.
Now here is the support bar:
Plenty of room.
While I was doing this I also drilled a hole for the HDD thermal sensor and of course it isn't complete with out a nice rubber grommet.
Here is the hole (middle top, under the slit):
And now with the grommet installed:
Now doesn't that look much better.
Well that's all for now. I needed to keep myself occupied today, I have my driving test tomorrow and I am a bit nervous lol. Hopefully tomorrow arvo I can get the window side floppy bay cover installed. Until then...
Happy Modding.
looking good!:D
Great work, looks much better than bare metal.
Good luck with the driving test :)
Thanks mate. The test is at 8am so I gotta get up early lol. Hope I pass though.
Should be no problem if you are just as good as with modding ;)
Thanks all. I have half an hour until my test so wish me luck :).
good luck? hope ya did good sorry bout the late good luck :P like the case so far. :)
Well the good news is I passed yay lol, got 91% out of a needed 80%. I did some more work today and have taken more pics but I won't upload them until tomorrow.