Thanks blue, working the next update!

Printable View
Thanks blue, working the next update!
I'm going to try to hard silver solder the blocks together. Two problems with that. I need about 1400F to hard solder which is near the melting temp of brass and well beyond annealing temperature. To test if it's even possible to do this, a little trial run is in order.
Here's the brass and copper pieces with cutouts of solver solder. Note the breaks in two of the solder pieces.
Here's the "sandwich" test block assembled. The pins are there to keep the pieces from sliding around under pressure.
I said that there were two problems. The second is how to keep the layers in place and under consistent pressure.
These are clamping plates made from 1/4" steel plate.
The bow in the plates is real and caused by the the screws.
30 PSI propane burner for seafood boils.
Clamped block in places and soldering underway
The solder melts at 1280 F and flows at 1370 F.
Steel glows dull red at about 1250 F and orange at 1400F+. It took about 15 mintues to get to this point.
After the plates were pulled apart, the pattern is from flux boiling out of the block.
The top piece coppery color is due to the zinc and copper beginning to separate in the brass.
Very ugly looking
You still can see and feel the edges of the silver. Interesting as they should have melted and flowed if temperature peaked above 1400F.
A quick trip to the disc sander.
The annealing that I was worried about doesn't seem to be a problem.
The threads held up ok too. Interestingly the copper at the bottom is coated in what looks to be brass but nothing appears melted.
You can see the solder layers. Note the two dark spots in the middle of solder layer 1 and 2. I believe these are the splits in the solder.
Not sure what the dark line in left corner of solder layer 3 is.
My fear was that I was going to melt the brass or anneal it to the point of softening the threads. This did not happen. The block appears to be solid; although I don't believe the solder flowed. This week, I'll test it under water to see if it holds pressure.
Pressure test success or no, I learned enough to try this for real on the sand blasted block from the last update...with a few tweaks that is. A few more heat bricks would help to hold in the heat. Longer time at higher temperatures would likely help too. More on the pressure test later.
Thanks for looking and many thanks to my sponsors!
Bitspower
Galaxy
HardwareLabs
Thats sweet! I love this worklog. I learn new things every time you post! you are a mod god! :D
Dear God, Mach. There you go again. Over the top, just where you seem to like it. :D
The men in the white coats should be arriving at your door any time, but don't worry too much. They tell me they have classes in glassblowing at the... hospital.
Awesome! One thing I would worry about though would be any solder or flux leakage into the inner chamber when you do the actual waterblock. Though, I guess if it didn't leak into the hole in this one, that might not be an issue...
In any case, awesome work! It's always fun to see what crazy new stuff you'll try. :D
this is getting ridiculous... will you adopt me and teach me the ways of the jedi?
Thanks! I am saving this post for my girlfriend as proof that my OCD is educational. Next time I can answer the question "What are you doing now?" with the answer "Teaching, teaching." as I drag the compressor across the yard. She would definitely disagree with you on my deity status tho. :)Quote:
Originally Posted by billygoat333
:) I'm a firm believer in the idea that you don't know where the lines are until your cross them. ;) Glass blowing? Hmmm, have I ever shown you my radioactive glass collection?Quote:
Originally Posted by blueonblack
8)
Thanks! Flux is a concern as are oxides. A "pickle" of peroxide and sulfuric acid should solve that tho. The solder will be ok as its primarily silver. Its been fun for me too.Quote:
Originally Posted by x88x
[jedi hand wave]This is not the hobby you are looking for.[/jedi hand wave] Sorry, the force is not so strong in this one. :) Glad you like it!Quote:
Originally Posted by diluzio91
I was rigging up something to pressure test but I went low tech with an aquarium pump up just to see what would happen.
Check this out:
That's a bubble out of the split in the silver pieces. Pretty cool huh? Lesson learned solid silver pieces and heat it hotter until the silver flows, not just fuses.
One of the nice things about hard soldering or brazing these things. Soft solder works very well.
Cleaned up
We'll see how it holds up to more pressure later.
Split sheets shouldn't be problem with this block but will be with the GPU block.
Nice work on fabricating your own blocks!
I think it will end up nice after some testing and experimenting. But sandblasting would might be better after sthe oldering? To prevent it from scratching and damaging.
I did some sandblasting too, my dad had a gun for it, and i made serveral engravings with it on acrylic and aluminum. Results are nicer than engraving on average, because lines are just as straight as you cut them (or get them cut by an machine) Also the surface is better, no engraving lines.
Obviously, soft-tape (isolation tape) is more resistant to the blasting procces than harder tapes (the transparents) were.
man mach, this is absolutely amazing work! great method to solder the blocks together! only thing i would worry about is cleaning them:P
+ rep for the godlike work!
Thanks ferry! After would be better. The existing etching will be sanded down and redone with some bigger equipment after soldering.Quote:
Originally Posted by _ferry_
Do you have a worklog for your sand blasting? Feel free to put up some pics here if not. Its a cool technique that I don't see used a lot.
Thanks pOPe! It shouldn't be too bad but finding out is half the fun. Thanks for the rep:up:Quote:
Originally Posted by p0Pe
Sorry, but i dont have in-progress pics of it. My setup is also a little bit different. The gun has a rubber cap, which should be placed agains the surface. Creating his own "sand-blast environment" +/- 1 square inch. Its made for spot repair on cars AFAIK. We have a large 150liter compressor, a easy job for him :)
But i do have final result pics online:
:up: Awesome work _ferry_ ! Nice to see some other examples.
Good goobley goo! 2K Games has apparently started another installment of their viral campaign for Something in the Sea. A group of folks over at the BioShock 2 forums received these letters in the mail. Their last installment was insane with puzzles, live meet-ups, and hand made swag delivered by bicycle couriers in 1940s costumes. What's this have to do with this mod other than the game? A good deal of the inspiration for the back story came from the viral campaign as well as the game.
Heheheh, awesome. I love when companies do cool stuff like this. :D
Me too. The last one was completely over the top. I cannot see how they're going to top that but it'll be fun to watch.
Oh yeah, almost forgot...
That'll do. No bubbles underwater either.
As someone once said, if first you don't succeed then get a bigger hammer.
After the 30th strike, I inspected the damage.
Amazingly the brass didn't crack but the copper started to crack right along that black line from earlier.
I wanted to break it apart but the metal, which was soft to start, is starting to harden and become brittle. So I'll leave it at that. This concludes our testing, onto the real thing.
Special thanks to my sponsors!
Bitspower
Galaxy
HardwareLabs
Congratulations on the successful testing. :up:
Strangely, your block seems have held up much better than the last thumb drive I used that test on. More testing is obviously required.
:) Obviously! I expect to hear about that thumb drive test.
Mach,
I've been extremely busy in the last few months and haven't had many chances to drop in to check on progress. Today I did, and whoa man, you never disappoint! I remember when I first saw your work as CobraMatic was coming along and thought to myself "who is this guy?", you continue to impress me my friend.
I was digging through my hard drive looking for a graphic for a work presentation and saw the old "mach" folder of video files and couldn't resist delving through some of the footage we worked on. I was most impressed with your final draft and you gave me way too much credit, that was all you bro and you know it! ;) I thought it might be cool to post up the version we used to tinker with "psycho" effects also.
Keep up the very impressive and inspiring work Mach!!!
Quote:
This was a teaser Mach and I were working on prior to the release of Bioshock 2 to drive a little "build-up" of energy in his worklog. I never finished it which is why there is a long gap toward the end with no content. In the end, he completed a far better video to display his masterpiece of modding skills but this version displays some rather extreme visual effects we were tampering with when coming up with the mood of a doped up psychotic splicer. Enjoy!
Hey! Did you finally get some sleep? :) Nice to see you back.
Ahh the video prototype. Man, its such a cool rabbit hole to fall down. So many ideas! I may need to recycle the psycho effect. The intro is amazing. Thanks for posting this up! Thanks for the compliments and credit where credit is due, you pushing me was the only reason the video got made. :)
At the height of its human experimentation, the CIA operated with impunity. Particularly disturbing were the experiments of a Dr Yi Suchong. Suchong defected from China through a bizarre series of events in which a CIA agent, GH White, staged Suchong's death during an interrogation. Even more bizarre or brazen, Suchong (apparently suffering no ill effects from his untimely death) was employed by the CIA only months later.
-----
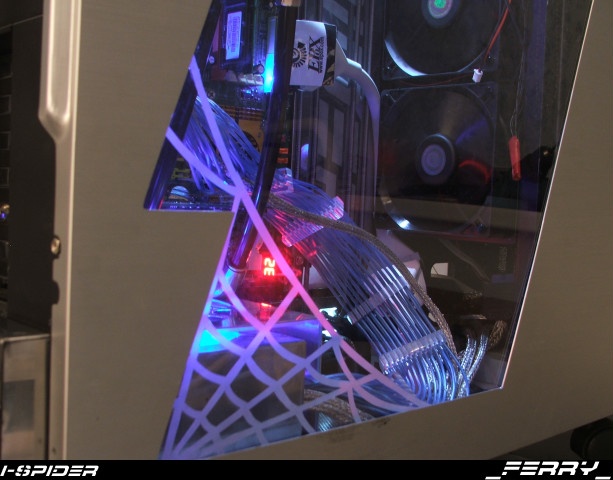
Someone, x88x I believe, pointed out that a UV led would look good in the flow indicator.
A Bitspower G1/4 acrylic plug would do the trick
but where I need to mount it is not wide enough.
Indicator dismantled
Brass adapter plate
Soldered in place
Drilled, tapped and filled
I took the opportunity to replace the orange rotor with a black one.
Lit up
Now for part II of the layer block, the real thing :)
Fluxed and clamped up.
Picked up some fire bricks to maintain the heat
At temperature looks good (probe temp)
Thermocouple through one of the bricks
Look at the paint burn. The gas burner did not like the fire bricks. Note how the steel is off center.
Cleaned up well. Unfortunately, it leaks like a sieve.
What happened? Several things. I don't think that 1/4" plate is thick enough. Look at the bow in the image above. It wasn't clamped flat. I'm guessing that only half got to adequate temperature due to it being off center on the burner. I also didn't allow it to get hot enough.
The small block was a good test but the larger blocks may be a different beast, requiring rivets to work instead of clamping alone.
Lastly, I rushed it and got sloppy. Back to the drawing board.
Many thanks to my sponsors!
Bitspower
Galaxy
HardwareLabs
As I see this one step ahead. but 3 steps back but an huge learning step, and I love what you have done with your flow indicator.
The weather is Improving fast now so I should be back in my workshop. instead of stalking you.
Thanks Cheron! It is a huge learning but that's what keeps me going. Someone at Bit-tech linked to Mokume-Gane. Amazing stuff that says it can be done if I'm persistent.Quote:
Originally Posted by Cheron
Edit: Going to try it again stay tuned. I've got a date with an oxy-acetylene torch.
No flex here. Those are 1" steel blocks.
While Barsarkar-gang is still very much on, things have been moving slowly. Although I don't have much to show, you might enjoy seeing this.
I'm taking a community college course in jewelery making in part to understand how mokume-gane is made. Its so similar to the fired water blocks that it kinda warrants some investigation.
I'm also trying to learn how to turn these into something.
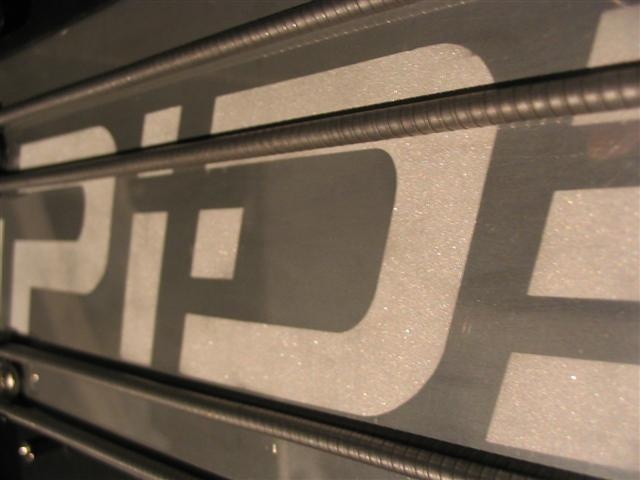
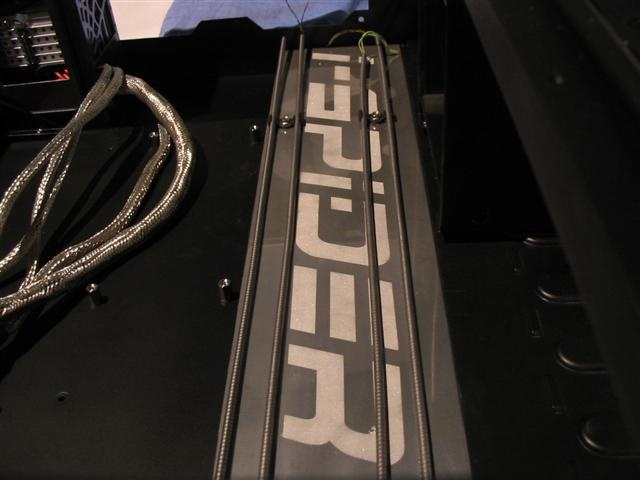
Those are laser cut brass pieces for the on off switch. Take a look at the base of the case in this render
It's the Bioshock 2 logo done in brass.
I've just started soldering the cityscape pieces together when I can steal the time. Most of the pieces are just set in place but it should give you an idea of just how fine a job that Vintage Laser did. My soldering job? Not so much. :) I've got some serious cleanup to do.
Unfortunately, I need a better magnifying glass as my eyes aren't what they used to be. Yup, that's small. Now you can see why I needed the jewelery training. ;)
That's about all I've got for now. I'm going to swamped at work for the next month so there won't be much progress but I'll be back soon with more. Thanks for watching!
Many thanks to my sponsors!
Bitspower
Galaxy
HardwareLabs
I love the brass logo! I suppose the quality of your soldering depends on the look you're going for here. Is this to be before the fall of Rapture (shiny and new, possibly burnished) or after (old-looking in various ways)? If the latter your soldering could actually add to the effect.
Edit: Your "shoddy" soldering put my best work to shame, by the way.
I love your soldering and I know what you talk about with those small pieces. I myself make Transformers (the electric part not the toys) and our customs can be very small.
I like the logo and good luck on the cleaning up.
Also good luck on your work. I am in about the same situation our national train company decided that all train transformers need replacing this year and that is a hell of an extra load on our daily job.
Thumbs up.
Thanks blue! After the fall but I've got some plans for patina so I need it as clean as I can get it.Quote:
Originally Posted by blueonblack
Thanks Cheron! Got pics of the transformers? I love the little fiddly bits that go in meters and electronics. They're like little magic boxes waiting to be taken apart.Quote:
Originally Posted by Cheron
Good luck with your work too. Its slightly inconvenient when work interrupts the fun no. :)
I would love to show some pictures.. but I only have pictures of the bigger ones (and those are mistakes I made, so it wont happen again)
Excellent work, Mach! I do so love mokune-game...
You have a bit more to read, and I have some pretties for you to look at-I think I just retook the craziest material ever from you. And if that doesn't, well, I may have the most expensive material ever as well...
Enough about me, though. This is amazing work (had to catch up, just got satellite installed) and I can't wait to see how it turns out!
;) Cheron
Thanks Kayin and regarding your unobtaniumQuote:
Originally Posted by Kayin
:) pics or it didn't happen :)
Quote:
Originally Posted by Mach
Of course you do. Undoubtedly some arcane formula centered around unicorn urine.
Lol...you don't know how close you are;)
0.0!
Mach, brilliant work mate.
I step out for a bit, and you step up the bar.
*j
Thanks Langer....here's your bar back ---------------- , feel free to move it up. :)
Hey all! I've been on a plane for the last month so only minor progress. Here's what I've got so far.
Remember the logo that I showed you last time?
Well its used to conceal a usb jack, the power switch, and a headphone jack.
I was most impressed with myself on drilling the hole for the hinge.
Still haven't mastered the art of hard soldering yet but getting there.
Here it is opened. Headphone jack on the left, power in the middle, usb on the right and a whole lot of sanding and filing left to do. Next up the letters and the cityscape. I'm back in town for the next few weeks so I hope to get back after it. Thanks for looking!
Many thanks to my sponsors!
Bitspower
Galaxy
HardwareLabs
:eek: Picks jaw up off floor.......
WOW!!!! Ummmmmmm....... ya, don't know what else to say.
Nice! That'll really look great once you get it sanded/etc (not that it looks bad now ;) ). Also, you hand-drilled the hinge hole? Wow. That's quite a feat getting that small and deep a hole that straight.
Dude, this mod gives me a boner.
/\ Thanks, Jon.
Thanks x88x, yeah it'll look much better when I'm done. The hole was drilled with a mini drill press but the bit was tiny.Quote:
Originally Posted by x88x
And what you really needed was some sleep :)Quote:
Originally Posted by jdbnsn
Thank you!Quote:
Originally Posted by msmrx57
I have some soldering tips, I'll post a how-to when I put my trumpet's braces together.