More programming, and adding the Q-touch sensor gives this as a result:
The PWM cyclus of the !-sign is not perfect, and there is no code to switch the PC off, but i'll add that later.... did enough for today 8)

Printable View
More programming, and adding the Q-touch sensor gives this as a result:
The PWM cyclus of the !-sign is not perfect, and there is no code to switch the PC off, but i'll add that later.... did enough for today 8)
this thin gis sooooooooooooooooooo coooooooooooool i want that circuit sooooooooo hard pleeeeeeeeeeaaaaaaaaasssssssssseeeeeeee
i think i can give you that +rep
You really, i mean, _really_ want a circuit? Because i don't have one, and in fact the circuit is quite simple, You should be able to program a microcontroller as well.
aye its ok i found em thanks anyways :)
lol mind possibly giving a parts list and where to find them? i'm new to electronics but would really love to build this.
Edit: Plus it would make my friends and family so jealous and awed by my POWER!! lol=P
Parts:
- PIC microcontroller 16f628
- PIC programmer, to write code and flash it into the PIC
- 10x BC547 NPN transistor
- couple of 1k resistors for current limiting/source/draining pins
- 4017 IC
- 7x +/- 470ohm resistors for the led's
- wires
- PCB
- 2 7x5 dot matrix displays
- quantum q-touch qt160 IC (6 buttons)
- 39pF condensator
Well, that's all i had to use for 1 button.
Build me a mod to keep my chin in place while I follow this thread. :D
lol thanks for the parts list. and greco, may i suggest duct tape?:p it really works. has for me.
i hate to hijack this awesome thread but does anyone know of a good site with schemaitcs for building stuff like this?
and +rep for _ferry_ coz this is soooo cool!
Ferry,... that us friggin cool man! I want to learn how to do that!!!
Some more light stuff:
Looks quite random right?
I'm having 2 weeks off from work, but still the time which is left for modding is little. I'll be visiting my sister, had minor other jobs to do etc. So 14 day's of which 3 i could spend on modding (this was day 2) :( And even then my dad ask giving him some help. :mad: I wish i could spend a full month on this mod, no-one asking or trying to frustrate me, just me and my garage.
waaaaaaaaaaaa more electronic stuff i want for my mod.. do have a circuit this time?..please?... if you give me those 2 (led dot matrix or whatever stuff) ill present you on my 19" tft ill take to the german casemod masters.. like commercials 4 ya....
a jeah sorry for highjacking but that thing is getting better and better..:eek:
i think i can give you a rep this time ;)
LOL :D
The problem is that i don't have a circuit dawning. It's build on the datasheets.
But do you have any PIC program skills? It's not just soldering and run it. You'll need to program a PIC in order to make it work.
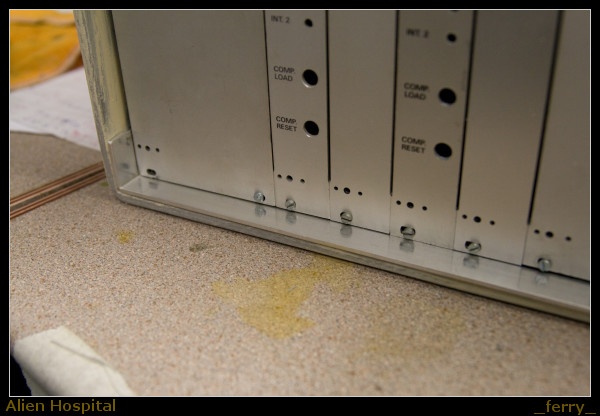
(the circuit is based on 6x 74HC595 shift registers, each module has 2 of them. The PIC sends 8 bits in order to switch 8 led's on and off. )
The box is not totally useless... I'll use it for my card reader, USB-DVD writer and a USB hub.
Cut a hole for the DVD and a rough cut to fit the CF card.
After some more dremel and file work
And the SD card slot has been cut as well. I wanted a cover for the DVD to stealth him, including the holes for flash cards as well. A torch helped me a lot with finding the place to cut.
Done :)
I'm thinking about using it as a identification plate. Engraving the name, serial number, building year etc. Any suggestions? How shall we call this box with led's and monitor? "Intelligent Repair Unit"? In fact i don't know the date of birth since the case is not finished. Shall i wait until the case is done?
Around the edge i'll fit such a strip of aluminium, i'll polish it offcourse ;)
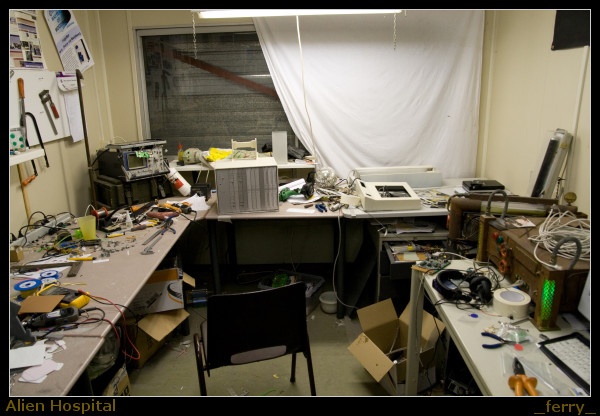
Need to clean up my garage :(
Good news, i finally received the airbrush spare parts. He'd cost me 50, these 2 parts cost me 30 :think:
Want to work on so many things at the same time, don't know where to start... Finishing the alien, adding the last led's to the front, painting the case, creating the identification plate, build more medical tools etc. etc. And my vacation is already over :devious: :( :mad:
first off
BAD idea buying airbrush things @conrad, its a german electronic store, i have one around here, example
11 ultra bright LED's (yellow) 11€!!!! other webshops sell those for like ~3, so take a look on the internet before buying things there, its way to expensive :rolleyes:
so single letters would be awsome*thinks* F.U.C.L.T.T.B.:
ferrys ultra cool thing that blinks :D :D
maybe not engraving the plate but press letters in there (like those dogtags they have in the american army)
Jeah, but it was the cheapest airbrush i could find around. Most of them start at 100€, it's my own stupid fault, i was cleaning the airbrush and then it felt on the ground. Offcourse with the tip pointing downwards :(
I know they're expensive, but most of my electronics (microcontrollers, switches, IC's, and especially led's, are shipped from china, very cheap :D
Pressing the letters would might bend the plastic, and engraving could have similair looks when using the right mill (little round one)
Googled:
This looks nice :) That's an option as well, cutting out the letters to raise them :)
maybe you make them out of copper and solder them on a copper plate, that would give a nice weld seam on the edges n sides
Letters must be quite small, so cutting and soldering them is not a real option.
But i'll keep that idea in mind for the main case itself, since that one will have a metal look and will be made of metal due to the weight of the hardware. Shure it 'll fit that theme. This part has more plastic look. :P
Great progress Ferry. Wish I was as good with electronics as you are. Great stuff.
Thanks, wish i had your polyester skills hehe, that would have saved me a lot of work with the alien body ;)
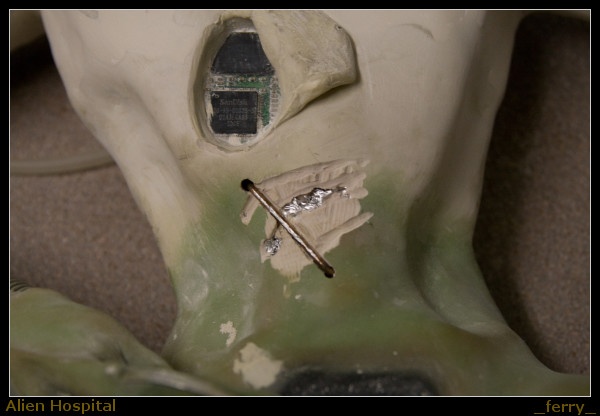
I'm planning to start painting the last body parts of the alien, but there was 1 small problem: A crack in his stomach :(
So i took the dremel, removed some skin around the crack, made a reinforcement and filled it up with bondo:
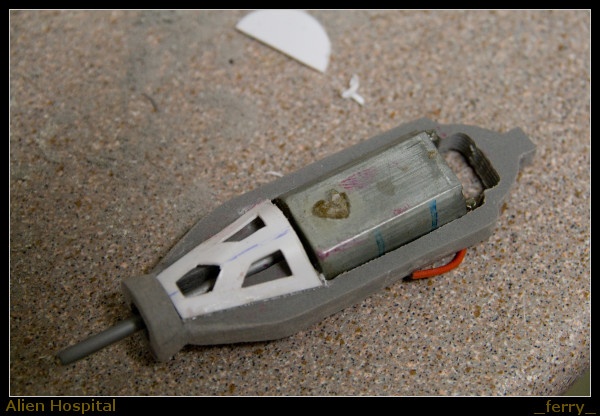
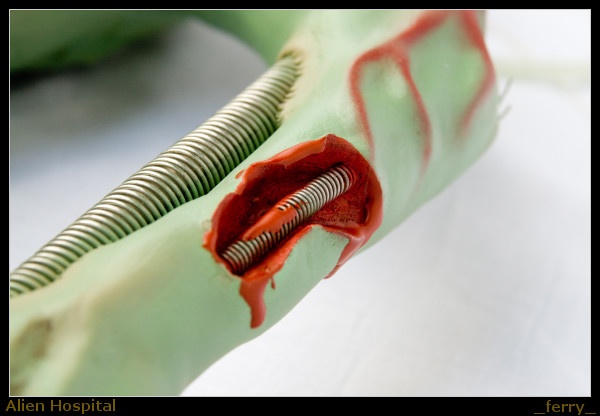
I was thinking about another surgery tool:
I need to make some more progress before I'm sure if this is what i want, but i think it's ok.
I'll paint the motor black, and add some blank metal mesh over it, plastic will be painted black, And maybe some other metal details.
I hope you''ll get your worst nightmare ever after reading this update:
I've been airbrushing the whole day to get his body finished. There are some minor steps left (clear coat, removing dust from his head, a few more coloring around the wounds, bla bla bla) But i don't thing you guys care about that. So here's the restof the pictures i've made today:
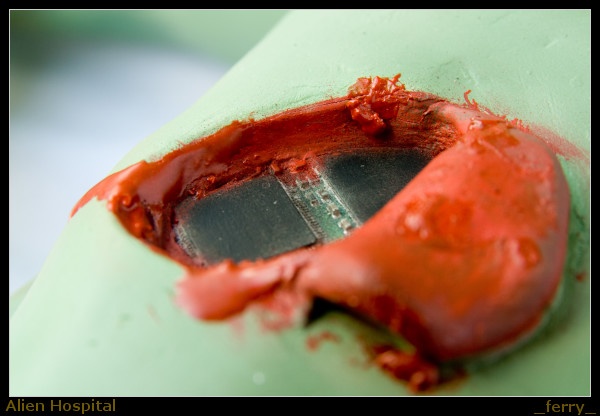
I improved the way blood does look like. Instead of using clearcoat mixed with red/brown paint i replaced the clearcoat with epoxy. This gives a more realistic look, IRL it's just like the blood drips are still liquid.
great one ferry.. explain me what the hell is should say tomorrow in school when i fall into sleep and wake up screaming every time?
That you've seen a alien? :rolleyes:
That's my mom!:banana: lol jk, I always make fun of her and she knows I'm doing it in good fun.
Lol, that aliens not scary! It's sexy!:p
I think the green should've been darker and more slimy but that looks good too
Too late for that right now :P But well, FYI: The case will basically be made of brushed aluminium, and the monitor case will be black with some brushed alu details.
looks good mate, i like the way you did the wet paint look for blood
Those alien doctors have seriously got their work cut out for them. I'm totally in love with this project.
-Dave
Dude,.... I dont think he's going to make it. God Job dude:) Yes,... I said god.
Hehe thanks. Well, if the alien isn't going to make it we could always rename the casemod to "alien autopsy" ;) Let's see if i can make some progress today with building a prothese leg made out of aluminium.
well well, finally I took the step to register at TBCS and one logical thing to do after that is to compliment your great work with a big +rep!
You're right, it's great ;) I've just been waiting for an update :(
Good thing! (to register yourself ;) ) Thanks, good to see your new project at TBCS as well, i'm sure the result is going to be great.Quote:
Originally Posted by floriske.nl
Me too,Quote:
You're right, it's great I've just been waiting for an update
But I'm damn to busy at work, each week i work +/-60 hours In the middle of dirt, cold and heat and it takes 4 hours drinving each day.
It's breaking me up :( When i arrive at home i'm watching my list of daily websites, take a shower and go to bed. Really annoying to work this way.
But december will be a modding month i guess since i told my chief i'm not going to that %&^%^%$ project back in december.
Can imagine that you don't have the energy to get started with the modding. I will be looking forward to december :) If you get even half the amount of results as tribaloverkills' month off, the amount of work done will be massive:DQuote:
Originally Posted by _ferry_
Holy crap nice work, lovely detail. +Rep
Hmm, i had some time left today for modding, but i could have spend it more usefull....
The monitor was already sprayed black since a few weeks. It had a nice smooth finish because i applied 7 thin layers and after each layer i sanded it with k600.
Today i thought it would be nice to have a dark green heartbeat line across the display housing to break the black color.
But then, i removed the masking tape, and the black coat came off. I tried to fix it by smoothen it with sanding, but no, it ain't gonna look good this way.
If it's ^&*%-up i could test a white line with the airbrush anyway. Next to it there has a lot of coat ripped off when i removed the masking tape.
So i sanded all the coat around the 'accident zone' away with k180. Next thing to do is smoothen it with k250 and higher before i can start the painting procces again.
Conclusion:
- Primer doesn't hold on smooth, unsanded, plastic
- Paint holds up well on the sanded edges of the case
- next time: sand all the plastic
Don't think i will add the green line after i'm done with fixing this ;)
Ouch, i would have thrown it in the bin.
Ouch, that hurts!
But, one thing I learned from setbacks like this: "The result eventually only gets better!"
Have you tried the blue painters tape. I know the adhesive on the painters tape is less aggressive than regular masking tape.