No, i haven't tried it.
I'll try to order it when buying stuff at the airbrush shop.
I have some airbrush foil as well, i could have used that as well.
Well, in fact it was the paint, not the tape, since the paint held well on other projects.

Printable View
No, i haven't tried it.
I'll try to order it when buying stuff at the airbrush shop.
I have some airbrush foil as well, i could have used that as well.
Well, in fact it was the paint, not the tape, since the paint held well on other projects.
Kick ;)
Case is painted now, working on the 4 touch sensitive display button's. But they work like hell :(
A single button was working fine, as i showed in a movie. But with 4 of them i'm getting too much inference, and they can hardly detect my finger.
So i'm planning some re-design on the q-touch circuit after reading the application notes. Like a separate power supply, shielding, keeping the wires away from the leds and 40x 10nF GND coupling capacitors on the common lines of the led's if necessary since led's can give some induction as well. Also some experiments with different sensor's. I might mill a hole in the acrylic to put a sensor in, instead of a sensor around the led's (which is further away from my finger)
I thought it would be easy Hehe :P Since 1 button was working fine. Well, i think it's worth the result.
Okay, here are the pics from yesterday. Haven't made a lot of progress today, since i lost some parts i needed to rebuild the touch sensors. But i ordered them. Thanks to AC Ryan i hope to receive the aluminum for the main case soon! The base 'll be anodized black, with a RVS or aluminum operation desk. Actually i'm looking for metal plates which has been circular brushed/polished:
Oh well, the case:
I polished 4 aluminum strips, to finish the edges of this case.
Test-fit.
Rear side of the case. I gave the grills a slightly weathered look. I decided to not giving it a fake-metal look, since fake metal with real metal will look bad.
Mount of the lcd to the base. When releasing the small screw i'm able to adjust the angle of the lcd panel.
Close up, a gray base with some red and black tints.
Front panel
Getting started with the other 2 LED displays.
Done, including a test-fit-sheet made of styrene.
Test fit. Looks cool right? (even when 3 are facing upside down ;) )
Milling the aluminum frame/shield. Lines are for reference, i milled it by calculating the length of each line including the mill diameter
I kept some connections to keep his strength while milling. i had to sand the edges anyway. Looks how straight, could have been lasercutted hehe. Imaging yourself trying to do it by hand, to get a straight looking front panel...
And even the handcutted front panel fits fine.
The fit exactly in the holes i´ve made, so they won´t fall out themselves :) But it's not only a mounting frame, it should protect the q-touch sensor area against EMI/conductivity from the microcontrollers and LCD panel. Since i had some trouble with fals triggering. But i'm working on that right now.
Together with his PCB.
Dude, that looks so cool! I can't believe what you've done with some of these ideas.
Way cool work. I can't wait to see the whole thing in action!!
The leds look really cool, I hope you get them to work :) I really want to see this project when you finished it, so I hope you will be on a NKCM or tBCL or something then :p
Thanks
The led's are working fine, i can show any symbol i want to. But the buttons are the problem. Well, it should be possible to get them working. I've ordered various capacitors to adjust their sensitivity. Hope to show this pc too, don't know if i'm going to finish it in 2008.
Congrats with the frontpage article, you deserve it :)
.Maleficus published and article for you on the front page! :)
Noticed that! Very nice :D nice picture too.
Buttons seem to work fine by now.
I made a new button panel, divorced the q-touch circuit from the display circuit (with his own power supply, to filter voltage spikes) and mounted it in the display.
He can even register my finger when having it 1-2cm above the sensor itself, so i can tweak that with other capacitors. Because they should only switch when really touching them. Once i fit the leds sensitivity could change.
The new buttons. I routed some acrylic away between the buttons to fit the metal wire.
A view from the other side
What's that?
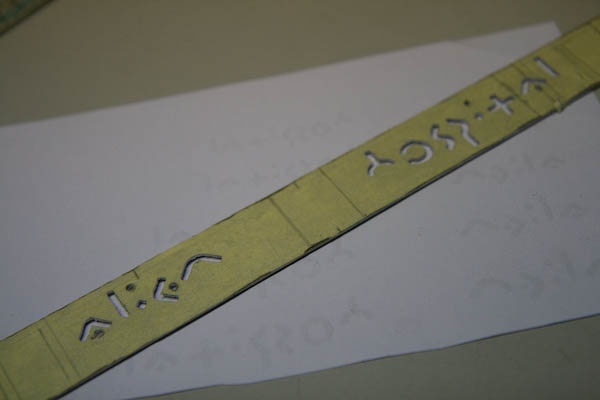
It was the rough cut for this part. A small acrylic strip, which can light up :) Good for details :smoker:
Now with the tape removed.
Getting the displays ready to be painted :) (black, to make them less visible)
The DVD/cardreader bezel.
Next things:
- painting the displays
- mounting them
- programming their functions (they share the same program/symbols ATM)
- mounting the LCD panel
- figure out which connections should be made from the PC to this case (USB, power, various power/data signals etc. So i can order cables & connectors for it.)
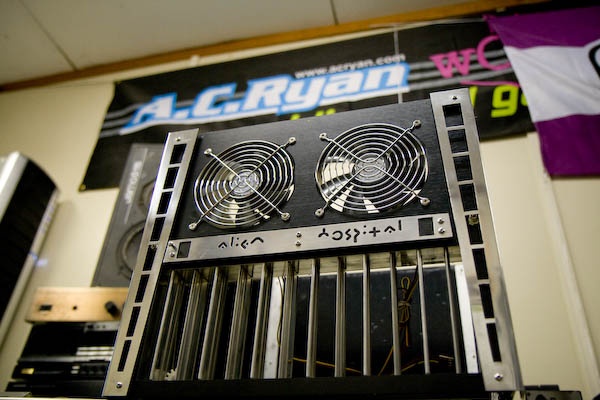
Ahhh, picked up some hardware at cooler master yesterday, and i can't resist showing it, since i;m so happy with it 8)
Freaking 1000watts of modulair power :eek: Overkill in fact, but who cares :D Will be used in this mod offcourse.
Oh, and the case I've been following since his first prototype:
The cosmos. Currently in the state of light dissemble and creating ideas for it.
I have to admit: I've never visited digg.com, so i just did. Its nice creating content by user input :) Just want to say that the updates from the last days are great (chatroom, awards etc. ) Thanks for that :)
If you are still looking for metal that has been engine turned (the circular pattern aluminum you were looking for), I can tell you how to make it on your own. Using your Proxxon micro-mill, you need to chuck up a piece of hard cylindrical rubber (or you can use a pencil with the eraser end down). The end that will come into contact with the metal should be flat (you can flatten it on your own by running it against a piece of sandpaper first if necessary). You then need to coat the rubber end that will contact the metal with valve grinding compound (you should be able to get this at any decent auto shop, or online). You then just run the rubber cylinder/eraser against the metal at around 100-200rpm (or whatever works and won't cause the rubber to spiral out of control and that won't spray valve grinding compound all over you and your shop). You then want to move your x-y table over by about 3/4s to 5/8ths the diameter of the rubber or eraser you are using. When you move down to your next row (by the same fraction of the diameter you were moving over on the horizontal), you will get a better pattern if you alternate the spirals so that they are staggered by the diameter of your tool (search for Engine Turning or Jeweling on google and you will find an image of how the pattern should look). If you have any questions, feel free to PM me and I'll help out where I can.
--BlaeceAelf (aka. Wintermute)
Thanks, that information is very usefull!
I havn't really been looking for it, i'm shure there are some shops where i can order it. Or else, i can try your way ;)
wow dude. i just looked and read through all 26 pages. it took an hour and a half.
best hour and a half i've had this week.
AMAZING mod.
and SICK parts dude.
I wish i could get sponsored for anything. haha
+rep!
Woah, i had some busy times. Offcourse i took a break to build the cosmod casemod. But even after that i was short in time. But past week i managed to spend some time on the power buttons. I mounted the displays beneath the touch buttons:
Mate those look fantastic. +rep for you
now thats just AWESOME _ferry_!
Those switches are so damn cool!!
you are a genius, pure and simple.
Very very cool. You combine your electronic skills with your designing skills. Great stuff.
thoose switches... man!... DAMN..... holy crap they look so awsome!!!! amazing skills!
can only give you 1*rep sadly! xD... cant wait to see the whole thing finished !
and that psu:P.. whuuuah
Even my wife who calls 3xNES the "nerd project" thought those were cool. +rep
Man, that is awesome. Are you going to make a tutorial on how you did those buttons? Maybe with a supply list? I think one of those will come in handy this summer.
I'll try to work something out for that. That will be "reverse" engineering, since i don't have real schemes for it :P Only some simple ones to know the stuff i usually forget.
Long time no see, but after some other projects (building a special bicycle, wooden toys for my sisters child, modding my bedroom etc.) I'm back on the alien :) Did +/- 20hours of work the past month, so i hope to serve a nice update this weekend.
insane my friend, +rep :D
i need to start reading... havent seen this one.
Fantastic news ferry. I can't wait to see more of this mod.
Welcome back man! :up: Long time no see.
I've been waiting for an update on this one for a while.
Can't wait to see what you have to show us.
Between this update and the previous one is a large gap of time, i know :D I worked on project Cosmod, and various other non-casemodding related projects. Like maintainance on my bicycles, work, and some electronic projects.
Anyway, i picked up the work on this project, but now on a different part: The operation table itself. I have a lot of work done on the monitor/instument panel part, but to finish it, the computer itself must be finished, since ther are a lot of connections from the pc to the monitor part (USB, VGA, rs232, power and signals for read out or controlling lights and cooling.
The base exist of a aluminium box, with the table on top. The table will be 40x80cm width, the box is 35x40cm and 32 cm in height. Just enough to fit a standing motherboard.
On each corner i'll fit such a aluminium profile. I first planned just the normal aluminium profiles, but these look better. I still use those standard profiles, but they're on the inside of the case now for strength.
cutting out another 2 of them
4 of them :D 2 are polished, 2 are sanded.
My plan is to have a little gap between the case and corner, giving some extra depth. Maybe some led's will fit there.
Another great part, a air grill which can be closed.
And here i was measuring where to put the 2 radiators. Guess 2 of them are enough for cooling the system.
Pointing out where to fit it.
Demonstration of the grill. I had to do some of it by hand since i don't have the circuit yet to rotate the motor in 2 directions, but the idea is clear, isn't it?
Fitted in the case. Note the HDD-size screws. Those will be replaced later with nice looking m3 bolts+nuts, i ordered them this week.
Working on the radiators and fans. I like the grills because they are shiny, but i'll try to build something myself based on RVS wire. A more open design with aluminium fans i guess.
I wanted to add a logo. On top a sheet of polished aluminium with a hole cutted out. Behind that cut-out the black aluminium with a engraved or sandblasted logo.
The planned position for the logo
This is looking seriously sweet mate. Well worth the wait.
looking great, love the grill
one of the most talented mods i have ever seen, sir, your are astounding
i like....need update again :)
Awesome. I can't wait to see the finished mod.
So far, its pretty schhweeeeet
Long time since my last post... Very nice _Ferry_, as usual.
Thanks guys good to hear you still like it :)
I continued with the logo, instead of engraving i went to cutting them out. Thanks for the designer of these 360 degrees cutting saws, you can even cut these small letters with the greatest precision.
But it took about half an hour to get it like this, and more time to cut away the remaining aluminum and sand it a little bit.
After a little polishing fitting the stuff on the case. It's ain't easy to get 6 holes all straight trough 4 layers of aluminum. But there's some toleration.
New M3 bolts and nuts and washers arrived. Been looking around that webshop for ages to find RVS M3 nuts, but all they had was countersunk, well, whatever, you ain't gonna see them anyway.
Let's screw this stuff ;) Mounted the aluminium corner.
Previously the case was just 4 walls, without a bottom. Let's change that.
In the bottom plate i made 4 small gaps, the aluminum profiles will fit there. In fact the bottom is hanging in those 4 profiles, just a few mm above my desk. I think some polished aluminum behind the bolts will look better than just direct on the case.
And a overall shot.