Wow. You now have the upper hand. I'll have to find something out of my neverending bag of tricks to top this with.
I think I have something.
However, I'm still absolutely sure you're gonna top me at this point. I love it.

Printable View
Wow. You now have the upper hand. I'll have to find something out of my neverending bag of tricks to top this with.
I think I have something.
However, I'm still absolutely sure you're gonna top me at this point. I love it.
Heh, heh, I believe you can after the last go round. :)
W00t, have to do so!
A placeholder for later :)
Hmm? :think:
indeed.
:eek::eek::eek::eek::eek::eek:
Wow. I'm seriously awestruck by your craftsmanship.
Thanks ATi, appreciate it!
Time is a slippery thing. Sorry for leaving you guys hanging. Work has been a monster since my last post. 2010 is slated to go to down as the weirdest job year ever. Not sure what's going on but I'm hoping 2011 is a little more relaxed.
But on to more mod related topics, Santa came a little early. My new modding ruler from MNPCtech ($29.99+S&H)
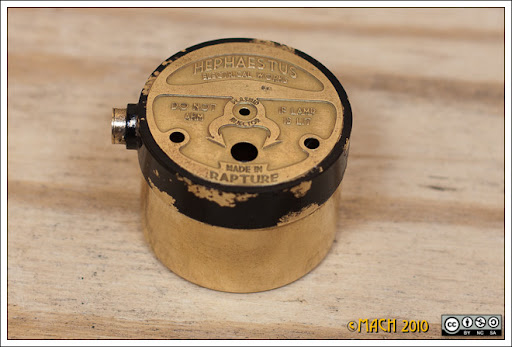
Back to where I left you, Scalecoat brass train model paint. This is supposed to be the shiznit for brass painting. I cringe to think what's in it.
My outdoor airbrush studio. The scalecoat has some nasty fumes so I only spray outside which leaves me at the mercy of the weather.
This is my paint curing oven.
2 paint cans taped together with foil tape and a 75W bulb in the bottom holds it a a constant 150-170 degrees. I can vary it by wrapping the outside in a towel.
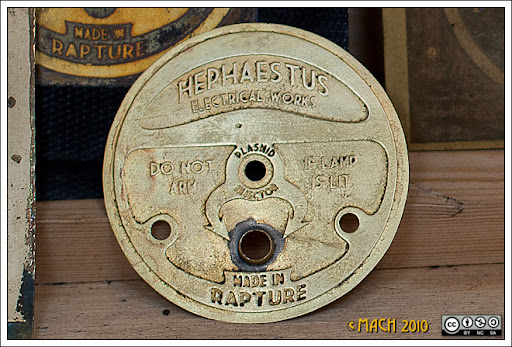
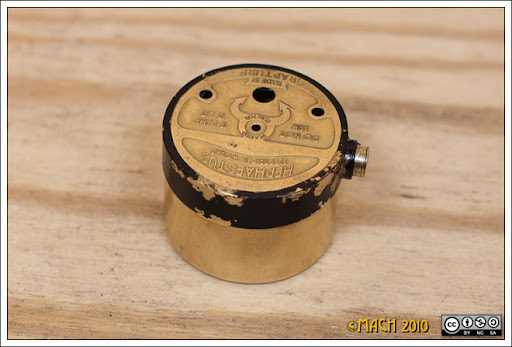
The meter repainted for version 2. The baked scalecoat is very niiice but very durable.
There's no way I can distress it after painting and make it look good. Back to the masking idea and waiting on the weather in my paint studio to cooperate.
Til then assembling Christmas presents. Anybody got plans for a 1:10 scale grinch sleigh. :?
Thanks for looking and many thanks to my sponsors!
Bitspower
Galaxy
HardwareLabs
so that stuff is like a powdercoat then? just not electrically conducted? :? seems kinda neat
No it's paint with aggressive adhesion properties for brass but still paint. I'm just speed curing it in the paint can oven.
Looks great Mach, keep up the good work. :D:up:
Thanks x88X!
I think I am going to start referring to you as Machguyver.. you come up with the coolest tools/toys. :D
If you want a distressable black for brass, get a bottle of Birchwood & Casey Super Blue gun bluing. Works a treat.
lol, nice. ;)Quote:
Originally Posted by OvRiDe
I've tried the Birchwood & Casey Brass Black with mixed results. It's fairly fragile and wears off if rubbed. I used the solution, and then coated it with black patinating wax. The meter case looked fairly good but the etched plate lost too much of the patina when I buffed it.Quote:
Originally Posted by Kayin
Attempting to mask off the patina with tape lifted the patina on the case. Sorry no pics before.
Looking at the remaining patina around the mounting stud. You can see it was fairly solid and even.
I'm looking for a solid background for the etched plate hence my efforts with the scale coat.
I'm waiting for a decent stretch of weather (high temps and low humidity) as the technique that I'm attempting oxidizes the brass quickly. It uses a salt crystal mask to mimic chipped and weathered paint so it has to be painted right after application.
http://www.scalemodelguide.com/guide...lt-weathering/
Yes the zombie worklog is back. :) Modding has very much been on the back burner. Real life, specifically work, has consumed most of the modding time.
I had been working on the meter painting but haven't much too show except for repeated fail. I must have stripped and re-painted the meter case 5 or 6 times. I also tried patina wax, liver of sulfur, and Brass Black.
I tried it so many times that the combination of ph Down and peroxide that I was using to remove the oxidation and put tooth on the brass started to etch the detail away after repeated dips.
So I took it as the opportunity to fix a couple of problems with the original face like the solder mess around the bezel. Unfortunately, it took a couple of tries. :) I tried electrolytic etching with copper sulfate as well as Sodium Bisfulate and peroxide but found the best etch was consistently with peroxide and muriatic acid.
The press and peel blue really gave me grief this time around but the addition of laminator soon fixed that too. This is a Royal Superguard Laminator Plus model. A little modding makes it perfect for etching PCB and brass sheet.
Opening up the laminator, see the resistor? A quarter turn there and the laminator heats up to 200F and works wonders for getting a good transfer after about 5 passes through.
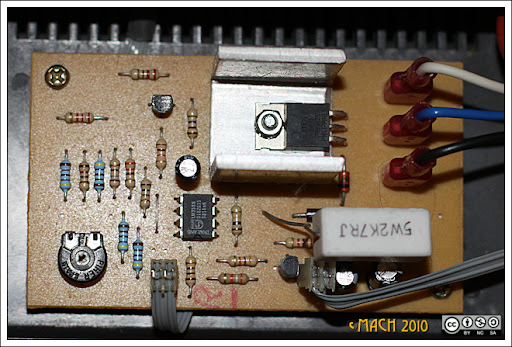
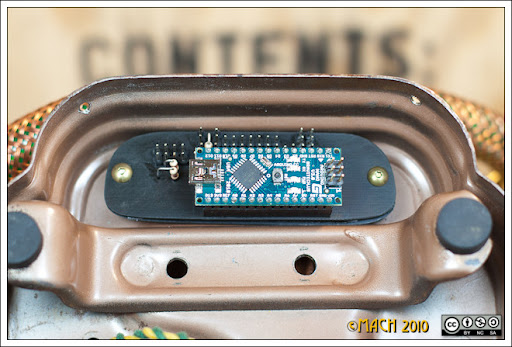
The laminator also came in handy for another part of the project: the case wiring. This is the bread boarding that I've been doing. Its a continual work in progress as I'm learning about circuits and programming the Arduino.
What's all that do? Controls the lights and sounds in the case first. Also outputs reading to the meter including the water temperature sensor that goes in the reservoir. (no nothing is hooked up in this shot)
It'll make more sense when I shoot some video of it working. This is the BlinkM Maxm being triggered off the motion sensor. Like I said it'll make more sense with video.
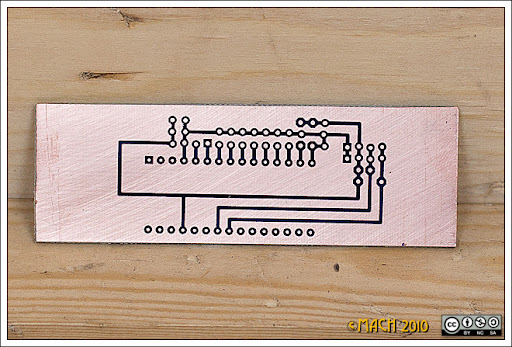
Here's the first version of the control PCB (and my first PCB, homemade or otherwise). The laminator and press and peel blue worked beautifully.
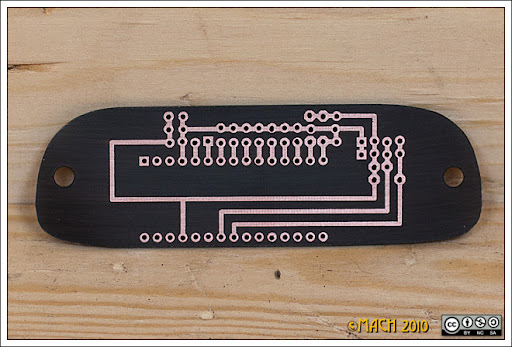
But the case said redesign for size. Here's the second version (pre-etching). See how the toner transfer held up? Only a few small touchups.
And after etching and drilling. The black was done using fabric dye.
I've still got a lot to learn on using Eagle (still have a lot to learn period) and designing circuits but I've got a new inspiration on that front. Check this out. This is a circuit board for a Nixie clock designed by a gentleman in Hong Kong.
I recently discovered Nixie tubes, at least their modding potential. If the US government ever decides to allow mail in from western Europe, I hope to have something to show you. Let's call it another experiment in modding. :)
But that's for another day, here's the circuit board mounted on the base of the case. I put a piece of black styrene on the back side to avoid any shorts.
This will be where all the non-essential wiring terminates.
Up next is the case wiring and sleeving. Anyone ever experimented with using para-cord for sleeving?
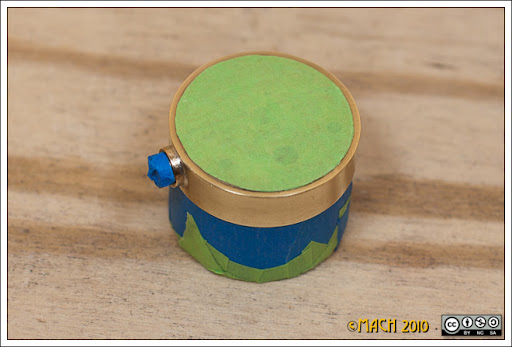
To bring this all full circle, the meter. So today the weather finally cooperated for another try at the meter. Instead of trying to paint and then weather it, I'm doing it in stages. The first stage is the chipped paint on the meter case using this technique.
http://www.scalemodelguide.com/guide...lt-weathering/
Masked for painting
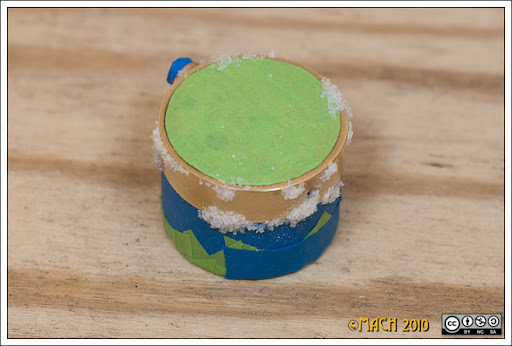
Margarita salt applied using a paint brush and water
Airbrush treatment and an hour baking session in the the paint oven. Chipped paint effect.
Next up is to paint the face using a very small brush. Here's the new bezel in place. Instead of soldering it, I made the bezel so it won't fall through once its mounted.
Waiting on brass parts to start on the water blocks again. Til then thanks for looking and many thanks to my sponsors!
Bitspower
Galaxy
HardwareLabs
As always, great work.
For the nixie tubes, I'm sure you can find a supplier in the US; they were pretty widely used at one time. What country is it that is the problem? As far as I know the US doesn't have an embargo on any countries in Europe.
Also, I ran across these vacuum fluorescent displays a while ago. They're not nixie's, but they're cheaper and easier to use (don't require high-voltage), and give a similar effect.
http://www.surplussales.com/Bulbs-In...acDisplay.html
Thanks x88x! No embargo but apparently a combination of weather and homeland security have caused a pile up of mail on the european side. I'm still waiting on packages from before Christmas.
Thanks for the tip on the multi-segment VFDs. I'm filing it away in the modding archive. I'm beyond the point of no return on the nixies though.:facepalm:
looking good!
Ok, subbed here. Don't you have a worklog on Bit-Tech, too?
Thanks SXR!
You too Nutman! Yes I have the same worklog at a few other sites. I was curious about the motivation behind worklogging so I put it up on several sites to figure out what the advantages were. It's certainly gets the traffic numbers up which is good in some ways for sponsor statistics but it's a takes more time than I would have thought.
Ah! I meant RealRedRaider. Not Bit-Tech, hehe...
http://www.realredraider.com/vbullet...=14411&page=10
Given up on that worklog?
Yeah I had a copy on RRT too. I gave up on updating it awhile back.
Oh wow! Mach, you have come a long way since I last checked in here. Incredible work as always my friend. There are alot of modders out there and many of them extra-ordinarily talented but you have shown an even more rare set of abilities than most. That is a totally original style of craftsmanship and inspiring attention to detail. Hell, that is what put this site on the map in the first place with Doom3. Thanks for sharing the superb works of art with us man! And would'ya kindly keep it up?
Jon
Thanks Jon! I appreciate the compliments :redface: although I need to find more time to work on it. And yes, I'll keep it up...after all a man mods, and a parasite says "What will the neighbors think?". :whistler:
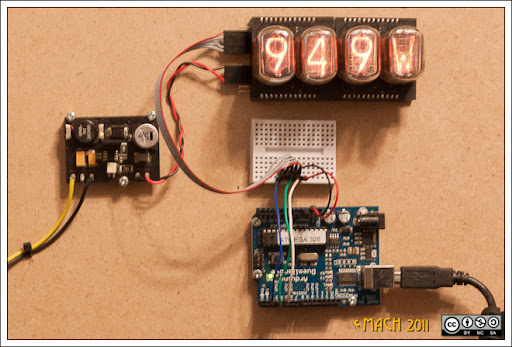
Woot! Nixies have arrived. Now the hard work begins but not just yet. I'm going to be out of pocket for the next few weeks until I get a couple of work projects finished but thought I'd leave you with this for the time being.
Mach, right now I feel this strange feeling as though I dislike you for having acquired nixies before me. However, I'm sure it will pass.
Nice setup, what's it do?
Nothing yet except rotate through the digits but add a few TI INA219 and some shunt resistors then you have some fun ;). Unfortunately these are IN-12s/15s which will be too big for what I have planned. I'll likely use IN-17s or 16s.
Oh yeah, please if you want to get this all figured out before me, I'm moving over in the slow lane so have it :). I'm more than happy to learn by example.
If I win this auction, I just blew my R&D budget for a bit. However, I'll have a nice new toy that will make every computer on this site quake in fear.
Even the 980X that Trace has.
Arise worklog! Arise I command thee!
That's right, its not just a post that goes bump in the night but a real life, honest to goodness update.
I would like to tell you a harrowing tale of my escape from alien captvity but the truth is much less exciting. I've mostly been trading time for money or as its commonly known, working.
Any free time that I've had has gone to making a photobooth for a friend's wedding. Much like this mod, it was a project that took on a life of its own.
Here it is on site being tested by one of the wedding guests. It was designed based on an instructables that I found. As the wedding was half way across the country, it had to be disassembeld and re-assembled for the event. A great deal of PVC later, we had a mobile photo booth that could hold 10 people at a time.
And the happy couple. Yes, there were costumes and much fun was had by all. :) But enough about that! Back to the modding.
The meter? Remember the meter? No? Allow me to recap, this is the meter that is interfaced with the motherboard to display temperature, HD capacity, ram usage, cpu load .anything really that an arduino can be be coerced into outputting.
Finally got it finished.
After several attempts at painting the etched brass back, I finally got close to the look that I was chasing. Aged, weathered, and a little abused.
Looking back at the orginal cracked and peeling paint, its a little exagerated but I'm happy with it. This is what the meter looked like before.
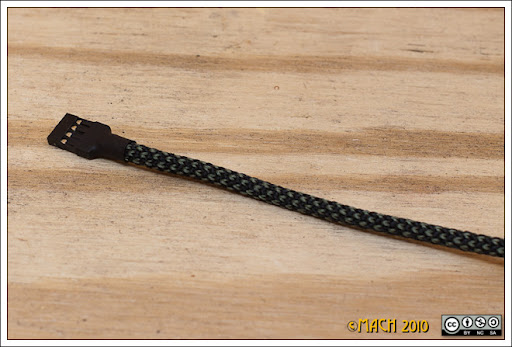
Completed the wire sleeving using paracord. It's a pain in the butt to sleeve with but I like the contrasting look. I had to run two sleeves due to the number of wire. Still need to complete a final test and tighten up the threads under the supporting arm but that can wait for final assembly.
Changing topics, here's the original design for the motherboard tray.
And the laser cut brass piece. What's missing is the support brace on the back.
Revision 1 mocked up in polystyrene from the last decade :)
I've been dancing around what to do about this piece because the tolerances in the case are so tight. When I taped everything together, I could foresee some clearance trouble brewing.
As originally sketched up, The tolerance were already tight. Part of the challenge is getting everything to fit. I think it all will fit but I don't *know* it.
To counteract some of the unknown, the back mount is meant to slide. Yes, its a cheat but dont judge me too harshly my sketchup-foo was/is weak. ;) Literally, an 1/8" makes a difference, more on that below.,
My first attempts went pear shaped quickly with a propane torch. My skills at hard soldering were not up to task. As with most things in life though, I blamed my tools instead. With a newly acquired MAPP and oxygen torch in hand, I tried again. By sandwiching the brass between firebricks, I was able to raise the temp of the piece and get the silver solder to finally flow.
The discoloration is from heat and the borax flux.
Up close, not as pretty as it should be but I'm well pleased.
Into the pickle for clean-up. Anyone know what I'm making when I mix Sodium Bisulfate with Hydrogen Peroxide?
I'm assuming some variant of sulfuric acid as its much more aggressive than sodum bisulfate alone but the upside is that it doesn't turn the brass pink like normal pickle.
Oh, yeah, I love it when a plan comes together. Still needs further grinding and polishing but it'll work.
The "stack" is still tight.
The original plan had the brass fan grill fush against the back of the case. The design changed when I gutted the heater case and discovered the need for a new frame to support the case skin.
The rails that you see that arc over the top are that frame. To gain back the 1/8" that I lost with the addition of the rails.
I notched them so the fan grill would fit in between and then soldered the fan grill in place using soft solder. After filing and sanding, I got my 1/8" back. :)
With the fan and radiator fixed in place, I was able to finally lock down where the motherboard tray fits. A little drill and tap action and voila
It's starting to look more like a computer. By the way how do you like the brass/bronze washer combo on the screws? I'm thinking about carrying that look across the case.
Oh look, a wild Big Daddy appears. For reference, the figure is about 7 inches tall.
Thanks for looking and many thanks to my sponsors!
Bitspower
Galaxy
HardwareLabs
:eek: :eek: :eek: :eek: :eek:
It's ALIVE!!!!!
And looking absolutely awesome, I must say.
I for one love the brass/bronze contrast.
I forgot COMPLETELY about this EPICNESS!
How COULD I?!?!?!????!?!!?
Hbwaah? What happened? How long was I out? ...holy crap, it's actually an update! :D
Awesome work dude, it's looking great! :up:
Nice photobooth too. ;)
:up::up::up::DQuote:
Originally Posted by Fuganater
Thanks Blue, yeah I'm digging it too. Still wondering what finish to put on the case though.:think:Quote:
Originally Posted by blueonblack
Its ok, really AmEv. Don't beat yourself up over it. :DQuote:
Originally Posted by AmEv
Tough crowd :smoker:. Thanks x88x! the booth was a fun build. Everyone seemed to have a great time with it so it made it double fun watching the craziness.Quote:
Originally Posted by x88x
Oh yeah, I'll just leave this here.
Looking great sir Mach!
Glad to see an update, looking awesome as always!
Thanks billygoat! for the compliment and the honorific ;)Quote:
Originally Posted by billygoat333
Thanks MainMan! Me too, I'm very glad to be back with an update.Quote:
Originally Posted by TheMainMan
Wow .. That looks AWESOME but I am not biased or anything ;)
I can't wait to see this one completed!
Few operations in decorative metal work are more important than hard or silver-soldering. The process of brazing is quite similar; it is used for larger articles and the solder is an alloy of copper and zinc, called spelter.
Silver solder is made up of silver and brass in varying proportions according to the melting point desired. It can be obtained in wire or sheet form, the latter being most popular. The flux used for hard-soldering consists of powdered borax ground with enough water to make a creamy paste.
-Decorative Metal Work, Popular Science Monthly 1936
----------
Thanks OvRiDe, yes me too. :)
I'm still alive and I have a little, but significant, progress to report. Remember the NB block? The one that leaked like a sieve after the silver and propane burner experiment. :wallbash:
After those experiments failed, I went back to the drawing board. I read up on the making of mokume gane. If anyone is interested, the papers by James Binnion are an interesting read. What they told me was, it is possible to get repeatable results with metal fusing but the tools, like a hydraulic press and inconel molds were probably outside of my price range. Anyone want to buy a used kiln?
After a call to the local metal smith left me with no solution, I took a different tack.
One that is likely obvious to most in the HVAC field. I found this gentleman's website which helped quite a bit. He's local to Houston and sells a training video online. One order later, I had a plan as well as an idea where I was going wrong.
Yes, the ad is cheesy but the video is actually solid.
I had been using a high silver content solder, the same stuff that is used by jewelers. It didn't flow as well as I would have liked. From the video, I was recommended this. Its a silver brazing alloy that is used for HVAC systems for joining dissimilar metals. Its 45% silver, 27% copper, 25% zinc, and 3% tin. On to the modding.
The parts sanded and cleaned.
The top was brazed first so I could still tap the threads. Not sure if this was necessary as the Bitspower threads are very short. I bolted the two corners together to hold the plates in place.
Fluxing the inside of the block and heating it to a dull red with a propane/oxygen torch, the solder flowed quite well. You can see where the silver flowed between the plates on the outside edge.
The holes in the block look pretty good with full flow on the silver. Here, they still need to be tapped. I was worried about annealing the brass (and copper) but it was a non-issue.
I tapped them with my mini drill press (the Cheaps pattened method) by putting the 1/4" tap in the chuck, unlocking the head of the press so it was resting on the block, and turning the chuck by hand. It worked much better than hand tapping. The threads are straight and it was fast.
The chamber will be fairly restrictive as you can see from the clearance. I'm winging it so we'll see how it works. Conventional wisdom says the performance would increase with pins or other turbulence building obstructions. The NB doesn't need a whole lot of cooling so it'll be a straight shot through the block.
The 1/8" copper was cut over-sized to be trimmed after.
The first time around, bolting the block together worked well so I drilled 2 more holes.
And bolted each corner down. The holes were lined with brass tubing to keep the solder out of the screw holes. I should put whiteout to act as a solder resist but forgot it. Two of the screws had to be drilled out after.
The final product after brazing. I fluxed the outside of the block this time and for good measure hit the threads again. It still needs a final polish but I wanted to make sure it held before I did that. As you can see there is some discoloration between the layers. Some pickle should clear that up.
The extra holes were filled with the button head hex screws that I'm using throughout the mod. They're decorative and were sanded flush on the bottom.
How's it work? Well it holds pressure. Using my ghetto pressure tester ( a bicycle pump and a pan of water), the only air bubble (singular) that I saw was at the seal of the Bitspower plug. It was only one and it didn't move so the block gets a pass. :banana: Especially since,
I don't plan to run the loop at 40 psi. :)
For the hold down screws, I silver soldered 3mm threaded rod to a button headed screw.
When its mounted, the screw heads will look the same.
I dropped it next to the CPU block to check it out. With more polishing and the sand blasted design in place, I can tick the box on the NB block and move on to the water block for the video card. But before doing that, the CPU block screws are bugging me.
I've also wanted to experiment with 3d printing over at Shapeways.com
Its a very cool way to make parts in metal or plastic. You draw them in Sketchup, export and upload the model and 14 days later.
Your part shows up. Here's the part printed in bronze which can be soldered. ;)
I was very impressed by the detail.
The part is about 3/4" high. Unfortunately, it was a little too big.
Here's prototype #2 in plastic impregnated with aluminum powder.
Side by side comparison with prototype #1. I need to tweak the design again to take the 3mm threaded insert.
So that's all that I have for now. I've got mixed feeling about my progress. Not exactly how I wanted to put the blocks together but I'll take the results.
Next up is the GPU block. It'll be a little more challenging. I'll post some flame thrower pics next time around. :) More soon
Thanks for staying tuned in and many thanks to my sponsors!
Bitspower
Galaxy
HardwareLabs