Man that really sucks about the res, ai hope you find your way around this problem.

Printable View
Man that really sucks about the res, ai hope you find your way around this problem.
I just tried some drilling with a modified drill, after reading and applying this:
http://www.plasticsmag.com/features....sue=Sep/Oct-01
It works better, I'm able to drill 11mm without the need to drill by steps ( starying with 3+7mm, and after that 11 mm)
No chance of chipping/cracks. At least that's what I've expected by now.
Only thing is that he needs more cooling. But who cares. There's plenty of water over here ;) I also changed the speed from 500 to 900 rpm, according to the table listed on that website. It doesn't matter if i press soft or hard on the press drill, it works. Only the end need some care not breaking the last few mm.
I wish i could buy some pre-modified drills. But i think they're hard to get. Does anyone know a brand or whatever?
You might try a brad point bit. Not sure what they're called in the NL but I could buy them in France and the UK at any DIY. The look like this: http://www.woodcraft.com/EnhancedIma...ameCode=146646
You can buy plastic bits in the US from Craftics; not sure who carries them in Europe. Here's the link to craftics. http://www.craftics.com/products.cfm?Category=87 You may find them under the brand name of PlasDrill or Plas-Drill
Thanks for the info! I think they're hard to get in europe/the netherlands, but whatever. I'm done drilling this thing. Repaired it today :)
A wood drill (that's the name we use here) like mentioned wasn't necessary. The modified drill works fine.
Next ting is the rear cover including a decent seal. That 'll be a though job i guess.
Here are some more pics:
Before the crack
1 of the indicators after some polishing.
Starting to repair the reservoir. Lets get divorced ;)
Preparing for milling. I need to remove 5mm with a depth of 8mm or else you'll see the edge after mounting.
Job done.
Preparing the reservoir.
My modified drill.
I was planning on ordering this drill set of plastic drills. They may do the trick for you next time. For now I'm still drilling every hole at the highest rpm my drill press can do, even 12mm holes in one step. A little water makes the holes look better, but you found that out also already.
looks great man!
Hey guys! I'm still alive :P
I spend some time at the reservoir since the previous one was still not the way i wanted it.
First i made a sketchup, so i could double check the dimensions and looks and see if it's possible to build without modifications after building it.
And this evening i've made the top of it:
I found out that those heat-set nuts (stolen from some Acrylic casings :smoker:) are very usefull! I heated them and pressed them in a 4,5mm drilled hole. After cooling down they're rocksolid!
Oh thank heavens, you're back!!! I have been wanting to see the completion of this epic project and was concerned you had vanished into thin air. Welcome back!
-Jon
I'll second that, welcome back!!!
jeah sorry for the inactive times, but i had so little time and so much work/hobby's. I bought a VW beetle and spend a lot of time on it. But it's mostly done, so i hopefully can take care of this project again :) All the parts of this mod are on 1 desk in my workshop, so it never stepped out my brain ;)
Here's a update about the reservoir:
All the parts together, to see how it's going to look.
Removing some acryl, or else the hose connector wouldn't fit in between the reservoir and pump.
And gluing a extension piece for the other connector.
This weekend i was on a exhibition, and bought these 6 for only 5. they're used but sharp. Buy them new from dremel and it would have cost +/-50
And they became usefull to make a channel where i can lay down the rubber seal. Hope it will be without leaking.
Gluing the first part onto the faceplate. i'm using acryfix. Smells very bad, but the result is nice.
Awesome.. great to see an update!
And it goes with out saying.. very cool work.
yay for updates! good looking work. :)
Today i ran the first tests to check if the reservoir seal is working, and yes, it is :D
But the flow indicator isn't working. Well, i didn't expect it to work at the first test. Because it's very depending on flow and circulation of the water.
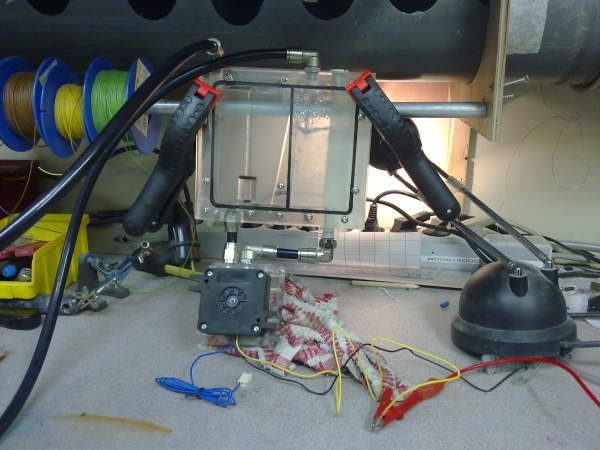
Overview, the hose is going to a cooling block, for some flow resistance.
1 pic, 2 problems. 1 is the flow indicator which is not working at all. Second is that screw. which i made in a part where there's water. So unless i thighten it well it leaks water. Guess i can solve it with a rubber O-ring.
And hopefully this will become the solution for the flow indicator. A bigger one. It's so big that it once it's on the bottom it will close the inlet port. Due to the water pressure there's no other way than going up. At least that's what i'm hoping ;)
Well, after building it might require fine-tuning in weight and/or resistance. But that's for later times.
edit:
I think something like this will be nice. Not sure if i should spend a lot of time on milling and working out this design while i don't know if this will work. But i have a good feeling about it, and i spend already ages on it :P
So very cool ferry. I need to back track on this worklog and read up. Nice having you back modding again. :)
Reservoir is looking great. Now I am anxious to see you tackle that flow meter.
I still have to show the pics of a perfect working flow indicator:
As mentioned before, the cilinder-shaped indicator wasn't working, so i made a bigger one.
[imghttp://tweakers.net/ext/f/tt6OWgWHnBmH9dEJLmqrfu0A/full.jpg[/img]
Next step is cutting the side in the same angle as the flow indicator. And milling the inside for a better look.
After doing so.
A photo after a little cleaning and sanding. Those corners are hard to reach :evil:
And a polished result. Including a drilled hole in the center.
But i had a problem again, he was going upwards, but only for a few mm....
But there's nothing that can't be fixed! In this case, the hose length and a CPU cooler in series was too much. I removed the cooler, and now the indicator is acting just like it should :D consecuence is that i should use one of those fancy CPU coolers with a lot of thin fins, causing drop in flowrate.
This could mean that the cylindric indicator will do the trick as well. I'll test it out later.
Well, this is a bit of a creppy setup of how it should look like.
I guess a video is all you've been waiting for:
http://www.youtube.com/watch?v=QMOL_U5axhU
And a more final pic i made yesterday:
The 2 aluminum covers will be polished, and the last open one on the left will be charged with a pump-contol-panel. Well, actually there's nothing to controll. Because the pump works without a controller. But it's just going to look like that with some fancy LED's and stuff ;)
------------------
BTW, i'll be in Madrid, visiting www.campus-party.org
I won't take a casemod with me. But i'll might take some parts of alien hospital with me. And do some live modding/airbrushing.
So if any of you is going over, see ya!
just joined this thread....looking AMAZING!
That flow indicator is looking awesome, really nice work.
Step by step...
To reassemble the case i need to get all the sidepanels done. 2 are done by now:
This is the cover plate for the lower-left slot. I engraved the letters, and finished them with a modified schrewdriver, to scrape off the aluminum. The edges and corners are too small to finish with a engraving bit.
Fitted in place. Almost done.
Presenting you the finished sidepanel. The leds are aqua green, a mix of green with a little blue tint. looks nice in combination with the watercooling. Also a good contrast with red, and possible to combine with white.
View on the rear.
Up to the next panel:
This panel receives a window, giving a direct view to the mainboard. Window sizes are matched with the other one.
A.C.Ryan sponsored me (a couple years ago) 2 sheets of 2side mirror. Great stuff. I never had a casemod witch had a full potential for showing it. But Alien Hospital surely has! Without lights the window will look like a mirror, just like the polished parts on the other side.
Together with the second panel
And all the other panels
Soon i want to finish the panel with the co2 cilinders. I need a control panel for lights and cooling. It will be placed somewhere over there. With nice lights and measuring probes, just like a medical instrument panel.
I have made hundreds of drawings before and while building Alien Hospital. Now everything is more and more coming together i thought it would be nice to make some pictures of it. Texts are in dutch, and i dont know how to describe everything. Even tho i think its nice to see some sketches and plans witch are used in this casemod.... Or end up in the garbage can.
I have forgotten all the awesome work you have done on this project. The entire mod is looking awesome, I can't wait to see more.