-
Night of the Living Dead 40th Tribute
Time to start work on my next project, since this one has a time limitation to it. Oct 1st is the 40th anniversary of one of my favorite films - Night of the Living Dead.
As it's pretty much required viewing before they allow you to live in Pittsburgh, and as a fan of the roots of horror, it has long been a favorite of mine. For my next project, I'm planning to put together a tribute case for this movie.
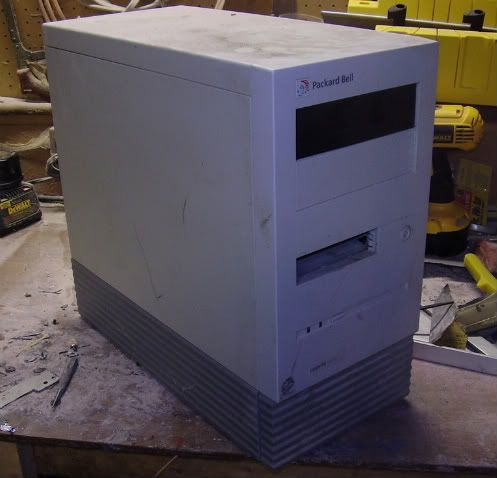
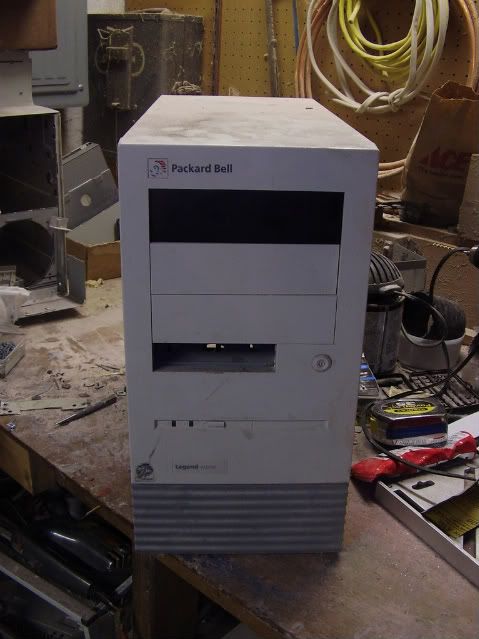
You may have seen the case I'm using in the background of pictures in my other worklogs:
It's going to require some fairly extensive internal re-working since it is not an ATX form-factor case. Why am I using it? That's a good question. I'm using it because A.) it has a nice flat, smooth shape to work with, B.) it's got a lot of internal space for it's size and C.) I like the bottom border. It looks like exaggerated wood-grain, which will factor in to my project.
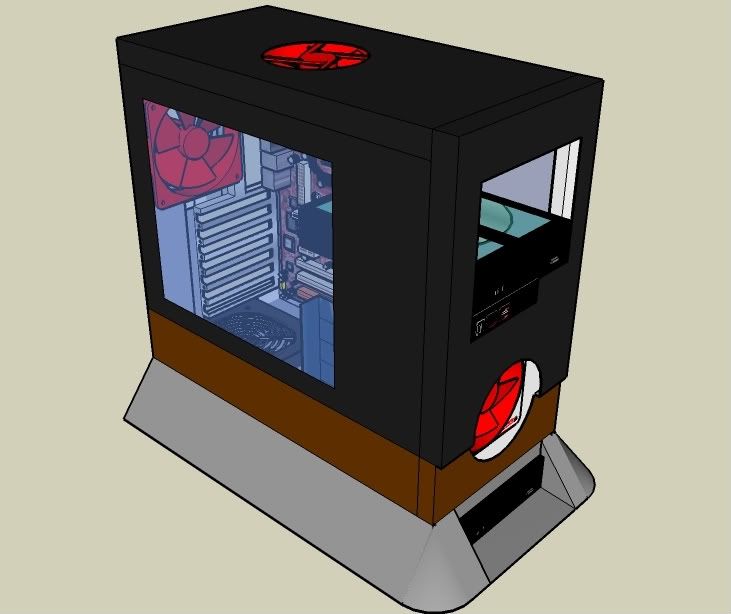
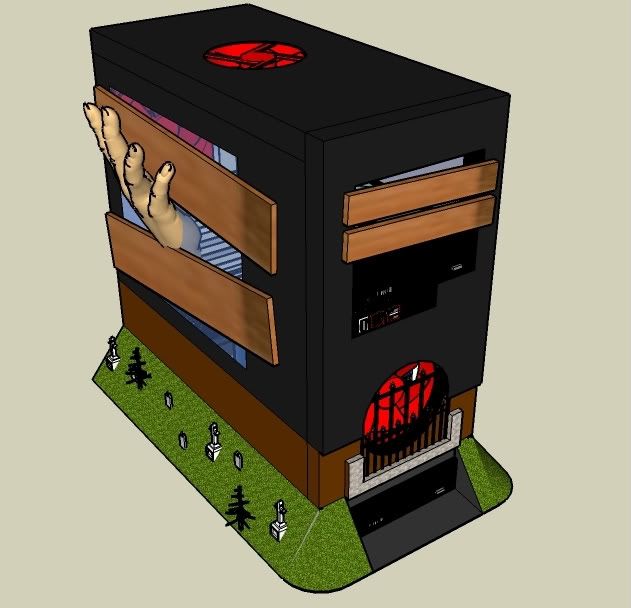
I am still pulling together supplies and doing my final planning and intend to start construction at the beginning of the month. In the meantime, I have put together a bit of concept art with Sketchup.
First off, you can see that I plan to go with a black body, "wood" trim, a window and some red LED fans. Also, because the case is not designed for a full ATX board, I will need to make a bottom addition to it to house the PSU. Finally, I plan to put an optical drive down front as well (why not? I have the space.)
This is all preliminary construction and shaping. Here is the concept of what the mod itself will be:
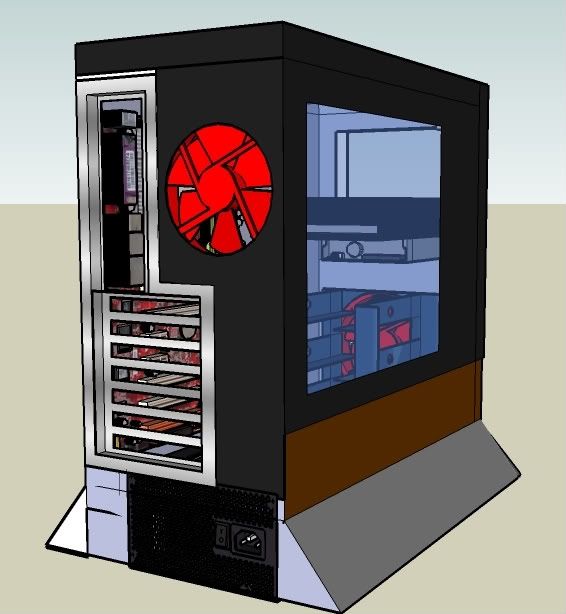
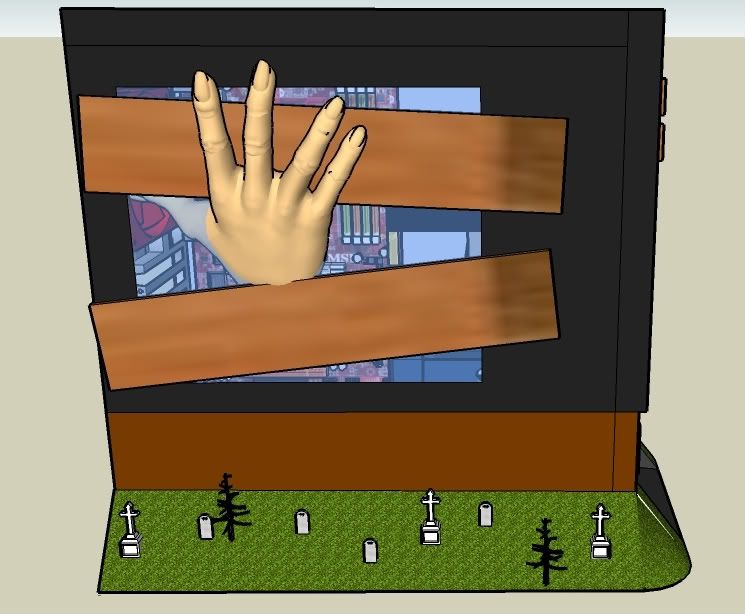
This should give you a better idea of where I'm going with this idea. I plan to have something along the lines of this for the hand coming through the side, but I may tone that back, considering the special effects level of the original movie. Basically, this part of the case is going to call back to one of the main visuals of the movie - that of the undead horde reaching through the hastily boarded windows.
Here is a better view of the side. There will be glass in the window, but it will be worked around the hand. I'm thinking of making it double-layered, with a hole busted in one piece. This way, it will look like the window is broken, but still be able to keep the case closed to ward of dust and debris.
Also note the graveyard scene. This will be done with HO scale train props and regular scenery-type grass.
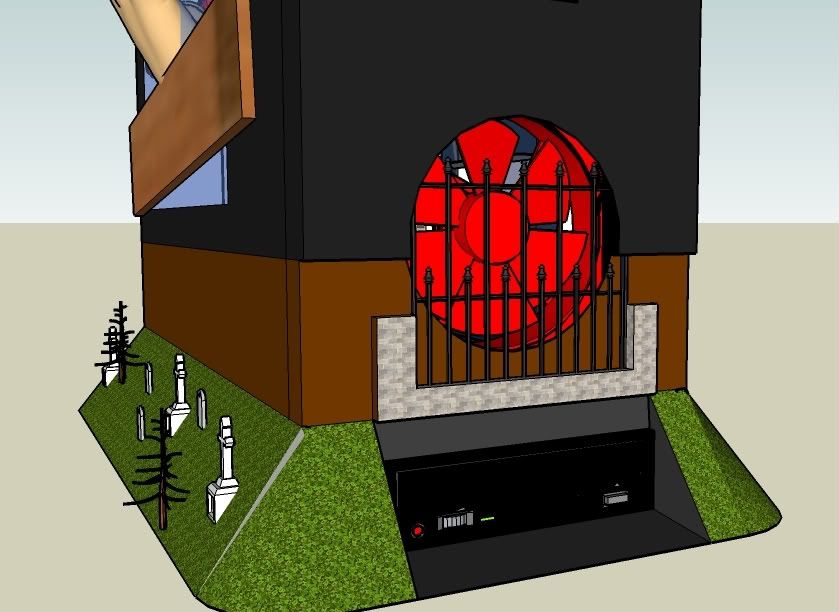
Here is a close up of the front fan. The plan is to fashion/buy a miniature wrought-iron cemetery fence to use as a front grill.
Finally, this side will either have "Night of the Living Dead 40th Anniversary" cut in to the case with a red CFFL to back light it, or be painted like a tombstone to read, "Night of the Living Dead, Oct 1968 - Oct 2008." I'm still up in the air on that.
I have a few more ideas I'm kicking around in my head, but I'm not sure if they'll make the case too "busy."
So, there it is. That's the general idea. Now, the next step is to see if I can create something at all close to these sketches... :lick:
-
Re: Night of the Living Dead 40th Tribute
HUh nice idea, good luck with it!:up:
Can wait too see how the hand is going to look!:)
-
Re: Night of the Living Dead 40th Tribute
This will be epic! +Rep
How about an etched movie poster on that side?
http://www.imdb.com/title/tt0063350/posters
-
Re: Night of the Living Dead 40th Tribute
Yeah, that's cool: No pressure or anything... :)
As for the poster...I dunno. If I cut the lettering in, it's going to be in the classic red font. (I'm also considering how i might be able to get that picture in the case.)
But, I'm leaning more and more towards replica stone with the letters "chiseled" in.
-
Re: Night of the Living Dead 40th Tribute
What a great idea!! I can't wait to see this one!That hand that you have picked out looks bada$$ too...nice choice
-
Re: Night of the Living Dead 40th Tribute
hahahahaha!!!! I love it, great idea!
-
Re: Night of the Living Dead 40th Tribute
Don't get me wrong, I love the idea. Tombstone included. A classic mod for a classic movie!
-
Re: Night of the Living Dead 40th Tribute
Quote:
Originally Posted by
dfigravity

WThat hand that you have picked out looks bada$$ too...nice choice
Those sick bastards over at Nightmare Factory have some great looking stuff. Just their body parts section is enough to make me wonder about them. I fear what my work search logs look like from my lunch breaks...
Quote:
Originally Posted by
jdbnsn
hahahahaha!!!! I love it, great idea!
Think you could come up with a snazzy header for it? *grin*
I tore in to the case a bit tonight to see what I have to work with. Too tired to type it up just now. I'll post something in the morning. Thanks for jumping aboard, guys!
-
Re: Night of the Living Dead 40th Tribute
Quote:
Think you could come up with a snazzy header for it? *grin*
sure, just post a request in the header thread and I'll get to it when I get back to work on them.
-
Re: Night of the Living Dead 40th Tribute
This should be a very cool mod ! I can't wait for the game to come out =O
-
Re: Night of the Living Dead 40th Tribute
+rep and a /subscribe from me. The Living Dead series is one of my favorites!
-
Re: Night of the Living Dead 40th Tribute
Okay, so I said I wouldn't get started on the construction until the beginning of the month - but that hasn't stopped me from getting started on the destruction.
I needed to take it apart to see fully what I'm dealing with here, since just the back panel shows that this case is going to take some work:
I'm going to have to cut that up and fit a normal ATX back-plate in there.
Next problem - the way the side panel connects:
As you can see, the side and (about 90%) of the bottom are one piece. It wouldn't normally be a big deal, but remember - I'm building a bottom extension for this case. What I will probably end up doing is cutting the bottom away, and then devising something to hold the side panel on without it.
Moving right along, here is the inside:
Yep, all of that is going to have to go. I don't need a PSU tray, and I certainly don't need a PSU/optical drive/3.5 bay combo thingy.
Side note: I spent 15, 20 minutes trying to get the bezel off. I was pushing down on the plastic tabs and trying to pry it off. I wasn't getting anywhere. Couldn't for the life of me see what was holding it on. Then, I bumped the bottom molding and found that - unlike the side molding - it wasn't attached to the rest of that side.
Doh. Screws. Yep, that will do it.
Here it is, stripped of all its plastic finery:
A few passes with drill and file on the rivets, and the drive bay/PSU tray is removed:
This will most likely be cut down and reinstalled. Why spend time building a new cage when the old one is just fine and already has the rivet holes drilled and ready to go? Once I remove the PSU part from it and support the back end, it will be fine.
Okay, so I have the case pulled apart and opened up:
I put the side panel back on, and laid a few things, such as mobo tray, optical drive, HDD cage and fan in to get an idea of the space I have.
After my last project, I could almost hear echoes, there was so much room. In theory, the mobo that will be going in here is (according to the manual) almost the same size as this one. (No, I'm not using a slot-socket P2 in this project.) I find that almost hard to believe, so I guess I'll need to open up the gaming rig and check.
More to follow.
-
Re: Night of the Living Dead 40th Tribute
Quote:
Originally Posted by
The_Crippler
Those sick bastards over at Nightmare Factory have some great looking stuff. Just their
body parts section is enough to make me wonder about them. I fear what my work search logs look like from my lunch breaks...
I loved "INTESTINES: Ok that's just gross!". Great link, at least for amusement's sake.
Regarding the case itself: very cool. I love bases on cases (cases with bases) (sorry), and this is an awesome theme.
LPX motherboards... don't love those. But this is a decent-looking case, and it'll do nicely for what you're planning. Besides - nothing some sawing and rivet-drilling can't fix, right? :D
-
Re: Night of the Living Dead 40th Tribute
Quote:
Originally Posted by
FuzzyPlushroom
Besides - nothing some sawing and rivet-drilling can't fix, right? :D
That's the idea! :):up:
-
Re: Night of the Living Dead 40th Tribute
Packard made removing the bezel hard to figure out on most of their post-Pentium 1 win 9x cases. I have one with a cyrix CPU stored away in the basement.
-
Re: Night of the Living Dead 40th Tribute
Not much new, but enough for a mini update:
First and for most, that which I hate to do - clean my work shop.
There we go. I really need to get a shop-vac. There was easily a quarter inch of Bondo dust on it, and an ungodly amount of spent dremel wheels. But, it had to be done.
A quick trip to the store, and I'm ready for battle:
Rivets, fresh set of Dremel wheels and 16 feet of angle aluminum. That means that this weekend, I can get started on the frame-work and the mobo mount.
The plan is to cut some pieces to add to the frame make it easier to install the mobo plate:
That will be the first step. After that, I will cut the back panel and test fit stuff so that I know how much room I need to add for the PSU. (Not looking forward to taking apart the gaming rig.)
In other news, there was a killer deal yesterday on newegg fr 4GB of Corsair RAM that I picked up. That will be going in my server, and the 1GB of Crucial will move over to this project with the existing 2GB. (Stupid XP and it's issues with addressing more than 3GB...)
-
Re: Night of the Living Dead 40th Tribute
Quote:
Originally Posted by
The_Crippler
In other news, there was a killer deal yesterday on newegg fr 4GB of Corsair RAM that I picked up. That will be going in my server, and the 1GB of Crucial will move over to this project with the existing 2GB. (Stupid XP and it's issues with addressing more than 3GB...)
This killer deal? I'm thinking of picking up a few things from there. I also want to get the 22" acer monitor from here.
-
Re: Night of the Living Dead 40th Tribute
Yeah, that one...thing is, I just got the email yesterday, but it looks like the mail-in rebate was only good for purchases up until the 31st.
EDIT: Looks like they have the same sale still going on, but with a rebate form for August.
-
Re: Night of the Living Dead 40th Tribute
Happy Saturday, everyone. Here's today's update:
This afternoon's work was mainly all structural. The first step was to remove the remainder of the back panel that's going to be in the way mainly, the expansion slots.
This was a simple matter of drilling the rivets out.
...And there we go.
Next step was to cut some angle aluminum pieces to size. The plan is to use them as mounting points for the new motherboard tray
Seen above are the two rails in the locations where they will be mounted in the case. To make sure that I had them at the right height on both sides, I laid a side panel from another case across them and checked.
The very slight bit it's off level is actually the same amount that my workbench is off so I'm not concerned with it.
A few pop rivets, and it's attached. Next, I cut a new mobo panel from sheet metal and test-fit it.
Not too shabby.
Next step is to get the back panel cut so that I can put in the mounting bracket for the expansion slots and the I/O panel.
Some Dremel work, and every thing's cut away. Here it is, roughly fit:
I'm going to need to do some more reinforcing, as existing openings are right where it needs to be mounted. However, this is good enough for the time being, as it gave me the spacing that I needed to mark out the holes for the mounting posts. (Below)
Here they are. They don't have a lot to bite in to, due to the thinness of the sheet metal. Once the chassis is painted, I'll put some lock-tite on them to keep them from getting loose.
I removed the mobo from my gaming rig and test fit it to make sure that everything is in order. Since it was, I riveted the tray in place.
Remember the optical drive cage?
Well, the time has come to cut it down to size.
Like I said earlier, it made sense to use the existing one rather than make a new one since all the mounting holes for it are already there.
As a last check before I get carried on further construction, here is everything test fit:
I had been worried that the motherboard was going to be just slightly too big to fit in here it was close.
Well, there we are that's where I got to today. The next step will be to build the bottom cage to house an optical drive and the PSU.
-
Re: Night of the Living Dead 40th Tribute
I found some molds you may be interested in. Here
-
Re: Night of the Living Dead 40th Tribute
Total rockstar, man! See, I'd stumbled upon that page quite a while ago - recognized it as soon as I clicked it - the thing is, I'd completely, 100% forgotten about it. Nice one!
-
Re: Night of the Living Dead 40th Tribute
The base plan looks uber nice. +rep for creativity!
-
Re: Night of the Living Dead 40th Tribute
Quote:
Originally Posted by
Acey
The base plan looks uber nice. +rep for creativity!
Unfortunately, I'm going to need to modify it a bit. Don't worry, the spirit will still be the same. More on that later
First:
Oops...I think I voided the warranty... 8)
Today was one of those days where I got a lot of work done, but not much of it was photogenic. A lot of cutting angle aluminum and, frankly, that would have been a boring set of pictures. My focus was making the PSU frame for the bottom of the case. Using a miter box, I cut the edges of the aluminum to 45 degree angles:
From there, I added the uprights:
The frame itself is bolted to the bottom of the case to keep it in place:
And there it is:
Now, the frustrating part. As can often be the case, something can look fantastic in Sketchup, but in real life...not. That was the case here:
I used some cardboard to mock up the graveyard side slopes and it just doesn't look right. The slope is too steep and the base will be way too wide (almost 14.) Well, these things happen, and we work around them, right?
I gave it some thought, and here is what I came up with: I will move the bottom optical drive out and form a case around it, giving me some area to work with. Since the front fan was already going to have a cemetery gate on the front of it, it would make sense to have the graveyard in front of it.
I probably won't have the flat sides on it, rather, I will round it off and blend it in to the sides. It will be less jarring that way. Also, I may stealth the drive front with the brick wall. Honestly, this plan may work better for my ideas in the long run. I plan to recreate a few scenes from the movie, integrated in to the case and this graveyard gives me some prime real estate for it. (more on that later I like to have a few surpises.)
That's it for today. Thanks for checking back!
-
Re: Night of the Living Dead 40th Tribute
Cmon mate, since you're already going for it on the front, go all the way man. We'd love to see it done.
-
Re: Night of the Living Dead 40th Tribute
There will be something along the sides, but not the high slopes from before. It looks really bad, trust me. Thanks for the encouragement, though.
-
Re: Night of the Living Dead 40th Tribute
-
Re: Night of the Living Dead 40th Tribute
More is coming, I promise. Sorry, it's been a busy week. I'm currently working on the back and side panels. There should be an update before the weekend.
-
Re: Night of the Living Dead 40th Tribute
Never rush a mod xD we can wait for the good stuffs
-
Re: Night of the Living Dead 40th Tribute
I had some time to work last night. As stated, I have been working on the back and side panels (though, only the back panel will feature in this update.)
The more I thought about the back panel, the more I knew I wasnt going to be happy with it. Seen here:
I was going to have a number of holes to fill (and a new one to cut for the fan) and structure to support and frankly, that was going to be a lot of pain and bondo dust. Sometimes, you need to work harder, not smarter. In the long run, it was take less effort (and look better) to cut a new back panel from scratch.
So, it was time to give the extraneous stuff the axe:
With that opened up, I grabbed some scrap sheet metal and marked out the important parts
a quick run with the jig saw
and some rivets.
As you can see here, since it was scrap, the outside edges are pretty wonky. This is what files are for. More on that later.
Side Note: Since this was affixed to the remnants of the old back panel, it actually moved the spacing of the back panel about an eighth of an inch out. This required me to move the motherboard tray so that internal parts still matched up.
Once it was affixed, it was a simple task to rivet in the back panel:
The last structural part to do was add the fan hole. Id originally wanted to put a 120 back there (as the existing case this computer is in has one) but it just wasnt going to fit, so I modified the plan to include a 92mm instead. This wont be a problem, as theres going to be a 120 on the front, and an 80 mm blow-hole.
Once again, here is an example of the work of my Harbor Freight Hole Markers:
And, after some Dremeling:
Hole is cut, but in need of a good filing to smooth it down and thats pretty much where I left it for the night. I knew that I had a good amount of filing to do, and that struck me as a pretty good Saturday project.
So this is where were at. Once thats filed down to the proper fit, Im going to start work on the front. Thankfully, that pretty much just needs a hole cut in it.
-
Re: Night of the Living Dead 40th Tribute
Subscribed.
Looks megariffic.
-
Re: Night of the Living Dead 40th Tribute
That was a very fast pounce. You were lying in wait, or something.
Thanks for subscribing!
-
Re: Night of the Living Dead 40th Tribute
I is cunning like a duck.
-
Re: Night of the Living Dead 40th Tribute
-
Re: Night of the Living Dead 40th Tribute
Today we pick up where I left off the other day. Here is the back panel filed down to fit and look nice:
Notice that I also cut notches out of the top to accommodate the tabs of the top panel.
Moving on, I set to work on cutting the fan hole on the front panel:
Lining up where this hole is going to go is critical I screw this up, it's not like I have a spare. Thankfully, all went well.
Next step is to cut the corresponding hole in the chassis.
Here is everything put back together:
Note: I purposefully cut the hole over-sized to accommodate the bricks and fence that I will be putting in later as a grill.
This next picture is a mock up with an optical drive and USB bay installed, along with some scraps of wood sticky-tacked up. This gives more of an idea as to what the finished front will look like.
Thanks for stopping by again!
-
Re: Night of the Living Dead 40th Tribute
looking good cant wait for this one
-
Re: Night of the Living Dead 40th Tribute
ding dong your header's done...
-
Re: Night of the Living Dead 40th Tribute
Oh, bra-vo. Very nice indeed. Just for this, I will have an update posted in the morning.
Thanks!
-
Re: Night of the Living Dead 40th Tribute
ok thats a really nice header
-
Re: Night of the Living Dead 40th Tribute
Yeah....I am totally a fan.
-
Re: Night of the Living Dead 40th Tribute
Todays entry: Fun with side panels (I had to get there eventually
)
One of the major difficulties with this case that the side panels are connected to the bottom panels, making it rather difficult to make it work with the stand I made for it:
(Blurry. Ew. Sorry.)
You can see the lip at the bottom of this picture. This is the smaller one the other panel has almost the whole bottom tray connected to it.
The other problem is that, to connect, the panels need to have tabs inserted and then the whole thing slide up. Even without the bottom lip. This was going to be awkward, as the stand is not going to make it easy to slide it. Thankfully, the bottom accent pieces come off:
What this will allow me to do is to cut the bottom off, as well as shave a little over a quarter of an inch of the side. This way, I can set it in place and slide it up then replace the accent, and its all covered up. The added bonus is that the accent piece doesnt move up and down, so when it is snapped in, it locks the whole panel in place.
I hope.
Before
After
And in place.
Hey, it worked! I almost appear to know what Im doing! Sure enough, the accent piece locks everything in place. I love it when plan comes together.
Again, the other side which is the main access side has almost the entire bottom of the case attached to it (Packard what were you thinking?) But not for long.
Note: I used a jig saw for most of the cut, and the snips just for the last ½. I just happened to notice at that point that I had never taken a picture of the bottom section.
Just like the other side, it fit perfectly:
Now, with these modified, the bottom of the case is open in to the stand where the power supplies and one of the optical drives are going to live.
Next step the window.
First, I opened it back up so that I could mark the top of the case where the drive cage ends. I figured that it would end up making the window too small, but I wanted to at least see if I could cut the window without exposing it. No major reason, just that drive cages arent the prettiest things in the world.
Im a very visual person. There are neater, cleaner ways of planning things out, but I like to just draw things out with Sharpie and get a look at it especially when its something thats going to be sanded, primed and painted black anyway.
When all was said and done, I had this:
The left box would be the window. A.) It just looks too small and B.) it was going to be in the way of some internal stuff
so, back to the drawing board. Here is the inside of the side panel:
This way, I get a good look at everything and what I have to work with. Since its obvious that the window is going to be big enough to show the drive bays, I can work from the inside out. The only hang-up is going to be those two tabs right in the center that lock the plastic part of the panel in place. Its not a show-stopper by any means since I can secure the plastic by other means but its something to be aware of.
Here is what I will be going with:
Okay, so obviously, my next update is going to be cutting that window out. After that, the only structural thing left is the blow-hole.