-
ODST Legendary
Hello All,
After being inspired by what J-Roc did with the Citrus G5 (Like here - http://www.thebestcasescenario.com/f...3&postcount=99, I decided to finally do one of my own.
I want to paint the case like he did, however, it will be a black (Intel Skull) or ODST green motif (see where I am going with it? :) ). Let me know what you guys think:D
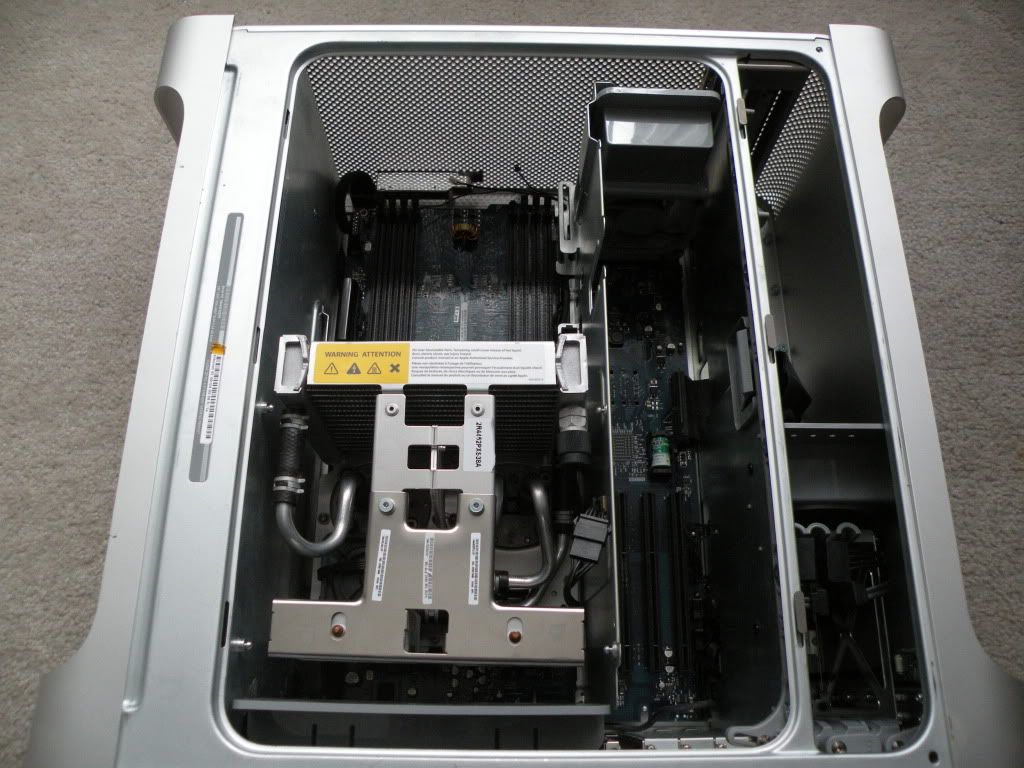
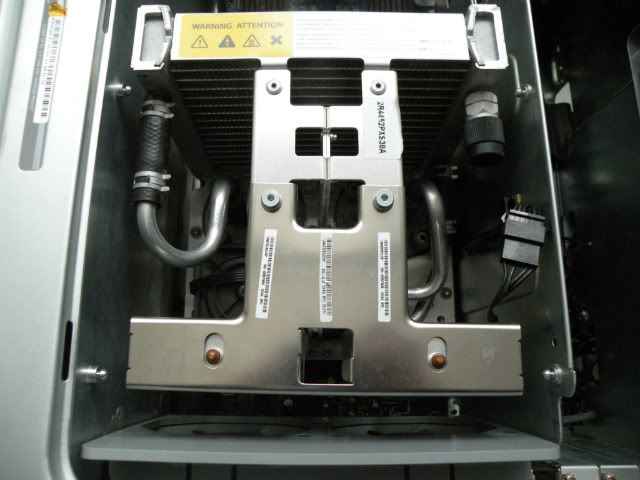
I have been waiting to get my hands on a G5 case and that came to fruition today:banana: I got the G5 (Dont know what the processor is, but its Liquid Cooled - see pics).
I am planning to do my mod with the following hardware:
- BIOSTAR TA890GXB HD Socket AM3 AMD 890GX + SB850 Chipset Dual Channel DDR3 1600(OC)/1333/1066/800 MHz with an AMD PHENOM II QUAD CORE X4 830 2.8 GHZ (OR) Gigabyte GA-P55-UD3R socket 1156 Intel P55 with a Core i5 650 (don't have the processor yet :crossed:)
- 8 GB RAM - CORSAIR XMS3 1600 GHZ
- Intel X-25M 160 GB SSD
- Seagate Barracuda 1TB SATA HDD
- Pioneer BluRay Burner
- AMD Radeon HD 6870 Black Edition 1GB
- Reuse Case Fans from the G5
- No LED stuff except for the Intel Skull pattern on the side panel (If I go with the Intel theme)
- Scythe Kama Panel - Not going to use this - cannot fit it with current plan - using Dell front panel instead
Parts I still need to get (in the works):
- Motherboard tray (debating this - either get an old case or order LianLi)
- CPU cooler - depending on if I can get my hands on the i5
- Plexiglass sheet for mounting LEDs
Here are some pics of the G5 I bought today. Scratched a bit here and there but in good shape. But I'm going to paint it anyways, so no worries there...nothing a little sanding cant take care of...
My plan is to work on this mod adhoc - i.e whenever I am not on the road and the wife and kids don't need me. Hopefully I will stick to a schedule :crossed:. If anyone has any guidance or words of wisdom for someone trying to do their first mod, let me know! Thanks. :)
-
Re: Yet Another G5PC MOD :) Yes I know...
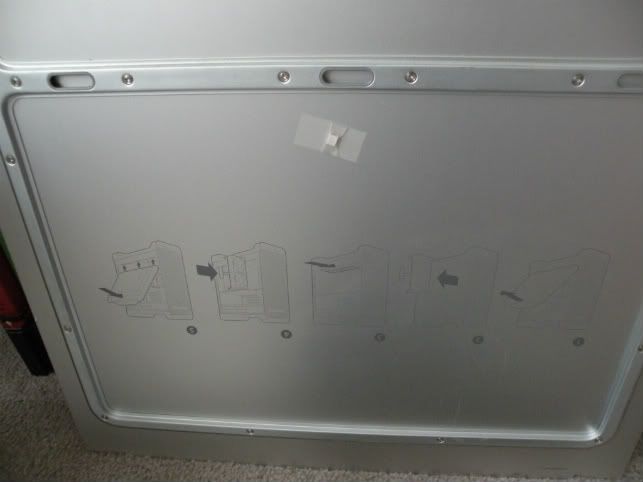
OK, I checked on the net to find out how to dismantle a LC G5, and boy, what a pain! I flipped through pages and pages of info and finally decided to follow this guide http://www.ifixit.com/Guide/Repair/I...ng-Unit/1953/1. Any comments or guidance on other guides is appreciated. Thanks!
-
Re: Yet Another G5PC MOD :) Yes I know...
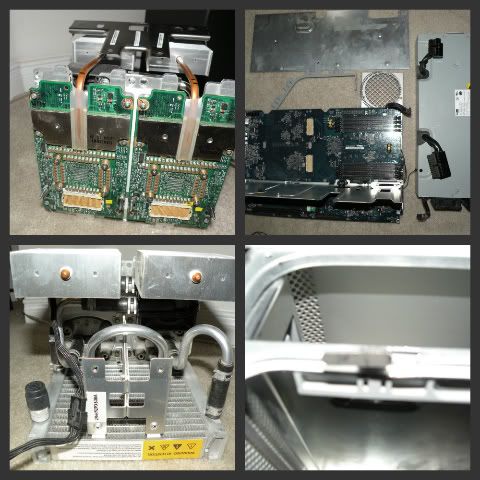
So moving along the disassembly continues (and with a silly unthoughtful rookie mistake - I should know my tools!:facepalm: - see pic.. :redface:
I will bring out the dremel tomorrow, for now, its the Leafs in Buffalo.
-
Re: Yet Another G5PC MOD :) Yes I know...
Theme decision made...Project ODST will be a military green with gunmetal finish. I have to figure out how to etch/incorporate the design into the side of the case...still trying to keep away from LEDs in the case, but might consider RED LEDs for the eyes...
Comments or feedback appreciated. Thanks.
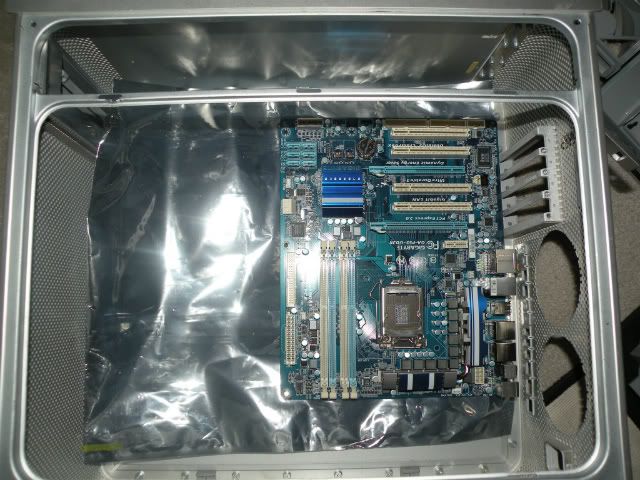
Here's what the case looks like now with the motherboard placed in it. I have to do something similar to what J-Roc did as the top separator would block the PCI slots http://www.thebestcasescenario.com/f...8&postcount=20
-
Re: Yet Another G5PC MOD :) Yes I know...
Nice! I will be watching this one.
-
Re: Yet Another G5PC MOD :) Yes I know...
That is one crazy looking CPU cooler.
-
Re: Yet Another G5PC MOD :) Yes I know...
I love G5 mods! Do you have any plans for the liquid cooler? I did my G5 conversion with an air cooled version, so I couldn't really reuse the CPU coolers, but it may be possible to reconfigure the liquid cooler to work with standard hardware.
-
Re: Yet Another G5PC MOD :) Yes I know...
@Fuganter - it is isn't it? Its a monster!
@Technochicken - The LC is controlled by the Open Firmware and don't think we can hack that yet :) Also, the cooling is not rated for anything new (i series or AMDs), air cooling will beat it out! That said no harm in checking up on LC mods ;)
-
Re: Yet Another G5PC MOD :) Yes I know...
Quote:
Originally Posted by
billygoat333

Nice! I will be watching this one.
thanks ... hope I won't disappoint :crossed:
-
Re: Yet Another G5PC MOD :) Yes I know...
Here's what I am looking at building from either bondo..please go easy on me...its only an artist's rendering :) I'll really have to work on the final product!
I will see if I can get some more of the case cleanup done tomorrow.
-
Re: Yet Another G5PC MOD :) Yes I know...
I would build with wood and finish with bondo. The less you do with bondo the better in my experience. It's not difficult to deal with, but not an ideal sculpting material. It's great for filling small gaps and smoothing surfaces, but not great for building up a large volume just to sand back down again.
-
Re: Yet Another G5PC MOD :) Yes I know...
Quote:
Originally Posted by
d_stilgar
I would build with wood and finish with bondo. The less you do with bondo the better in my experience. It's not difficult to deal with, but not an ideal sculpting material. It's great for filling small gaps and smoothing surfaces, but not great for building up a large volume just to sand back down again.
Thanks for the advice! Do you think I can use DAS clay instead and use a wire frame for backing?
-
Re: Yet Another G5PC MOD :) Yes I know...
Quote:
Originally Posted by
Neodymium
Thanks for the advice! Do you think I can use DAS clay instead and use a wire frame for backing?
That . . . I don't know.
-
Re: Yet Another G5PC MOD :) Yes I know...
So this morning, I set out to see if I can find some of the parts that I still need. Am I lucky or what...presenting to you....some of the donors for the project :D The victims don't know what's coming their way!:evil:
Old case! :banana: Also, just found out that it had a wireless card in it...:up:
I really got lucky with this one! :banana:
Ma, look what I found!!!!!! (Of everything else I wanted to find, didn't expect this one...LOL!)
I will try and do something today, if not I'm out until Friday (traveling on business). I will get back on it when I return.
-
Re: Yet Another G5PC MOD :) Yes I know...
Note on building the sculpture for the front like in the sketch...
I took d_stilgar's advise and called up these folks http://www.exotic-woods.com/product.aspx?s=basswood. Seems they have wood that really yields itself to sculpture, called basswood. I will see if they have the sizes I am looking for when I get back.
I also had another idea with air drying modeling clay, like this one https://www.currys.com/catalogpc.htm?Category=A191B004609, which is easy to manage. I was thinking about building a wireframe base, then model the shield, SMGs and the Skull in that order. Then make holes once everything is ready for mounting and for the LEDs (RED ones connected to HDD activity LED...that's what I am thinking for now).
Let me know what you think!
-
Re: Yet Another G5PC MOD :) Yes I know...
Here are some of the other participants in the project :D
Biostar board with Phenom II X4 830 mounted in it
HD6870 and Corsair XMS3's
Corsair cooler:
SSD:
Also, here are my initial thoughts on the layout. See the ducting, I am thinking I will deflect the air through them around the shield that will go on the front and hopefully, I will be able to maintain the airflow.
-
Re: Yet Another G5PC MOD :) Yes I know...
Someone ship me an AM3 ATX board, so I can stuff my current board into my PowMac G3!
(or help me out with dreaded sponsorship....)
You make me want to revive the project!
-
Re: Yet Another G5PC MOD :) Yes I know...
Quote:
Originally Posted by
AmEv
Someone ship me an AM3 ATX board, so I can stuff my current board into my PowMac G3!
(or help me out with dreaded sponsorship....)
You make me want to revive the project!
Thanks AmEv...I'm going to end up with 4 motherboards in a span of 2 days :facepalm: Too much of procurement! I already have the AMD board, a P55 board, an Intel Q67 board from the dell and the new 1155 P67 board I will be getting soon...
If I dont end up using it, maybe you can? ;)
-
Re: Yet Another G5PC MOD :) Yes I know...
We'll see soon enough.
Have fun with that T-Bird and a crappy HS clip.
-
Re: Yet Another G5PC MOD :) Yes I know...
The hapless victim fell to the driver and it's ilk, the drill - gave up the goodies I needed :devfrown: Here's the damage:
And then -
We have the tray and the IO shield!
That's it for me until Friday...on the road for a couple of days. :D
-
Re: Yet Another G5PC MOD :) Yes I know...
OK, just got back from my trip. I will post some more stuff tomorrow. But for tonight, here are my thoughts. I was originally going to use the front IO panel from the G5, but after I got the Dell, I realized, I can use that front panel and not have the Shield interfere with operation of the panel. Here is a pic of the panel itself and I am thinking about positioning at the very bottom of the front side (just above the power supply enclosure).
-
Re: Yet Another G5PC MOD :) Yes I know...
I rewired the original G5 front panel for standard headers, and it works perfectly. I found the pinouts for everything here:
http://www.insanelymac.com/forum/ind...owtopic=109381
If you don't want to do it yourself, some people on insanelymac sell pre-made adapters.
-
Re: Yet Another G5PC MOD :) Yes I know...
Quote:
Originally Posted by
Technochicken
I rewired the original G5 front panel for standard headers, and it works perfectly. I found the pinouts for everything here:
http://www.insanelymac.com/forum/ind...owtopic=109381
If you don't want to do it yourself, some people on insanelymac sell pre-made adapters.
Thanks TC...the shield I'm working on is going to pretty much fill the width of the case. So instead of using the original io ports, I thought it would be easier to relocate the panel further down. Checkout my sketch of the shield from the first page. If I am going to carve the Shield-SMG-Skull from wood like it was suggested before, then it would go from one side to the other all the way.
Appreciate the feedback.
-
Re: Yet Another G5PC MOD :) Yes I know...
I removed the front IO panel of the Dell and here are the parts from it
- Front USB/Audio
- The little white squares are LEDs
- The power switch assembly along with the cable
I am not sure how the LEDs work, but am assuming they're for HDD activity, etc. Have to figure out how to get them working with the motherboard I end up using.
The updated plan is to use the shield on the front spanning left to right and most of the front (like in the picture).
Here's a pic of the SMGs (courtesy Bungie...love those guys) I am going to either carve or model from clay. I am not really sure what my carving skills are, but I can play around with some putty before I make the final design.
I am hoping to keep the G5 as close to the original as possible, including the back plate. Sometime today, I am going to completely disassemble the G5 case and prepare the case for painting.
-
Re: Yet Another G5PC MOD :) Yes I know...
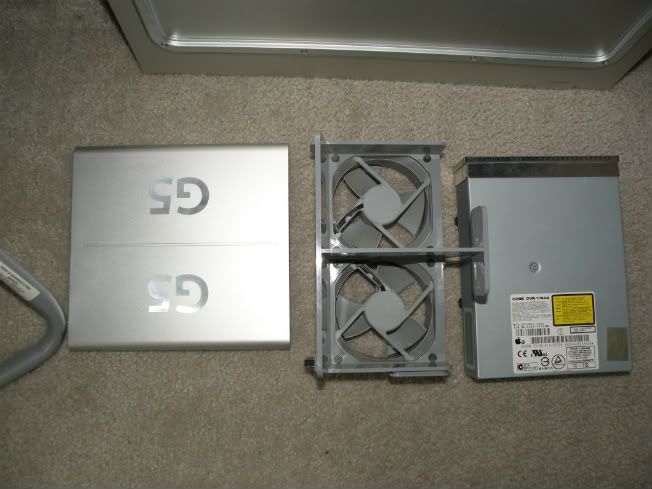
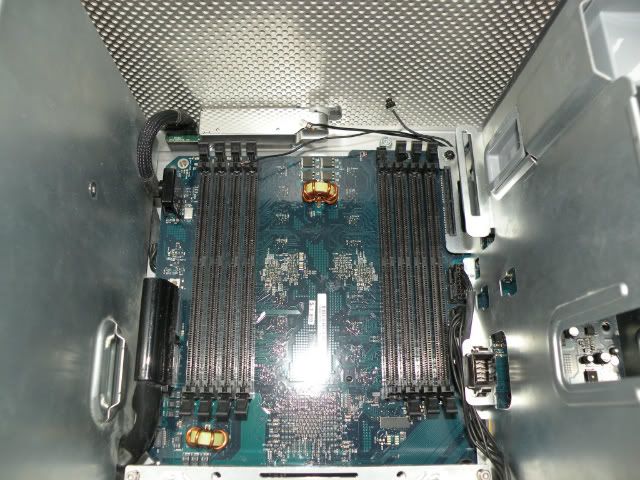
So I finally dismantled the case! What a PITA! Half the weight of the case must be just screws and nuts! :facepalm: Here are the parts ready for sanding (I'm borrowing an orbital sander from my neighbor):
The pic below is showing all the motherboard mounts still in place. I am not sure who said it, here on TBCS or another forum, the posts can be repositioned, trimmed and JB welded to fit my MB tray :up: That way, I also get the height to accommodate the back panel.
Also, as mentioned by a modder named Cyprio in a worklog he posted on bit-tech, I am going to keep the sliding door mechanism for the optical drive. That is really an amazing piece of Apple engineering.
For all the folks that are following this worklog, firstly, my thanks! I do have a question that I am looking for some thoughts on...I thought I would never use LEDs in this build, but am thinking, what if I used a couple of very dim (low voltage) LEDs and embed them in the plexi airflow panel that comes with the G5. Please let me know what you think.
I'm going to work on some playdough to get some ideas on how I am going to shape the shield/smg/skull tonight. I will post some pics regardless of the outcome, maybe someone might get a laugh out of it :D
-
Re: Yet Another G5PC MOD :) Yes I know...
Did some more planning on the color and design...the green should be darker on the final result and the orange should be more reflective - like the visor in ODST. Here's a preliminary artist's rendering of the view from the left side of the case. Sorry, I know it's not perfect and my skills are not the greatest :)
-
Re: Yet Another G5PC MOD :) Yes I know...
I went out yesterday to shop for some modelling clay (found what I was looking for @ Curry's) - to build the front piece.
Here are the approximate measurements of each of the pieces (Shield/SMG/Skull)
Shield: 7in width x 10in height x 1/4in depth
SMGs: 7.5in width x 10.5in height x 1/4in depth
Skull: 5.5in width x 6.5in height x 1/4in depth
I was hoping to play with some playdough earlier, but didn't get a chance to...I will do a quick mockup today to try my hand with it and see how it turns out. If the results come out satisfactory, I will move on to working with the clay itself.
The design on the right side of the case is going to be tricky, I want to incorporate it into the layers of the paint itself than being a vinyl on top once painting is done...there should be a technique to it, just have to find it.
Paint color still needs to be chosen...I am looking for a drab olive grey color...I may have to mix a couple together...our local crappytire store sells Krylon Camo paints...will visit them today. Also checked on Molotow (chromium oxide green or black green - like in the pic) which resembles what I am looking for, the store didn't carry it but can be ordered online.
I'll post my adventures with the playdough shortly...
-
Re: Yet Another G5PC MOD :) Yes I know...
Quick update. I tried to keep the G5 as intact as possible, however, I had to resort to cutting the back panel completely to accommodate a single fan vs both fans. I am strapped for cash, so I am reusing some of the parts from the backplate from the donor system. I am going to reuse the standoffs like this guy did here and place the motherboard tray (from donor case) over them: and here:
Once the JB weld cures, then I can start sanding. Also, I am planning to soundproof the case as J-Roc did here:
Playdough didn't work...too soft to hold the shape...I am going to buy some styrofoam to make mould's for the three pieces. I am going to work on the Power Supply mod tonight.
-
Re: Yet Another G5PC MOD :) Yes I know...
So I set about doing some more work today, in between "real work" :whistler: but ran into a design issue...my brain didn't register the logic for a minute...so here's my drawing of how I am going to do my whole back panel. I have the aluminium sheet and my neighbor has graciously offered to help with it...so we tackle the back plate tomorrow!
Also, thanks to some guidance from Technochicken, I gained most of my clarity back - brain was :dead: for some reason, but am on track with help from friends :D
Also, thanks to more help from Technochicken, I am going to modify the original fans and not the 80mm's...so all (mostly) fans will be put to use!
Here's my power supply, cheap one from Top Power (Never heard of them before), and I'm going to void the warranty to install it into the PS enclosure at the bottom! :) :
I will post pics of the PS as well once I am done...either I go through with putting the whole PSU in the original case or dismantle it completely, pics will be here :)
Until then...yours truly
-
Re: Yet Another G5PC MOD :) Yes I know...
Aight, worked some more on the PSUs...I really lucked out with this one...no cutting, nothing...just took the internals from ATX case and put them in the G5 PS case...even the connector fits like a glove...not sure what to do with the big honkin' fan though :D
Pics:
End result:
Only thing left is to cut slots for power switch and voltage selector, then close the box up and I am good to go...for now...
-
Re: Yet Another G5PC MOD :) Yes I know...
PS is almost ready. I bolted the PS down to the case using screws. Case is almost ready to go on. Need to cut slot for power switch and extend the slot where the cables come out. I will post the completed PS later today...
I rewired the back fans 5v and used a power switch to MB cable to connect them to the PS.
Have a few meetings today, but will become a little free around 6PM...I will work on the back panel and the rest of the fans then.
Still to be done:
- Shield/SMG/Skull front piece
- Etching/Engraving right panel (UNSC logo)
- Cut slots for front IO panel/power switch
- Back panel
- Sanding/priming
- Ordered paint (will get here in about 1 week or so)
- Fans
-
Re: Yet Another G5PC MOD :) Yes I know...
Very interesting PSU mod.
-
Re: Yet Another G5PC MOD :) Yes I know...
Quote:
Originally Posted by
Fuganater
Very interesting PSU mod.
Thanks! I guess it was because of the power supply I bought...I have seen a lot of other PS mods which, well, had a lot of work to be done on them...in this case, it was almost a straight swap.
Also, there is a ton of space left in the PS enclosure...maybe something can go in there :)
-
Re: Yet Another G5PC MOD :) Yes I know...
Finished the Power Supply (Finally!)
I moved the on/off switch to the top so I don't need to cut anything in the grill.
Next up, back panel...
-
Re: Yet Another G5PC MOD :) Yes I know...
That way, if your heatsink falls off, it can quickly hit the switch and save your procy :P :whistler:
-
Re: Yet Another G5PC MOD :) Yes I know...
LOL...that was good...hopefully, it won't and I still get to :banana:
-
Re: Yet Another G5PC MOD :) Yes I know...
All work and no play...so I thought I would have myself a laugh with something going around my brain...just randomness ;)
and says to himself when safe:
-
Re: Yet Another G5PC MOD :) Yes I know...
Good job with the PSU. It should look really clean once it's installed in the case.
-
Re: Yet Another G5PC MOD :) Yes I know...
Quote:
Originally Posted by
Technochicken
Good job with the PSU. It should look really clean once it's installed in the case.
Thanks TC, most of the credit goes to you for the PSU modding :D
-
Re: Yet Another G5PC MOD :) Yes I know...
I started working on the fans and so far the PCI and the front intake fans are done...I will post pics once all fans are ready. I used Technochicken's guide here: http://build-its.blogspot.com/2011/0...c-g5-case.html
Also, I changed the motherboard/CPU combo I thought I was going to use. Instead of my original plan to use AMD, I went out this evening and got me one of the newer Z68 based boards. I am going to use the i5 2500 in it. Pic of the board below:
So, this is going to be an all Intel build :)
More pics later today or early tomorrow (unboxing the MB + Fans)