-
Water Cooling Turbine
Hi everybody!
My water cooling kit came in today.
Here are my ideas for the setup to house the radiator, fans and Resevoir.
My cooling system: the Swiftech H20-120 Premium Kit
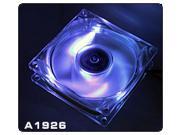
Fans: Thermaltake A1926 120mm Blue LED Case Fan
Resevoir: XSPC Passive 250mm Reservoir - SILVER
Basically it will look like this:
Back exhaust:
Front looking down tube:
Here is a section cut from the top:
The unit will sit ontop of my computer and, the large tube will house the radiator in the center and air will flow over it to help cooling, then the tube will taper to meet the entering fan and be pushed thru the radiator. I'm going to add a second fan on the back side to help also.
Obviously I did not add any colors to anyting.
It will mostly be silver and black with Blue lights
I'm not sure how to "Dress up" the outside of it yet. but I"m working on it.
I have to order the resevoir yet, but I thought I'd see what you guys thought before I get too far into this.
So... What do you guys think?
-
Re: Project: Water Cooling Turbine
Well, looks like this might actually get under way. My first real creative Modding project. Everyone wish me luck please!
Today at lunch I went to a local concrete block facility and picked up a 2' section of 6" dia. Sonotube. Its basically a thick hard cardboard tube that has a coating on the inside to make it smooth for forming a round concrete column. It was only $1.50 per foot too. but the bastards charged me $3.00 to cut it. LOL
I'll try to get some pics tonight after my bowling.
-
Re: Project: Water Cooling Turbine
ok, Here is what I got done over the weekend.
Here's a shot of the parts and the tube I purchased:
I started by laying out where to cut the tube so the radiator and fans will slide down into it from the top:
here are the holes i had to cut:
And here is the radiator assembly in the tube:
Next I cut a section of board to form the backing for the back of the tube.
I then cut the hole out of the middle for air.
this piece will help me to mold and shape the exit of the tube.
And here it is glued into place:
Thats it for now. :)
-
Re: Project: Water Cooling Turbine
Hmmm... here are the specs posted on NewEggs website.
Model
Brand Thermaltake
Series Thunderblade
Model A1926
Spec
Type Case Fan
Compatibility Case
Fan Size 120mm
Bearing Type Sleeve
RPM 2000 RPM
Air Flow 78 CFM
Noise Level 21 dBA
Power Connector 4 Pin
Color Transparent
LED Blue
21 db doesn't seem that loud to me.
especially for 78 CFM. Most of the ones I've seen in that CFM range are around 30 db or more.
-
Re: Project: Water Cooling Turbine
Here's my next update:
I left off with just one round form on the rear, so I made another for the front:
Then added some bondo:
and some more bondo:
after some sanding I added some spot putty:
here is the finished end.
Up next was the front part. I first had to make a template to help shape the bondo as access to this area was kind of tight.
Here is my first attempt. I think it turned out pretty good.
and here is a shot after adding spot putty:
While that was drying, I turned my attention to the base. I cut some plastic panel to shape:
then I beveled the edges of the sides so they will fit better to the tube:
Thats it. Next up is to cut a design in the sides of the bottoms, and sand the inside of the tube.
FYI, my resevoir, coolant and glow wire should be delivered tomorrow. YEAH!
Later!
-
Re: Project: Water Cooling Turbine
Ask and ye shall receive:
Here is all the stuff I got from FrozenCpu:
The resevoir next to a 12" ruler:
The end. -Notice the small scratches, I could not see them untill the flash.
The end with the cap off.
The cap itself:
I got just a small amout done yesterday. I was way to busy with parties and family.
I laid out a pattern on the side of the bottom frame.
Then I taped the two sides together
I have to go get my scroll saw from my Dads workshop to cut them out.
Later.
-
Re: Project: Water Cooling Turbine
maybe you guys can help me decide on what shape hole to cut into the tube. here are some options I came up with:
Option 1: Just a large rectangular hole.
Option 2: One small hole:
Option 3: Two larger holes:
Option 4: Irregular, geometric shape cut into tube:
FYI the bottom panels will not have the holes on them as shown in the pictures. -This one actually matches the design of the bottom and panels that will be applied to the tube. so it fits the best with the overall design. but does it look good? this is what the bottom panels look like
Please any comments are welcome!
-
Re: Project: Water Cooling Turbine
Here is an updated 3d model.
-
Re: Project: Water Cooling Turbine
I made it out to my dad's tonight.
here is a shot of how much sawdust was on my scroll saw. I haven't used it in a long time!
First i drilled the 1/2" hole for the tubing. and small holes for the blade to go through.
Then cut out around the 1/2" hole
Then proceded to cut out the rest:
Here is the finished cuts:
obviously I have some filing and sanding to do, but it turned out pretty good.
-
Re: Project: Water Cooling Turbine
Tonight I sat down and filed the plastic cutouts.
Now I have 2 identical, mirror image pieces. Isn't that lovely?
-
Re: Project: Water Cooling Turbine
Well, here is tonight's update.
I stopped picked up some semi-translucent plastic as a backer for the bottom section,
I cut it to shape and set it aside.
Then came the task of cutting all the small strips to add to the sides.
Too bad half way thru, I almost sliced the end of my left middle finger off. I was holding a straight edge and pulled a razor blade right across the tip. -I didn't get any photos.
Then I glued the sides, front and back together and added some gussets for strength.
Then I glued on the little strips:
then I glued it to the tube:
Then just for fun, I checked to see how the tubing would look:
Thats it for now. Tomorrow I'm going to get working on the cover that goes over the radiator.
Later,
-
Re: Project: Water Cooling Turbine
Thanks for everyones encouragment on this! I really appreciate it.
So, as promised, here is another update.
I had some blue CC tubes that I never turned on inside my case, so I took those out to use in the base. They will only light up the base area. with that Translucent plastic film I showed earlier.
Then I worked on the front and back of the cover for the radiator:
Here is a shot installed on the tube.
Then for grins, I hooked up the fans to test airflow. WOW does having two of those fans move a lot of air!!! It literlly felt like a vacume at the front of the tube. Here is a shot with the flash on:
and with the flash off, The bright blue really washes out the image. I will have to play with the settings to try and get a better shot.
Thats if for a few days, I am going on vacation tomorrow and won't be back untill this weekend, So everyone take care, Later!
-
Re: Project: Water Cooling Turbine
Hi everybody, I'm back from our Vacation. Unfortunaly my wife's father passed away while we were gone, so we had to cut our trip short. I still managed to find a little time to get a little modding done, so here it goes.
Here is a shot of the sides attached to the radiator housing:
and some braces on the bottom:
Then I mocked up the removable top:
and here it is all together:
Then I turned my attention to the 3 tapered rails that run along the tube.
I used a thin sheet of plexi sandwiched between two plate sheets.
I left a recessed in the bottom edge of the rail:
\
The recess area is for the glow wire I purchased.
Here are some shots of it lit up:
And with the lights out:
Then pictures really dont' do it justice. it is much brighter than shown in the pics and looks great!
One down, 2 more to make, then I can mount them on the tube.
-
Re: Project: Water Cooling Turbine
Thanks everybody, dgrmkrp, You are right, there is a cap on both ends that does hinder the airflow into the fins. however after testing the airflow and feeling how much air moves thru the tube when both fans are running, I thing it will be ok. There is a ton of air moving.
as for how its going to tie into the case... I'm not really sure yet. I have some ideas for the case, but for now I'm just concentrating on the top. FYI, my current computer case is all aluminum silver and clear plexi with blue lights everwhere.
here is a shot:
so obvously, that will be next. :)
-
Re: Project: Water Cooling Turbine
I had some time to get some stuff done this afternoon. I ended up getting alot more done than I thought I would have.
I finished making the other two light rails.
I got both sides of the back tube wraped in the trim.
then before mounting the rails, I took a piece of plexi and melted it to match the ouside of the curve for the main window.
as I heated it with a torch, I used tape to help pull it down to match the tube.
This is the final shot with it all taped down ready to cool.
Then it came time to fit the light rails.
I had to add trim to the intake end of the tube:
then I cut a slot for the wire to tranition from on rail to the next. the other transition happens inside the back box.
here is a light rail attached to the side
with the lights off
so what do you guys think?
Up next comes some serious thought as to the size and shape of the window and how I will cover the edge to make it look good.
I know I have to order more glow wire so I might get some other goodies too.
untill next time,
-
Re: Project: Water Cooling Turbine
Tonight I added a cover over the glow wire in the front, although its hard to see being white, the flash kind of washed it out.
Then I laid out the shape of the tube window:
and using a dremel, I cut it out:
here is the final window:
Here is the piece of plexi I heated and bent to match the tube:
and here it is taped to the tube:
Just for fun I installed the blue CC lights and tested the cover for the bottom.
I think it is alittle too bright. I might have to come up with something a little less intense for the bottom light.
I then traced the shape of the window onto the plexi and covered it in tape to protect it.
Cut it out:
So my final thoughts on the window were to "MAYBE" laser etch something in the plexi. lets say TBCS? or logo or something. I'm not sure yet.
happy modding, later!
-
Re: Project: Water Cooling Turbine
You are correct, Spawn, I don't wan't to see any brown tubing. I'm trying to figure out how to install the window and still paint it. Like I said earlier, I may be forced into painting sooner than I had hoped.
Just as small update tonight.
I started to trim the underside of the front. You won't see it much, but in my opinion, attention to detail everwhere counts!
Here is what started with, I added a few trim pieces around the edges:
Then I simply added a few layers of board down cut to random shapes. Note: this area will not have any glow wire.
The only other thing I got done was to rough up the surface for the other side of the tube:
Like I said, just a small update tonight, I'm waiting on the extra glow wire that should be here Thursday.
and an update on doing the laser etching. I will have to wait on that. they guy that I know that has access to it teaches at a local high school and he informed me that he won't have access untill school starts, which is at the end of august.
later,
-
Re: Project: Water Cooling Turbine
I just had an idea, but I"m not sure how to go about doing it.
Basically I want to add some led's under the tube instead of the cc tubes that are too bright. I found these 2 color leds: http://www.frozencpu.com/products/18...l?tl=g6c77s665
my idea would be to have several of these wired up below the tube and would start out as blue when the liquid is cool. they would be hooked up to a controller that would slowly change them over to the red as the water temperature went up. then as needed if the water temp went down, they would return to blue.
anyone know how to accomplish this. I'm not very good at creating ic circuits. I can do basic soldering, but circuit design is not my fortay!
-
Re: Project: Water Cooling Turbine
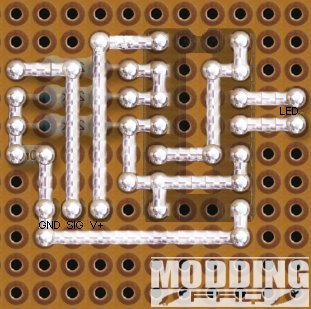
first off i want to know if you think you can solder something like this.. its the basic version, fades a bicolor led from 1.2 to 12V, we would manage that with a ntc and some stuff more.
-
Re: Project: Water Cooling Turbine
i think this would take some more time, so are there bipole leds avaiable? cuz this circuit works like this i think
0V= led got power from the upper pin.
power rising to 12V= power fades to the lower pin(upper pin goes ground)
so i think youll need a bipolar led which is pin 1 red and pin 2 green or sumething
dunno yet, gonna find that out 4 ya
-
Re: Project: Water Cooling Turbine
Here is tonights update. I started to layout the framework for the recessed glow wire lighting on the back side of the tube:
Then I taped the glow wire along next to it just temporarily.
Here is the framework all finished: -note: wire has been removed.
and here it is at night:
Then I proceded to layer the covers over the top of the wire:
and her is the effect it gives. The picture really does not show how bright it its. you can see how the glow lights up the other "layers".
I am going to finish the covers and add more layers as I see fit. but the wire will be removed for painting. After its painted, I can run the wire back around the path and tuck it in between the tube and the first layer of cover. but the entire thing will be hidden. all you will see will be the glow radiating out from behind the multiple different layers.
What do you think?
-
Re: Project: Water Cooling Turbine
ok, here we go...
I finished doing right side of the turbine tube:
Here is a close up:
Then I moved to the other side:
Here it is finished.
The glow wire on the window side will follow the shape of the window and be concealed by a trim ring. I still have to add a little detail to its surface and I can't install it untill I get it painted:
Speaking of paint. I started to mask off the 3 light bars on the tube. I had to cut a long strip of masking tape to a very thin piece, so I used my stripe cutter from my Airplane modeling days.
here is a piece of mask on the top section:
I finished the other 2 sections with mask and now its ready for paint.
My son's birthday is tomorrow so I probably won't get anything done untill after he goes to bed, So I may or may not have another update tomorrow night.
Later,
-
Re: Project: Water Cooling Turbine
NQ, thats ok, no offense taken. :)
Thanks for the reps and positive comments guys!
Here we go again,
Ask and you shall receive, you wanted to see it painted, here it is in black. BORING black base coat. I have a lot more air brushing to do, but for now I just applied the base coat.
While the body was drying I turned my attention to the supports for the resevoir inside. I cut and glued up some strips of plastic.
Then I used my dremel and a sanding drum to rough out the shape:
The shape is meant to look kind of like an airplane wing so air will flow smoothly around them.
I covered it in fine filler:
Then I used my straight edge sanding block to smooth it out:
here is the final piece:
I have to cut it into 6 sections to use around the resevoir. I also have to figure out how I'm going to attach them to the resevoir. so for now, thats it.
Cheers!
-
Re: Project: Water Cooling Turbine
Once again, here is the nightly update:
Tonight I decided to turn my attention to building the LED light bar for the "Fuel Tank". Here are the Leds and Resistors I got from LSDiodes.com
I started by cutting 2 strips and drilling small holes in them equally spaced for the leds.
Then I added a thin plastic spacer to act as an insulator between the wires.
Here it is with the led's in place.
and here is the negative side wired together.
Here is the positive side soldered together with the resistors.
Here is a test. They all light up. Excellent the third one from the right on the bottom seems like its not as bright as the others. I might have to replace that one.
I put it under the tube and put the translucent cover in place.
OH NO! it looks like ****! The led's have too great of a spot light effect and leave very distinct bright spots. I hate it!
Looks like I may be going back to the cold catholdes, they were a little bright, but atleast it was uniform light.
What to do.....?
-
Re: Project: Water Cooling Turbine
well, +rep to Sgtm for the first to suggest sanding the tops of the led's, that worked great! Thank you.
I tried it on the left one first.
Before:
After: Very nice and diffused!
And here it is on the body: Much smoother glow, it still has a few "hot" spots but deffinetly not as bad. I can live with that.
I added a little detail and rivits to the window trim and tube: -I know it looks like alot, but after airbrushing, they will fade away an be hardly noticed.
I also painted the frame on the exhaust fan.
Then I cut the supports for the resevoir to 3 equal lengths to fit inside the tube:
here they are as a mock up holding the resevoir centered in a spare piece of the tube:
I have to notch the end of each one to fit around the chrome mounting ring.
One down, 5 more to go...
-
Re: Project: Water Cooling Turbine
Quote:
Originally Posted by
elbarto241

imagine if you transfer this genius onto a case
Actually I do have plans to continue this design into a case. Basically everything will be hidden behind panels that light up and be motorized to expose the case and inside. It will be crazy! Not to mention how much work it will be getting all the motorization working.
There are 4 seperate motorized items:
1. Doors that open to a blow hole in the front
2. A dvd burner that motorizes up from the top to expose the slot loading mechanism
3. Motorized flip over panel to acces the fan controller, memory card reader and light switches
4. Some type of covering over the side window to expose a side fan and inside of the case. (still working on the design for this)
But first things first. I have to finish the cooling system, then I can start on the case.
-
Re: Project: Water Cooling Turbine
Like I said, its still in design phase. I only have a model to show the movable parts. so picture this case covered similar to the turbine only you won't be able to tell a difference between where the openings and movable parts are and the stationary sections are.
Here it is with everything closed.
And here it is open:
here is another angle to show the twin intake fans and the side fan.
The around the side fan will be clear plexi so you can see the inside of the case.
The pop-up slot load dvd player may interfere with the turbine on top (not shown obviously) -so I might have to move it.
Probably put some type of logo on the front of the case in that big blank area, but not sure what yet.
But that gives you guys something to "Drool" over. LOL
-
Re: Project: Water Cooling Turbine
ok, the vicodin seems to help alot so I got alittle work done tonight.
here is a shot of the fan I painted: Not exactly thrilling, yet...
I figured I'd play around with the airbrush tonight so here is what I did.
I took the trim piece for the window and taped off a few areas and painted some rust color:
then I added some silver and tan:
Followed that up with a little back drybrushing:
And here is the final piece:
So what do you guys think? I still have to do soemthing with the rivits but I have to get a fine paint brush. I was just playing around so I'm not sure if I like the colors. I think it looks pretty good, just not sure If I will like it if the whole thing looks like this. But then again, I wanted a rustic, weathered look to a metal structure so I think I hit it pretty good. Comments?
-
Re: Project: Water Cooling Turbine
I've been really busy the last few days and haven't had a chance to get much done, so just a small update for now.
I started to airbrush the main body. Here it is with some of tape for the different colors and pieces:
and here it is with the tape pulled off (Not Finished)
I went to remove some of the tape to get a feel for the whole thing (Not finished yet) and it started to remove some of the paint. looks like I will have to fix that.
I also got the other sections of the resevoir supports made. I forgot to take a picture though. Maybe tomorrow night I will get them mounted to the resevoir brackets and can test fit it in the tube. I noticed somethign else I completly forgot about while working. The led light bar I instaled on the bottom of the tube goes right thru where the tubes from the resevoir are supposed to come thru the bottom. Again, I'll have to redo this area somehow.
-
Re: Project: Water Cooling Turbine
Hi everyone, Sorry its been a while, been busy going to the doctors but lastnight I got some more done.
I finished painting the main round part of the body. I still have to figure out the back half.
Unweathered:
Weathered:
Then I glued the window in place:
I also started to run the el wire around the window:
I have an issue with the el wire for the other side, It has a bunch of dark spots in the wire. however when I bend the wire, they move. its like the el is not working correctly. Not sure what the problem is. I may have to replace this piece. good thing is its only tucked in behind the trim work.
Some night shots:
FYI there are 3 el wires all together.
I should be able to finish the el wire around the window and isnstall the trim ring next. After that, I can concentrate on getting the resevoir mounted.
LOL, looking at these pictures, I just realized that I forgot to paint the rivits. DUH.
TTFN
-
Re: Project: Water Cooling Turbine
I told you guys I would not let you down.
Here's a shot with the window installed. it doesn't sit as flat as I'd like it to. this is mainly due to the curved surface. If I had it to do over again, I would have prebent the trim piece before installing it. Oh well, I think it still looks good:
I laid out 3 60 deg lines so I could mark the resevoir brackets:
then I just drilled some holes and cut out the padding on the inside for the head of the screw:
I painted the supports black for now:
here are both supports with the factory mounts cut off:
I then drilled and tapped each support:
And here they are with the supports mounted and ready to go:
Installed on the resevoir:
then I slid it into the tube. Very tight fit. I will have to go back and do a little touchup paint when I'm done:
Then I installed the translucent side panels on the bottom:
I fixed the issue with the tubes that come out of the resevoir. I cut some holes and made it work: :)
Just so you guys can see, the back part is packed full of wiring, 3 transformers, 2 fans and the radiator. I still have more to go!
I'm getting to the point of forcing myself to decide what to do on the back half. I'm still not sure yet....
-
Re: Project: Water Cooling Turbine
Here is just a small update tonight.
My dad was adding some gutter helmut to his house so I snagged a piece. here is a section of it.
I ran to the hobby store and bought some plastic modeling parts so I could start some "kit basing". not really though. I'm building most of it from scratch.
sorry, not very exciting.
-
Re: Project: Water Cooling Turbine
I continued with the kit bashing tonight. here are some pics.
-
Re: Project: Water Cooling Turbine
Ok, I'm close to being done with the kit bashing.
Here are some Chrome wheels from a car kit my friend gave me. I thought they would make the perfect "Intakes" for the vents on the back. What do you think?
Here are the ones in the back. they look like a fan blade. Infact I think the model of the wheel was for an old style mustang and it was called "Turbine". Ironic huh?
Here is the kit bashing I did tonight on the other side:
By the way, I'm not sure if you realize this or not but the top of this whole back comes off to access the radiator, fans and transformers.
Lastly, here is a shot looking at the end of the resevoir inside the tube. you can see the two holes I cut for the tubing directly below the barbs on the resevoir.
I hope I have enough room to install the tubing and get the clamps tight when I get around to it. :)
Up next. More painting, masking, painting, more masking, painting some more, masking........... You get the idea.
Later,
-
Re: Project: Water Cooling Turbine
well, after alot of work, here is where I'm at:
Final shots of the Kit bashing:
Then I started to mask stuff off and do some painting:
Some more masking and painting:
then after some weathering with the drybrush, here are the results:
What do you guys think?
I'm just about done with this part of the mod. I have to get all the wiring soldered up and in order, then I can permenantly mount the resevoir with the tubing and afterward do some final paint touchups. but overall construction is almost done. Now I have to start planning out the case for this...
-
Re: Project: Water Cooling Turbine
OK, last night I got some wiring done.
Here are some shots.
I installed everyting into the back housing and cut the wires to clean things up.
Then I soldered and heat shrinked them together.
Everything goes to 2 molex connectors. One for the fans, (12v) and one for the leds and glow wire. (5V) -I didn't use the same plug because I want to be able to remove the radiator and fan assembly without having to cut any wires.
And now the obligitory night shots with all the lights on. -Note, I still don't have the led for the resevoir installed as I"m waiting on my sleeving.
And here it is with the lights on, but still running.
My hope is that when the tubing is filled with blue liquid, that the led in the resevoir will light it up. right now I just cut a piece of tubing to show you what it will look like. That is all I can do untill my sleeving comes tomorrow. :( By the way, have I ever mentioned I HATE FEDEX!!!!!!!!!!!!!!!!!!!!!!!!!!!!!!!!!!!!!!!!!!!!! !!!!!!!!!!!!
Later!
-
Re: Project: Water Cooling Turbine
Ok, here is the stuff that arrived today.
I proceded to sleeve the led wire. (The only wire that may be seen on this mod by the way).
here it is installed:
Thats it. ITS DONE!!!!!
-I'm not going to set it up just yet. I still have the case to make.
-
Re: Project: Water Cooling Turbine
Water Cooled Turbine Closing Images:
I'll let the images speak for themselves: