-
Project: Blue-Hellfire Feb 2 stick a fork in it..its done!!!
ok i am carrying my worklog over to multiple forums so i can get feedback from all angles while i do my build. this will catch everyone up to where i am now.
Be warned from the onset that this is gonna be a looooonnnnngggggg build.
Also the quality of some of the pics wont be brilliant but all I have to work with atm is snapping shots between a tempermental vivitar 3mp camera that eats effin batteries like candy or my N95 with the 5mp cam on it. I will do the best I can with pics and try to give you as much detail as I can. also being in England atm i dont have a dedicated mod area, i am betting this is the main reason i get the evil eye from wifey when i talk about working on it lol. The project tends to follow me into whatever room i decide to sit in to mod that day, kitchen, sitting room, back garden, hell even wet sanding in the bathtub isn't off limits.
Technically I am building 2 PC's, one for me and one for the other half. internals will be identical but she doesn't have allot of care for the exterior modding aside from paint.
so mine gets the surgery to make it the way I want..hers just gets some lipstick and a new pair of shoes.
Knowing from the beginning that the budget will be a limiting factor since all the components will be bought in pairs ( if they aren't identical spec hdwe wise wifey says I can sleep in the back shed for a while till I come up with a good excuse for the deviation =oX)
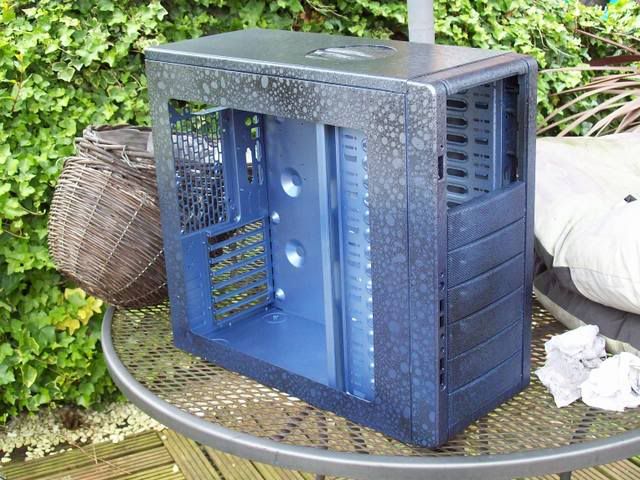
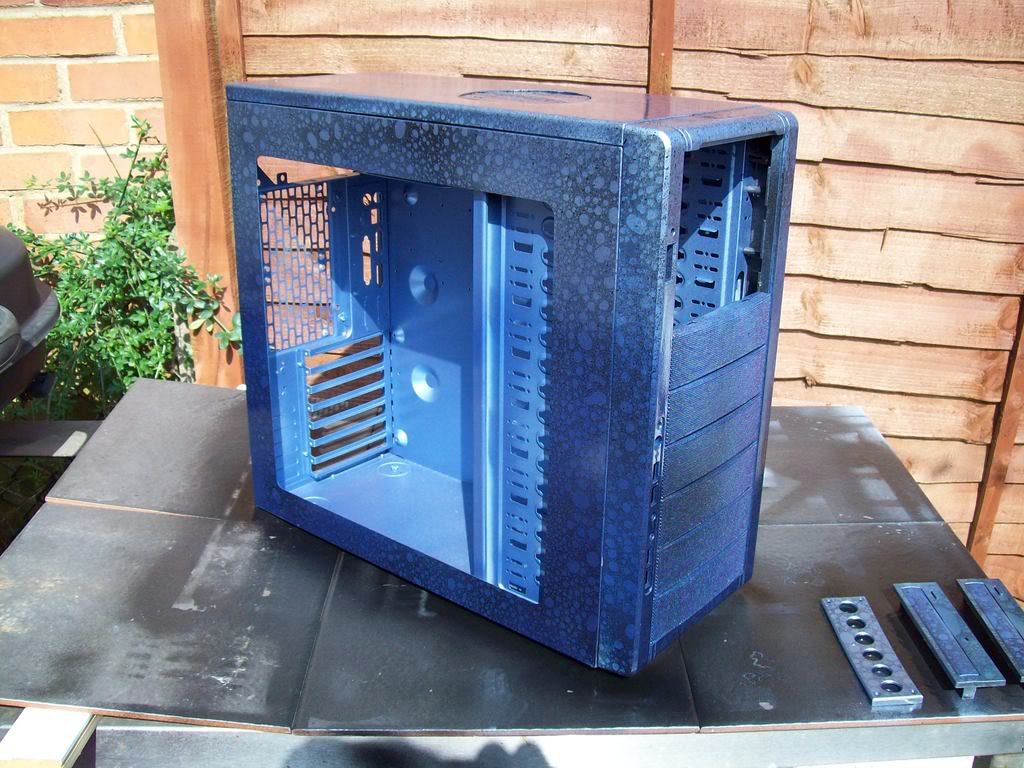
we start out with a budget case bought from our friends over at scan, a Sharkoon Rebel 9 economy edition
this will serve as a good canvas for me and sufficient room for the hardware we are considering.
My goals for this build are as follows:
increase ventilation through the case
add a side window
add internal lighting
try my hand at wire management
pull out the airbrush after 17 years and see if the hands still work
lastly, come up with matching systems that will last us four or five years.
While I know I am no where near as good as some of you in sketch up, I did try my hand in it to see what I could come up with.
Here's the basic results:
these depictions give me a good idea of how I want my layout to be. Mind you the color scheme isn't picked yet aside from my determination to use blue in it lol.
Placement of the lower intake and upper blow hole should give me the airflow I am looking for.
When coupled with the turbine intake on the front panel and the dual 80mm exhaust at the rear I think there should be plenty of air moving through the case.
First things first...
deconstruction:
off comes the front panel
followed by the front usb io panel
then the power and reset buttons
leaving me with a bare front panel to play with
Now onto the fun bits:
i hit Wickes(for those in the states Wickes is like Valu home center..smaller more personal version of home depot) and picked up some cheap clear plexi
I know this isnt top of the line mod material but its cheap and cheerful and foots the bill for what i need to do with it.
off i went to grab my trusty razor knife...scored a strip of plexi and placed it over the edge of the coffee table ( makes note..wife really doesn't appreciate me modding in the sitting room) after a bit of downward pressure *POP* the piece snapped clean off scaring the crap out of the 2 dogs in the process.
this piece will be the filler for the bottom portion of the front panel.
i started out using araldite(5 min epoxy) to hold it in,
once the epoxy set i got paranoid and followed up with super glue down the joint as well simply because i didn't wanna get halfway through makin this front panel and have the seam go pop and have to start over.
once the new insert was affixed to the front panel i had a bit of a rummage around the local Sunday market and found a cheap hole saw set (more on its quality later)
i chucked up the largest diameter hole saw in the drill and marked everything up.
i would love to tell ya that i took 10 different measurements, made sure all were spot on, crossed them all with Einsteins theory of relativity and then only after putting on all appropriate safety gear including gloves goggles and steel toed boots, started drilling.
i'd be a lyin **** if i did, truth be told i set the front panel in place back on the chassis. marked out where the center of the stock 120mm fan cage sat and freehand marked the center point for it (Gasp).
then i grabbed my custom specially made turbine intake port unit ( shhhh i know its just a Cd sleeve but its all fun =o)~)
marking the ring to cut off the end was kinda easy..lay a sharpie marker in the table and spin the cd sleeve against it for the straight line.
end was removed with trusty dremel tool and cutting disc.
checking the diameter against a 120mm fan
looks close enough for me. the sleeve is a bit wider than necessary but i will make small filler panels on the fan housing itself so it wont be noticeable.
i then reversed the placement of the mounting panel in the chassis to give it a bit more depth and set the front cover back on the chassis with the cd sleeve through the hole so i could mark where to cut it.
i know i will prolly get beaten severely for not having a pic of that process but to be honest, when yer on a roll its hard to remember to snap pics of every step you take.
once i had everything sitting flush, i marked the intake with a fineline marker again and cut it with the trusty dremel again.
i sanded the interior and exterior of the cd sleeve to give the adhesives something to "bite" onto. i figured that had to be better than leaving them ultra smooth so things pop off later.
i set the cd sleeve into the front panel and grabbed the araldite again
cant ever say i waste things... what was a scrap cd sleeve top is now a pallet for mixing epoxy, hehe
this one i epoxied from top and bottom. the followed up with a fine bead of super glue as well to make sure it never comes off.
wow from this angle the tube looks alot longer than it actually is..
a quick hop to Halfords brought me back with this
English bondo!!!
eh it suits a purpose for now. i know the front panel was never meant to be a "one fill then done" project so i popped open the can, grabbed a mixing pallet ( technical name for a few paper plates )
and promptly got kicked out of the house into the back garden =0/
apparently the wife doesnt share the same affinity as i do for the smell of body filler.
undeterred i went ahead and layed on the first coat.
Note to self:Use masking tape to keep body filler out of areas you dont want filled moron!!
now i got to do the fun and wonderful job of sanding the first coat down so i am close to where i wanna be.
-
Re: Project: Blue-Hellfire
this is after sanding the first coat.
i needed to find some flat drive bay covers as the curved mesh ones that came with the case wouldn't fit the idea i have in my mind. after lookin at the 6 machines in the house i only have one that will work as a donor..shamefully its mine and not one of the wifes or either of the daughters =oX
luckily it is the box i am replacing with the PC i am building so its not too painful to rip things out of it.
so pillaging i went, i took the first drive cover and super glued it to the top slot of the case. i want this area clear inside the case because i will have the blowhole in the top panel and i wont want the chance of it being able to hit an optical drive once they get installed.
time for more body filler to blend it all together
some more sanding and time for coat number 3
thats after a bit of sanding and just before i drop on the first coat of primer.
after coat 1 of primer
e bay came through for me in a good way.
nice thing about this one is that the pots come off the end of the pcb now at a 90 degree angle so i can fit them into the side pillar of the front face plate.
first thing i did is dismantle the fan controller and use the faceplate to layout and mark my holes
then i used the actual pcb pots to double check and make sure they were all gonna be center.
then i loaded up the trusty drill with a small bit for guide holes and *POOF* i got thrown out in the back garden.
apparently the sound of the drill was drowning out an ever so important episode of Judge Judy =o/
eh no matter, i went ahead and drilled my holes and snuck back in the house. hehe
just about now Judge Judy was ending so i grabbed my dremel to help me remove some of the excess plastic on the back of the face plate that would allow me to flush mount the fan controller.
plastic removed it was time for a test fit.
then i threw on the knobs to make sure they would look the way i wanted from the front once assembled.
winner!!!!!
eh for now thats where i am gonna leave off on this update.. nice day and more to go dremel cut saw fill and sand.
possibly small updates during the week but more than likely looking for the weekend for major posts.
till then
cya soon =o)~
-
Re: Project: Blue-Hellfire
WOW! So far so good dude. /sub I'll be watching.
-
Re: Project: Blue-Hellfire
a nice thing about that fan controller is that its not very deep and when its installed it hides itself entirely in the front panel.even with the front panel installed on the chassis theres still a 2mm gap so no chance for a short anywhere.
thanks for takin the time to read through this everyone. all comments are welcome
as it sits now the shopping list for this build looks like this
already purchased:
Sharkoon Rebel 9 economy
Generic 6 Channel fan controller
Still need to acquire:
Asus P5KC, iP35, S 775, PCI-E (x16), DDR2/DDR3 1066/1333/667/800, SATA II, SATA RAID, ATX
520W Corsair HX Series Modular PSU, ATX, EPS12V
Intel Core 2 Quad Q9300, Yorkfield Core, S775, 2.5 GHz, 1333MHz, 6MB L2 Cache, OEM
4GB (2x2GB) Corsair XMS2, DDR2 PC2-6400 (800MHz), Unbuffered, CAS 4-4-4-12, DHX
Zalman CNPS9500-AT Intel LGA775 Aero Flower Cooler
250 GB Seagate ST3250410AS Barracuda 7200.10, SATA II, 7200 rpm, 16MB Cache, 11 ms, NCQ
512MB BFG Tech 8800GT OC, PCI-E 2.0, Mem 1800MHz GDDR3, GPU 625MHz, Streams 112, 2x DL DVI-I
2x LiteON DH-20A1S-18C Black 20x DVD±R, 8x DVD±DL, DVD+RW x8 / -RW x 6, DVD-RAM x12, SATA Black
2x Sharkoon 12" Blue CCFL 2in1 Kit x2 CCFL Tubes
2x 120mm Akasa AK-174BK-S Black Case Fan, 3 Pin, Sleeve Bearing Ultra Quiet (17dBA) Retail Package
2x 80mm AKASA Auto Thermal Sensor Black Fan, 3 Pin Ball Bearing
Saitek PK 02AV Eclipse II Wired Keyboard, BackLit Purple, Red + Blue Keys, USB 1.1/2.0, Black
as i mentioned at the beginning this is a budget build x2 so as we scrape together cash and get new bits you will see them get added little by little :up:
-
Re: Project: Blue-Hellfire
Quote:
Originally Posted by
Cobra

as i mentioned at the beginning this is a budget build x2 so as we scrape together cash and get new bits you will see them get added little by little :up:
This is how mine went. Took me like a year to finally build both my computers.
-
Re: Project: Blue-Hellfire
/note to self - start working with bondo!
amazing stuff you can do with that thing:D the front panel looks sweet! like the fancontroller idea
-
Re: Project: Blue-Hellfire
got home from work last night and had a look at the back panel for the case.
decided i will end up changing the rear exhaust to a single 120mm fan rather than the twin 80's
will mean a little bit more work to obtain the look i want but hey....thats what we are here for right? lol
this weekend i should have pic updates on the main side panel and prolly either the top or bottom panel of the case.
cya soon
-
Re: Project: Blue-Hellfire
I like the idea for this case design as well. This is a well laid out design, simple, yet extremely functional. Sweet!
-
Re: Project: Blue-Hellfire
ok.... couldn't bother waiting for the weekend to post a bit more of this mod in progress.
hmmm i hate stock pc case feet. especially when they look like this.
they were screaming at me to kill them each and every time i looked at them.
not liking to leave anyone disappointed i had to oblige. off they came.
simple push through pin construction made removal easy enough.
took a bit of a stroll over to Homebase to find something suitable to use for case feet.
about an hour later i ended up back home with these.
drawer pull handles with a knurled finish on them.sad bit was they only had 3 in stock. so my wife being the loving woman she is undid the display model from the front of thier display section, threw it in a bag for a different knob and just told the cashier thats the way we found it.
gotta love a chick who bends rules so i get what i want sometimes hehe.
one of the reasons i wanted to replace the feet on the case is because i am planning on a 120mm intake fan mounted inside the bottom of the case. need room to let the air draw in. plus i generally think they look tons better than the stock crap.
note favorite coffee mug in picture
plenty of clearance now and after i hit the knurled bit of the feet with some color matched paint i think they will look mint.
now back to the front panel......
i still had 2 more holes to drill in the front panel before i considered it finished.
i had to make room for these.
i know i know... i said 2 holes and theres 3 switches there. one i have other plans for but not in this part of the build.
the other 2 are basic momentary switches.
they will be replacing the buttons on the dvd drives to open and close them. since i plan to stealth them behind face plates i figured i might as well go the full monte and do a proper job of it.
so i drilled the 2 holes
so now the front panel looks like this
i am quite happy with this result as it will give me ample area to botch together a mess on it when i grab the airbrush in a few months =oX
with the front panel nearing virtual nirvana i figure its time to take a look at the rest of the case to see what i can throw together with some bubble gum n duct tape.
before i can rebuild it i obviously had to break it thoroughly so out came the power tools (insert Tim Allen grunt here)
time to get rid of some rivets..
started drilling out the connecting rivets
got to the front dvd optical and hdd frame and have a rough idea for what i may do with it.
i will cover that in a different update, for now i just kept drilling rivets
till i got it broken down to look like this
its totally amazing how many of them little damn things they use to hold something so small together.. i know car manufacturers that don't use as many lol.
so now tis all in pieces for this update ending. next one i see what else i can break bend twist n twirl to end up with what i want in the end.
cya next time
same bat time
same bat channel
=o)
-
Re: Project: Blue-Hellfire
Looks like a great start . .Looks real Smooth! :up:
+Rep for finding a use for the disc containers.
-
Re: Project: Blue-Hellfire
Looks good with those feet on it. But do you want to have a intake from the floor? Wouldn't you get a lot of dust from that?
-
Re: Project: Blue-Hellfire
will be some dust but it will have a fan filter on the lower one so nothing but air gets in the system itself. i will prolly have to clean the filter once a month but i dont mind that part.. might make the filter a clip on unit to make it easier when i get to that part.
-
Re: Project: Blue-Hellfire
-
Re: Project: Blue-Hellfire
-
Re: Project: Blue-Hellfire
found some more time for another update.
where i left off before we had new case feet and a chassis broke down into pieces.
i planned to add extra ventilation to the case with a bottom intake and an upper blow hole.
these of course need holes for the fans to draw air through.
here is where i get to come back to my £5 hole saw set and and let you know how much of a quality piece of equipment it really is.
the poor thing didn't have a chance in hell of cutting a hole through either steel panel.5 minutes at low speed effectively damn near flattened the teeth of the cheap blade right out barely scribing the circle shape into the case floor.
it did good on the plexy for the front but appears to be useless for anything pertaining to metal.
finally giving up on the hole saw idea i grabbed my jig saw and proceded to add the additional ventilation holes.
its not the cleanest cut in the world but after some attention with a file at a later date it wont look too bad.
the hole placement is set back far enough so the rear of the front turbine intake ends where the side of the floor panel intake begins.
should create plenty of air flow coming in.
now to take care of one of the exhaust mods to help remove some of that hot air.
i covered the top panel with tape and measured out where the power supply will end up. then layed out the placement where i want the upper blowhole.
grabbed my trusty jigsaw again(didn't bother even tryin the wanna be hole saw this time =o))
and this is what i end up with
now i don't think in the final product that this will be the only hole in the top panel.
i can almost bet that by the end of the build i also add a windows either over the optical's or the power supply.
just have to decide on that once i get to that stage i guess.
alright, lets take a look at the ugly stock rear panel
first off can someone explain to me why case manufacturers add extra holes to case bits for no apparent reason.
how is someone actually supposed to be able to control and direct air flow is there are extra holes and louvers all over the place to dissipate the slip stream.
eh first to close up the louvers..grabbed the small hammer and the 2.5lb mini sledge to use as a backer.
holding the mini sledge against the back of the panel i lightly tapped down each louver with the small hammer until all the gaps were closed.
the back panel itself had mesh covering the area where 2 80mm fans could reside. i wont be needing this much ventilated real estate so i will have to fill some of the stock mesh.
grabbing some masking tape i first masked the rear panel from the inside. then came to the outside and only applied masking tape to the area where the 120mm fan will sit.
then i grabbed my body filler and *POOF* i got thrown outside again.......
eh at least its a nice day out hehe
ok so i mixed up some body filler and carefully covered the area where the louvers were and also the vent area. this also took care of a few other random holes the manufacturer put in the case for no apparent reason.
let dry for about an hour and peel off the tape.
then i was left with this
grabbed my trusty sander to start knocking things down to level
and ended up with this
still needs more work to get it totally flat but it looks much better than the stock crap already in my opinion.
i will be removing that stock mesh area once i get things leveled out and replacing it with something different. havent decided with what yet but you will be the second to know.(wife being first)
ok since the rear panel needs a bit more filling and sanding and you guys know how all that looks already i will move on to a different bit and just bring back the rear panel later in the build when i am ready to cut the stock grills and get it ready for paint.
important bit:
i need a show of hands here......who thinks the stock panel on this case looks like crap?
(/me raises hand, annoys wife long enough to make her raise her hand and threatens to take away his 2 girls pocket money away for 2 weeks if they don't raise their hands as well)
ok majority rules.
now we have to do something about it.
since the beginning i have planned a window in the case but i didnt want a basic rectangle or circle.
i also want to stay with the hellfire theme i have picked so i covered the whole side panel with masking tape and started testing ideas with my wife as a control panel
(she doesn't really get into modding and just kinda puts up with me cause she loves me) after a few different sessions of hearin her eh, ugh, ewwww, i got to a " that one looks ok"
once i had the design layed out i ran out to the back garden.
eh i would have gotten kicked out here anyhow once i start cutting so i might as well save a step and just start here for a change.
grabbed my drill with a fair sized bit and drilled a hole at the center or each flame curve.
starting points for the jigsaw.
after about 30 mins i ended up with a rough version of what i want it to end up like
this week i will see if i can spend a few hours cleaning up the edges a bit on the flames . the jigsaw does an adequate job but does leave rough edges that will need to be filed down and sanded.
i think thats it for todays update..
weather is supposed to be nice so i will spend some time out in the garden
( prolly sanding or dremeling something)
and maybe get the BBQ fired up later today =o)
note that its modded too..got the biggest charcoal one (gas is cheating for real BBQ) available, then brought it home and sunk it into the top of a stainless steel hospital table. 17 jigsaw blades later i have a great BBQ with a work surface built in =o)
cya soon
-
Re: Project: Blue-Hellfire
-
Re: Project: Blue-Hellfire
Great Job on those flames, looks really cool! :up:
-
Re: Project: Blue-Hellfire
Great work, and kudos on an awesome BBQ space too. +rep
-
Re: Project: Blue-Hellfire
i was gonna grab one of Bills Blowhole covers from Mnpctech for the top but i figured i would try my hand at a custom version first and see if it fit the mod a bit better.
i grabbed a piece of plexi and cut it to the rough dimensions of the cover i want.
then i traced on the outline of an image i planned to use.
out came the dremel.
after 30 mins of
and
i had the image cleaned up sufficiently to hit with some primer.
that left me with
covers the hole fine in the top of the case
and will look good once i add some mesh behind it.
i dont think it looks bad and it will fit in with the theme fairly well once painted and installed.
also with the mesh.i look around locally for "expanded metal" mesh as i am a cheap sob lol
heres a bit of a tip if your looking for cheap (free) mesh
hit up the local quick change oil service places in your area.
ask them if they have any of the old air filters in thier trash ( if they say no they are lyin.)
the mesh backing on them is great as a use for grills and the likes
recycling at its finest =o)
-
Re: Project: Blue-Hellfire
Wow that really turned out great! The Scull is awesome +Rep
Another good place to look for free mesh is the dumpster near a residential construction site. I found approx 60lbs of aluminum expanded metal scraps there.
-
Re: Project: Blue-Hellfire
I dont know whay everyone always has so much trouble finding mesh!!
I dont think its all that easily available in the states but in the uk just get down you local builders merchants and get a sheet of expanded metal, wont be more than a couple of pounds for a 8'x2' sheet.
-
Re: Project: Blue-Hellfire
wont be more than a couple of pounds for a 8'x2' sheet
free=better =o)
-
Re: Project: Blue-Hellfire
just ordered up 4 of these LiteON DH-20A1S-18C Black 20x DVD±R, 8x DVD±DL, DVD+RW x8 / -RW x 6, DVD-RAM x12, SATA Black
2 for my rig and 2 for wifeys
i already plan to stealth them in the front panel of mine and relocate the open/close button
will have to see what i can do about the chassis of them tho.. they are a bit ugly n nekkid
-
Re: Project: Blue-Hellfire
quick update...did some work this week on the induction fan for the front turbine unit. (pics will follow for the weekend update.
a mojority of this mod will be painted deep candy blue but i need to come up with a color for the interior chassis parts.
right now i am leaning towards high gloss black as it wont detract from my blue lighting i have planned for it.
i also have the option for white but i think that will end up being too "in your face" when everything else is added.
any other ideas or thoughts?
dont really want to have it same color as outside of the case cause i dont want to lose the work i do in there in a mass of blue.
thanks for any input =o)
-
Re: Project: Blue-Hellfire
Hi everyone, been a fairly busy week here in non mod life so i will go through what i have done so far in the spare time i have had.
first off my wife snuck in a gift this week for me
they will go well with the theme of the mod once its completed
up close and personal this is how they look
did some lookin around here and there to find a way to make a turbine fan nose cone.
in and out of every hobby shop in and around London and no one had anything usable for what i wanted it to look like.so it was time to think outside the box and see what could be subbed in to do the job on it and make it look right.
decided i would hit B&Q(home depot in the states)and see if i could find something ,,,,,anything with a cone shape on it.up and down every aisle, even checked out every type of cap to damn near every product they had just lookin for the right shape. was no good =o/
so me and wifey stop at woolworths cause we need a few small things out of there for the home.
low and behold wifey actually found something to work.
Silly putty!!! well not the actual putty, but the egg shaped container its sold in =o)
so i took the upper half and stripped the stickers off of it.
once i had it sanded lightly and ready to go on i grabbed the super glue.
i centered the half of the egg on the fan hub and taked it on with the super glue.
after 3 or 4 times popping it off then putting it back on so i make sure its centered i finally got it where i wanted it.
so i hit it with some primer and this is what it looks like now.
remember the optical / hdd cage
well it needs to go on a diet so out comes the jigsaw for the rough cuts.
after a few decisive cuts i am left with this
this leaves me the bit at the top for the opticals and then the small support bit at the bottom for the turbine fan support.
thats where i am gonna leave things off this atm. i have alot more planned for this week all pending on available time.
remember everything so far in this mod has been the "rough draft" the refinement is yet to come once i get the layout close to where i want it.every edge still has to be filed or sanded,and every piece primed and painted.
still waiting on opinions for interior color choice.
i am leaning towards high gloss black at the min bit cant commit yet .
cya in a few days =o)
-
Re: Project: Blue-Hellfire
free mesh *drools* my cuz owns a car auto wreckers so i may be able to get tones and tones of them sweet y didnt i think of that ty +rep
-
Re: Project: Blue-Hellfire
just a small update today.
kinda screwed up my lower back over the weekend so its makin it a bit hard to get any modding done at the min.
but this is where things are sitting so far.
start with a pic of how the nose cone will look when its in the turbine opening
i think it looks pretty good for what it is =o)
next lil thing i got around to was Blow hole cover V2.0
i wasn't totally happy with the first one i did as i felt i could do better.
so once again i grabbed my dremel, this time the canvas was a perspex clip board from staples.
its a bit thicker than the material i used to make my first fan grill so i already thought it was an improvement.
first thing i did was cut a hole in the clipboard the size of the opening i wanted.
this is the point where i am gonna get bashed,kicked, clubbed and beaten.............
i started with an idea in which i wasn't sure if it would work out or not so i just dug into it.
i didn't take pics of the actual process because you all know how to do the simple stuff like drilling and shaping things with the dremel and assorted bits.
all i can say is that i started with this basic shape
then i fashioned a lower jaw bone as well and cut both pieces out of the same clip board,
once i had the rough pieces cut out i drilled and ground out the eye and nose sockets so it was similar to my other blow hole cover.
heres where i did something a bit different.
1st my wife let me borrow one of the steel muffin tins from the kitchen.
2nd i grabbed my small propane torch.
mixed the 2 together with a bit of imagination and a touch of clear 5 minute epoxy to join things together afterwards and i ended up with this.
i now have a 3D version of my skull for my blow hole cover. i used the torch to heat and melt the rounded edges of the skull around the shape of the muffin tin to give it a bit of depth.
next i hit it with a coat of primer as i will plain this unit with high gloss black shortly.
once i have it painted i have an idea of something i want to try out which i think will work good on that part in particular.
more on that once i figure out exactly how i wanna do it.
one nice thing this week tho is my opticals came in
so of course i had to start dismantling them hehe
who knew there were so many parts in these damn things? lol
eh they will more than likely end up getting a paint makeover and a full stealth before they go in the case
anyhow i will cya this weekend with something more hopefully
-
Re: Project: Blue-Hellfire
wow i thought that fan grill looked **** till you painted it omg thats cool now aslo bad luck about the back my dad always has a crook back(im 14) lol good work
also what did u want those bottles for i dont know where u could get them but i would like to know.... ttyl
-
Re: Project: Blue-Hellfire
pain meds kickin in atm...what bottles bud?:blivnk:
-
Re: Project: Blue-Hellfire
lol oops different mod
told u im retarded good pain killers help
ttyl
-
Re: Project: Blue-Hellfire
Nice work. I like the plexi skull fan grill.
-
Re: Project: Blue-Hellfire
ty,
havent decided if i am gonna stay with version 2.0 yet or do another revision. i have a few diff ideas i will try out (with pics this time) and see what turns up.
-
Re: Project: Blue-Hellfire
sorry for the lack of an update this week guys,
lower back is really giving me a problem atm. doc's given me some decent drugs so once they kick in i hope to be able to sit upright and actually do a bit of modding soon.
cya as soon as i can =o)
-
Re: Project: Blue-Hellfire
Thats perfectly understandable. I did some exercise incorrectly and my arms feel like there about to drop off. Anyway, I hope to see more of this project when you have recovered.
-
Re: Project: Blue-Hellfire
yay:clap::clap: i can move again!!!
well at least somewhat, enough to get a bit of modding done.
in the end i decided to stay with that version of the blow hole cover. i am going to try some different things with it to see the effects i end up with and hopefully come up with something i am happy with.
this past week was a slow one for modding my machine as wifey wanted to see some progress with her own so she didnt feel left out.
so this is what i been doing this past week.
remember me and wifey have the same case we started with
hers we did basic mods to, store bought side window for the sharkoon rebel 9 ran us a whole £10 and i deem that cheap enough to justify not cutting the whole myself lol.
stock pic courtesy of the sharkoon website.
we didn't like the stock plexi that came with it cause it came with mounts for 2 120 mm fans built into it.
pulled that out of the frame, filled the holes with some bondo and smoothed things out.
primed it all up and went to halfords for her to pick out some colors.
she wanted a dolphin/water theme so various blues came home with us.
she went to work on her new side panel piece of plexi
she is engraving for her first time so i will ler her do her thing while i do the paint thing.
popped off the front covers fron the dvd drives and also the front faceplate from her fan controller ( they do have to match or i get my but kicked)
i wish i had some pics of the process up to now but to be honest my back still wasn't up to par and she left the new cam up in the bedroom most of the week and i just wasnt up to hitting those stairs back and forth for the cam so i just got on with it.
did a basic fade for the undercoat of the case including the drive covers and fan controller cover.
then grabbed the squirt bottle.
filled er up with some water and set the case one its side.
spritzed the side of the case till i thought the water drops were big enough for the effect she wanted.
then grabbed an aerosol can of gloss black and lightly misted the entire panel.
note to self....when watching commandos vids on painting make sure to have the sound on and also watch them to the end.
see part of my prob is i am a MAN
i see an example of how to do something and figure,,,eh i got this.
since i am said MAN i cant be like a normal person and actually get the information i need first time through and then go try on my own.
i say that for one reason
i almost had to strip the whole damn case down and respray it like a moron.
i misted the panel and left it sit on its side for about 35 mins.
all the while it was sitting there i am thinking hmmmmm.. that don't look quite right.
so figuring i was screwed anyhow i went into the house and came out with some paper towels.
started dabbing off some of the excess water that was left on the panel.
ugh this looked like crap, so wifey came over and grabbed the paper towels and decided since the paint was screwed anyhow she would scrub it a bit and see what happened.
tis there where the bit of luck came in.
when she rubbed it wasn't perfect but it did pull up a good bit of the paint that was inside the bubbles themselves and that made it look the way she wanted it to in the beginning.
little more rubbing with the paper towel and first side was deemed done.
i continued this on the rest of the faces of the PC
top first
then other side panel
one at a time, the only difference being, after misting i only had to wait about 10 mins for the gloss black to flash dry before i grabbed a paper towel and dabbed off the excess.
all in all it turned out pretty good looking.
i also did the face plates for the drives n fan controller
once everything was "bubbled" i pulled out the clear coat and layed out 6-7 decent coats of it.
now the pc is mock up assembled and waiting for the clear to cure enough for the color sanding and polishing.
which leaves us here..
thats it for this week guys.. i have done some small bits on my own rig but i felt it more important to keep being able to sleep in the bed as opposed to the shed by putting her PC up here =o)
cya soon
-
Re: Project: Blue-Hellfire
Looks great M8. I really like that effect, is that a pearlescent underneath?
Clear coat the crap out of it if it is, it will make it look really deep (like those oldie cars with the heavy metal-flecked paint).
-
Re: Project: Blue-Hellfire
nah its more of a metallic i think she picked up a ford color called paris bluefor the one with the most metallic in it . no worries tho. its got 6-7 coats of clear on it now.. i will rub that out in 2 weeks or so and see how deep it is.. if need be i will rip more on later
-
Re: Project: Blue-Hellfire
This is realy coming together love the skull great use for an old air filter sweeeeeeeet like the bubbles too +rep +subscribe
-
Re: Project: Blue-Hellfire
That gives you a really cool finish. I may try a few colour combinations of a few pieces of scrap I have laying around. Purple on white??? Hello next mod.
-
Re: Project: Blue-Hellfire
Quote:
Purple on white??? Hello next mod.
it will look good providing you use the right shade of purple..
purple bubbles would be cool.but.would ya start with a white base or purple? :banana: