Page 5 of 6 FirstFirst 123456 LastLast
Results 41 to 50 of 56

Thread: Off Road Electric Kick Scooter Build

  1. #41
    Draco Dormiens Nunquam Titillandus Technochicken's Avatar
    Join Date
    Sep 2009
    Location
    Atlanta
    Posts
    386

    Default Re: Off Road Electric Kick Scooter Build

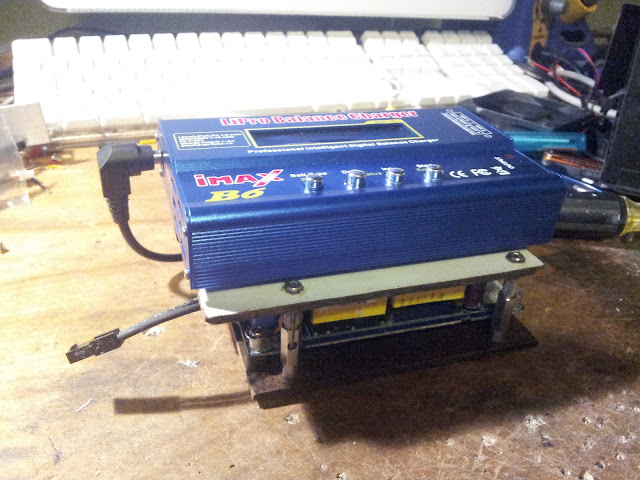
    To make the batteries more convenient to charge, I made use of my computer modding skills to build an all in one power supply and charger. I pulled the 12V 18.5A power supply out of a dead iMac I had lying around, and mounted it to a composite sheet. I screwed standoffs into the sheet, to make another layer above the power supply. The charger is held to the layer via some cable management clips that came with a PC case. I then mounted the whole assembly in an old ATX psu shell.

    PSU:


    Mounted together:


    In the case:


    I also made a parallel charging harness, so I can charge all the packs simultaneously.

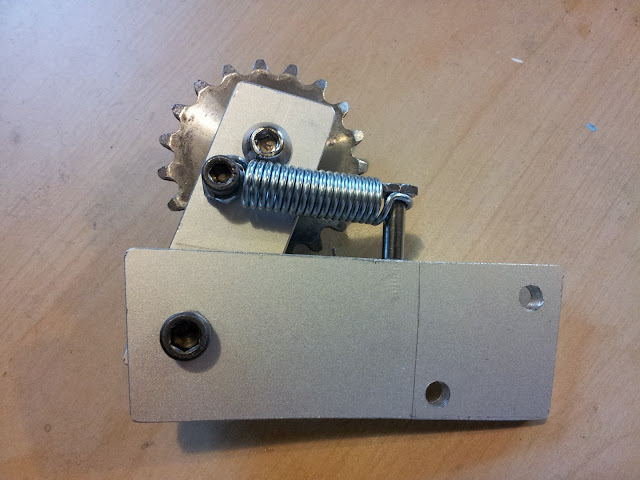
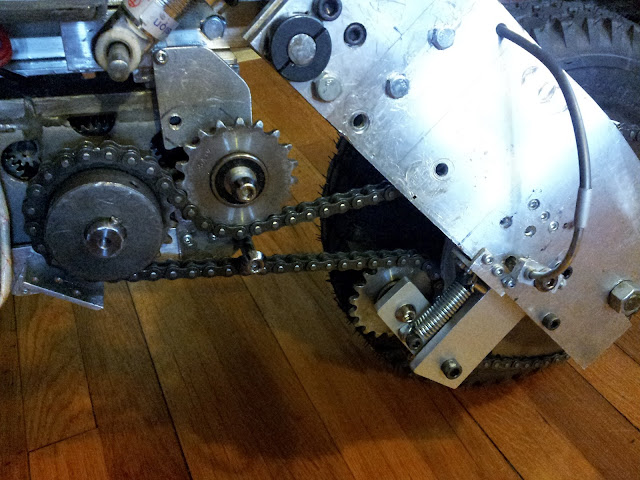
    Also, to prevent the chain from coming off, I built a chain guard out of some angle aluminum. I cut wedges out of it so I could bend it, and then brazed over the seams.


    And a video. I made a camera mount out of an old cell phone holster, and it attaches just below the handlebars. It could use some more stabilization.


    During this ride, I reached a max speed of 24 mph, and went 15 mph average while moving.

    As you'll notice, it didn't go as smoothly as I had hoped. The chain guard did work, and I was able to go over the trail much faster than I had previously been able to. That is, until the chain broke the chain guard:


    I've rebrazed it, but it obviously needs to be supported on both ends. Also, I managed to lose the master link of the chain at the end of the ride, when I went off the large bump between the grass and the asphalt. I ordered 5 more from McMaster, so they should show up in a day or two.

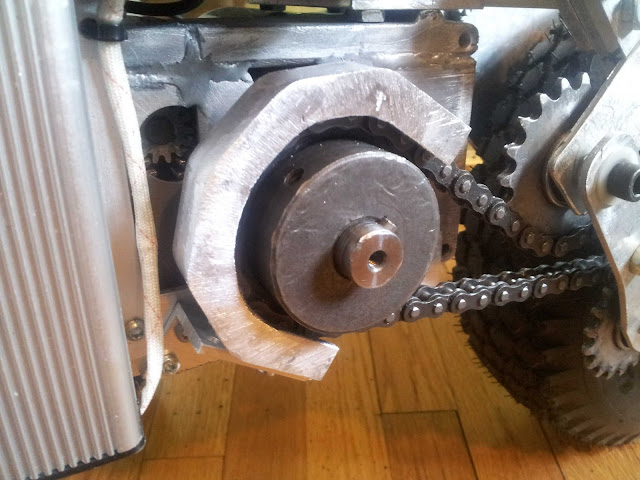
    Also, some pictures of the whole thing:


  2. #42
    Administrator OvRiDe's Avatar
    Join Date
    Dec 2005
    Location
    Tulsa, OK
    Posts
    4,586

    Default Re: Off Road Electric Kick Scooter Build

    Nice work.. and congrats on Hack-a-Day!!

    http://hackaday.com/2012/07/07/all-t...scooter-build/

  3. #43
    Draco Dormiens Nunquam Titillandus Technochicken's Avatar
    Join Date
    Sep 2009
    Location
    Atlanta
    Posts
    386

    Default Re: Off Road Electric Kick Scooter Build

    Thanks! Here's a third video, same course as last time, but smoother due to a helmet cam rather than one mounted on the frame, and also a bit faster than last time.


    Looking back this was a terrible idea, but I tried going up a long steep hill at the end, and I gave it full throttle most of the way up. At the very top of the hill, I noticed a huge drop in power, and it sounded like the chain had come loose again. It hadn't, but it still made weird grinding sounds when I turned the throttle. Turns out I burned out two of the three motors. They can still turn, but they do so much more slowly and less smoothly than they should. I opened them up, and one clearly has some burned out windings. The enamel on the wire is blackened in places. Lesson learned.

    I have one extra, as does a friend of mine, so it should be back up and running this weekend. Also, I have some more drivetrain refinement to do to keep the chain in place on impacts. Basically, I just need to slightly rearrange the idler sprockets.

  4. #44
    ATX Mental Case
    Join Date
    Feb 2012
    Location
    USA
    Posts
    184

    Default Re: Off Road Electric Kick Scooter Build

    Wow incredible work. Lol this might be totally different but seeing it seems you know allot about controllers and Motor you might be able to help me huge.

    I have a Golf Cart that seemed to be the same concept. New Batteries New potentiometer however you spell it. Anyway the electric throttle part is new. I cleaned every terminal. Took the Motor apart to check out inside. Brushes all looked good as well as the winding from what i could tell. I cleaned everything inside also. The solenoid tests correctly . According to the test procedure one side should be roughly 5 volts lower then the other or its a bad solenoid. Anyway i tried everything and its been 2 weaks now and im still not sure whats wrong. The controller on your scooter looks exactly like the one in my cart just smaller.

    Here is my problem is is driving me crazy and making it so we cant use our cart.

    Its a 36 volt Yamaha G16E 1998 golf cart but that shouldnt matter as we are just speaking electronics right now. Batteries fully charged right off the charger are around 40 volts but drop to about 38v and stays there. That's normal. Also i know these Batteries are perfect because they are less then a month old purchased by me and i use them in my old 1986 cart that runs fine with them.The 1998 cart we bought to replace the 86 but since owning it have had no luck.

    Ok here is my question that you may be able to answer. I have lets say 38 volts during testing. The cart is extremely slow after driving maybe 20 feet. So i drove it sitting on the floor testing Voltages with the peddle to the floor. Wide open Throttle i get 38+ volts everywhere besides the wire going from the controller to the Motor. That wire only shows 24 Volts? I tested at the Motor which has 4 posts 3 show over 38 volts but the one coming from the control only shows 24 volts.

    Your Opinion or anyone else reading this threads Opinion on what is wrong?

    Bad Controller? (Everything is aiming to this but i always thought when a controller died it just dies completely. I can still drive around just extremely slow 2mph maybe)

    Bad Motor? (Everything looks ok to me but really not sure how to test it with the 4 posts.I know the Motor moves the cart)

    Sorry for asking this question but after reading your whole log i realized your Scooter mod is basically same as a Golf cart as far as electronics go.

    Awesome ,Awesome talent you have Kid. Also you look young so i can only imagine your future.

    Very Impressed !! (Also let me know if you can help me with my problem)

    MybadOmen

  5. #45
    Mostly a nutcase CorsePerVita's Avatar
    Join Date
    Mar 2008
    Location
    Oregon!
    Posts
    426

    Default Re: Off Road Electric Kick Scooter Build

    Nice work dude!

    I'm curious though, what made you want to use the specific tires you have on it?

  6. #46
    Draco Dormiens Nunquam Titillandus Technochicken's Avatar
    Join Date
    Sep 2009
    Location
    Atlanta
    Posts
    386

    Default Re: Off Road Electric Kick Scooter Build

    Thanks!

    I thought about using mountain board wheels at first, but I decided I wanted at least 10 inch wheels, for both clearance and their general ridiculousness. These particular wheels came with a hub that was designed to have a sprocket mounted to it, which was convenient, and also I have the option of switching to knobbier tires, if I want to try riding in the snow or something like that.

    My only real complaint about these wheels is that they have pretty crappy bearings that are poorly shielded and have some play in them. Switching out the bearings is one of the first things I plan on changing when I start school and have access to more tools.

    @mybadomen (I totally read your name as "my abdomen" by the way )

    Thanks!

    It could be that your throttle's output range does not cover the entire throttle input range of the controller, so that the controller never gets the full power signal, even if the throttle is floored. Is there any way you can either adjust the positioning of the throttle's potentiometer, or reprogram the throttle input range of the controller?

    If you're sure that it's not the throttle, if the motor's only getting 24 volts from the controller, but you're putting 40 volts into the controller from the battery, that's a lot of voltage drop over the controller. That does make it sound like a controller problem rather than a motor problem.


    Back on topic. I've replaced the motors, rebuilt the chain tensioner to accomodate more extra chain, and significantly rearranged the idler sprockets. I'll be doing another test ride this afternoon, to see if it all paid off. Pictures and maybe another video of the changes are on the way.

  7. #47
    Mostly a nutcase CorsePerVita's Avatar
    Join Date
    Mar 2008
    Location
    Oregon!
    Posts
    426

    Default Re: Off Road Electric Kick Scooter Build

    MOAR VIDEO! Lol! This is a rad project man. That is a really cool way to get around. Once you minimize the leeching friction, what do you think the max distance will be?

  8. #48
    Draco Dormiens Nunquam Titillandus Technochicken's Avatar
    Join Date
    Sep 2009
    Location
    Atlanta
    Posts
    386

    Default Re: Off Road Electric Kick Scooter Build

    Well, I lied when I said I'd have pics and a video soon, but I have them now. Since the last post, I've actually gone through two chain tensioner editions, the first of which was a miserable failure, and the second of which is pretty much the final version.


    This new tensioner is made from of 1/4" aluminum. I got the metal from some iMac stands I happened to have lying around, which is why the larger surfaces of the metal are anodized.

    The bolt that holds the right side of the spring was screwed directly into the 1/4" edge of the aluminum. You can just barely see the peaks of the screw's threads on the side of the metal, since the screw only has about 1/64" of metal on each side.

    I would have preferred to have the smaller sprocket at the end of the swinging part of the chain tensioner, as it would respond to bumps more quickly due to it's smaller mass, but the geometry did not work out.


    The pivot point actually pivots around a bearing(!). Since I don't have the proper tools for either boring a press fit hole for the bearing or actually pressing the bearing in place, I used the same method I did for the tensioner's small sprocket: I drilled out a 1/2" hole, which is the largest drill bit size I have, and then carefully filed the whole to the 7/8" O.D. of the bearing. I could not apply enough force to press the bearing in place with my wooden vice table, so I carefully hammered the bearing in, with an anvil (yes, I have an anvil but don't have a proper vice) on one side, and a block of aluminum on the other, so that I wouldn't destroy the bearing's shielding.


    The combination of actually using bearings and using a lot more metal makes the whole assembly feel extremely solid, especially compared to the previous version. To mount the chain tensioner to the swingarm, I bolted it through two 1.5" x 1.5" squares of 1/4" aluminum. Where it's mounted, there's a full inch of solid aluminum.

    I kept the part of the previous chain tensioner assembly that stopped the chain from coming off the drive sprocket, as it did it's job properly.


    I added an assortment of stickers to the steering column. From top to bottom, the are:


    This chain tensioner was a drastic improvement over the previous one. I managed to ride two lengths of the trail that I had previously never been able to ride all of without losing the chain. However, riding on the field by my old elementary school, the chain tensioner managed to move more than it had been designed to, so it horribly overstretched its spring. When the tensioner stretched past horizontal, the spring became caught on the corner of the tensioner, which is why only about a quarter of the spring was actually ruined. Fortunately, this is an easy problem to fix. All I need to do is cut off and round the corner, so that the chain tensioner can bend farther without ruining the spring. I know that if the entire spring rather than just a short section of it is stretched, the spring can extend plenty far enough to accommodate the extra chain length.


    Finally, here's five minutes of me tooling around on the scooter. I attached the camera to the steering column, rather than my helmet, so the video is pretty bumpy, even after a bunch of post filming software stabilization.


    I'm super close to getting this thing reliable on rough terrain. Hopefully I can completely finish it before I leave for school in a week and a half!

  9. #49
    Mentally Underclocked mDust's Avatar
    Join Date
    Aug 2009
    Location
    Michigan
    Posts
    1,639

    Default Re: Off Road Electric Kick Scooter Build

    mybadomen: you should post that in your own thread so more people see it if you haven't figured it out yet.

    technochicken: awesome work! what is the top speed and range (in distance or time)? Is it as loud as in the video or exaggerated by the camera or editing? Is the majority of the noise caused by the motors or the chain drive?
    I'll procrastinate tomorrow.

  10. #50
    Draco Dormiens Nunquam Titillandus Technochicken's Avatar
    Join Date
    Sep 2009
    Location
    Atlanta
    Posts
    386

    Default Re: Off Road Electric Kick Scooter Build

    Thanks! With the current gearing, the top speed is 25 mph. Riding as I do in the videos, with frequent starting and stopping over varied terrain, it will get about 8 miles. Just riding on long stretches of flat road, it would probably get at least 12, but I haven't actually tested that scenario. It is pretty loud, though not quite as loud as it sounds in the video. Pretty much all the noise comes from the gearbox, as the gearbox's housing seems to resonate easily.

Posting Permissions

  • You may not post new threads
  • You may not post replies
  • You may not post attachments
  • You may not edit your posts
  •