Page 7 of 10 FirstFirst ... 2345678910 LastLast
Results 61 to 70 of 94

Thread: Project R2-D2 PC

  1. #61
    Over 75 Custom PC's in 20 years TheGreatSatan's Avatar
    Join Date
    Apr 2005
    Location
    Southern IL
    Posts
    6,633

    Default Re: Project R2-D2 PC

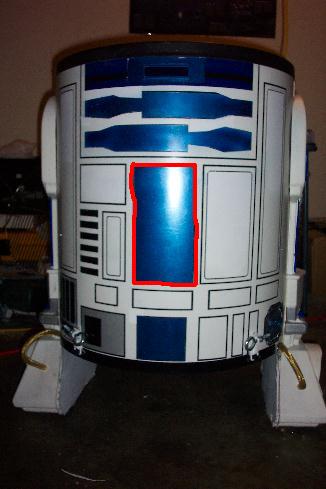
    I think I want to add a Window to R2. I'm thinking right about here:


    Maybe only half of the total square so the mobo could be seen. I will be using blue lights within R2 so that will at least go with the theme. I could also, put a Blue LED intake fan on the window.

    What do you think?

  2. #62
    Over 75 Custom PC's in 20 years TheGreatSatan's Avatar
    Join Date
    Apr 2005
    Location
    Southern IL
    Posts
    6,633

    Default Re: Project R2-D2 PC

    I'VE FINALLY PIN STRIPED THE DOME!!


  3. #63
    Over 75 Custom PC's in 20 years TheGreatSatan's Avatar
    Join Date
    Apr 2005
    Location
    Southern IL
    Posts
    6,633

    Default Re: Project R2-D2 PC

    I never knew, THANKS!

    I've been testing the LED's. The HD LED is pretty hard to see. I think it may be the thickness or darkness of the plastic lens.


    Here's one with the blue Pwr light and a very hard to see HD light that's red.


    Here's R2 hooked up to my craftstick plane's mobo. Despite how unliked the mod was, it has proven to be useful enough to keep.


    Lastly, here is another lens I have. I'm gonna try this one next. Originally, I didn't because I thought it looked too orange.


  4. #64
    Over 75 Custom PC's in 20 years TheGreatSatan's Avatar
    Join Date
    Apr 2005
    Location
    Southern IL
    Posts
    6,633

    Default Re: Project R2-D2 PC

    I got to using a better lens. The one I had previously suggested is bigger than the original and clearer.


    But unfortunately, it was really scratched up.


    I had another great idea when I thought that I could use the one from my elbow flashlight (you military guys know about these). They come with several lenses and since I have two of these flashlights, I'll have enough red ones.


    As you can see, this one is much more clear.


    I've attached it to the dome with glue. I have pieces of tape to hold it on till the glue dries.


    Later I'll test to see if the LED appears brighter.

  5. #65
    Over 75 Custom PC's in 20 years TheGreatSatan's Avatar
    Join Date
    Apr 2005
    Location
    Southern IL
    Posts
    6,633

    Default Re: Project R2-D2 PC

    First off, I just want everyone to know that I am not happy with the floppy drive. I like the way it looks and all from the outside, but from within it is not very stable. I will be using the square on R2, where the floppy drive resides to hold my power, reset, and fan boost switches. So....


    My wife's Aunt gave me this old tower she had in her garage with an old system, minus the HD. The motherboard is oddly small. Is this Baby ATX?


    The processor fan was not working, so I laid this 80mm fan on top of it to keep it cool.


    I was thinking of using part of the front panel to define the drives on R2, but changed my mind. And it wasn't the dust that it changed it.


    One thing Air Force One had that I wanted R2 to also have is the ability speed up the intake fans at the push of a button. So when I scrapped AF1, I took the switch out. The fan is actually spinning in this pic.


    When I pushed the button my test fan speeds up and the lights turn on. Remember the intake fans on R2 do no have lights.


    I'll be using a 3.5 inch bay to hold the floppy in place for stability and use this section to create R2's Power/Reset/Fan boost panel. This panel will not be visible from the outside. The floppy drive hole will stay the same; only the switches will be added to R2's "look".


    I still have some sheet metal left from when I made the heat shield inside R2.


    After I set the floppy on the bottom of the cage I began to mold the metal to the floppy's placement.


    As you can see I bent the metal to match R'2 shape.


    Then I drilled the hole for the Power Button. I will do the reset and fan boost in a bit.


  6. #66
    Over 75 Custom PC's in 20 years TheGreatSatan's Avatar
    Join Date
    Apr 2005
    Location
    Southern IL
    Posts
    6,633

    Default Re: Project R2-D2 PC

    I worked on and completed the front panel for R2. I gutted a USB 3.5 inch drive.


    Then pulled my floppy drive out of place.


    I traced the ports on to the piece of metal I had cut earlier.


    Here are the holes I'll have to cut.


    And after it's been cut out.


    Check you work before you make it final.


    And presto! To the left top is the rest and under it is the fan speed button.


    My speakers arrived yesterday.


  7. #67
    Over 75 Custom PC's in 20 years TheGreatSatan's Avatar
    Join Date
    Apr 2005
    Location
    Southern IL
    Posts
    6,633

    Default Re: Project R2-D2 PC

    Today I worked on installing the speakers in R'2 feet.


    This is how it looked inside. That's all the expanding foam I used earlier. In the pic you can see the support rod I used too.


    After pulling some of the foam out I fed the wire through.


    And pulled it out the other side.


    The mostly completed look. I will be using more of the mesh from earlier to disguise the hole.


    Then I started cleaning up the pin striping. BEFORE.


    And AFTER. Go figure I ran out of pin striping. I'll have to go buy pack 19 tomorrow.


  8. #68
    Over 75 Custom PC's in 20 years TheGreatSatan's Avatar
    Join Date
    Apr 2005
    Location
    Southern IL
    Posts
    6,633

    Default Re: Project R2-D2 PC

    I wasn't happy with the front projector. It just wasn't to the same scale as the dome, so I got a bigger one.


    My front panel is officially completed. I used a bit more of the pin striping to define the USB ports. You can still see where I need more touch ups.


    And I painted the mesh that will cover the speakers in the feet.


  9. #69
    Over 75 Custom PC's in 20 years TheGreatSatan's Avatar
    Join Date
    Apr 2005
    Location
    Southern IL
    Posts
    6,633

    Default Re: Project R2-D2 PC

    I removed the LED from the projector and the red lens on R2's dome. Instead of using them for HD and pwr lights, I'll be replacing them both with LED's running on a molex. The pwr button on R2 has it's own built-in power light. When I had AF1, it had 4 lighted feet, each with their own LED all strung together. The LED's were running from a switch that had since become stuck in the down position and prohibiting the lights from turning on.


    I removed the switch and did a little soldering to get them on the same strand.


    The next problem was getting the LED for the little red lens under his eye to stay in place.


    I used a Milk gallon lid for the shroud.


    First I punched a hole into it.


    Fed the LED through.


    And glued it on.


    The new larger projector has been painted and is now dry.


    I reinserted the LED for that too.


  10. #70
    Over 75 Custom PC's in 20 years TheGreatSatan's Avatar
    Join Date
    Apr 2005
    Location
    Southern IL
    Posts
    6,633

    Default Re: Project R2-D2 PC

    Here's some current pics of R2.


Similar Threads

  1. Project PC In Disguise
    By purdy in forum Works in progress
    Replies: 129
    Last Post: 12-07-2008, 09:42 PM
  2. Project: Hard Drive PC
    By TheGreatSatan in forum TBCS Featured Worklogs
    Replies: 121
    Last Post: 07-10-2007, 08:08 PM
  3. Noname Media PC Project
    By TheDingo in forum Works in progress
    Replies: 2
    Last Post: 12-07-2006, 08:47 AM
  4. Project H-1 concept pc
    By Defyant in forum Works in progress
    Replies: 31
    Last Post: 04-04-2006, 10:38 PM
  5. LCD and general PC mod Project
    By Ali_2k in forum Works in progress
    Replies: 5
    Last Post: 01-06-2006, 07:36 PM

Posting Permissions

  • You may not post new threads
  • You may not post replies
  • You may not post attachments
  • You may not edit your posts
  •