Page 2 of 5 FirstFirst 12345 LastLast
Results 11 to 20 of 43

Thread: How to: Working with electronics

  1. #11
    SOB Fettler xmastree's Avatar
    Join Date
    Mar 2006
    Location
    Burnley, Lancs. UK
    Posts
    1,704

    Default Re: How to: Working with electronics

    Quote Originally Posted by XcOM
    Different solder diameters are produced, too; 20-22 SWG (19-21 AWG) is 0.91-0.71mm diameter and is fine for most work. Choose 18 SWG (16 AWG) for larger joints requiring more solder.
    Another tip, if you only have the thin solder available and you need to make a larger joint. Rather than buying thicker stuff for one task, you can take multiple strands of the thinner one and twist them together.

    Excellent guide, but I feel there's something missing. The guide centres around soldering components to pcbs, whereas I imagine the majority of modders will be dealing with extending fan/psu wiring, mounting remote CD/DVD buttons, extra LEDs, that kind of thing.


    Here's a tip from an old hand...

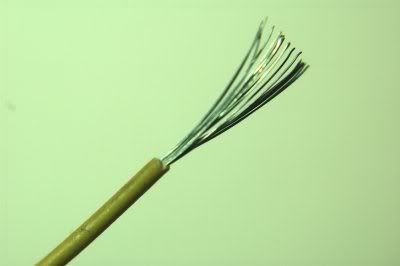
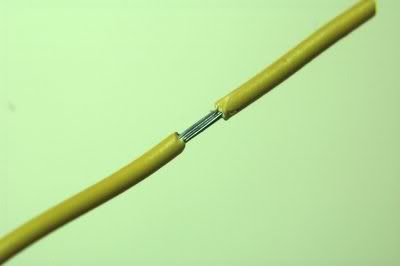
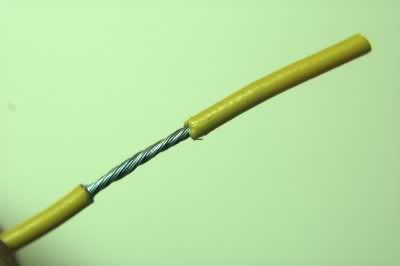
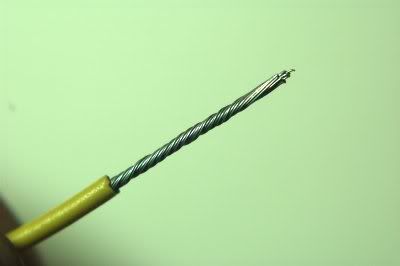
    When stripping stranded wire, don't remove the insulation before twisting the strands. Instead, slide it part way and 'unscrew' it. That makes the resulting twist much neater and it's easier too.

    The wrong way, it's difficult to twist when it's like this:


    Pull the insulation part way:


    Start to twist it:


    And unscrew it completely:


    Another tip, regarding LEDs. If you solder right up to the body, you run the risk of damaging it through excess heat, so solder at the end of the lead if possible.

    And here's another. If you're using wire cutters to strip the wire (who hasn't? ) turn them round.
    By that, I mean look at the jaws, one side is usually angled more than the other. If you use them one way the angle will tend to squeeze the insulation onto the wire, making it dificult. The other way they're more likely to push the insulation rather than squeezing.
    Code:
    wrong:
       |/
    ==--====
       |\
    
    right:
      \|
    ==--===
      /|
    Is that clear? \| are the cutter jaws, = is insulation, - is bare wire. Cutters are moving from left to right.

  2. #12
    Woodworking unicycling bodybuilder tybrenis's Avatar
    Join Date
    Sep 2005
    Location
    Doylestown, PA, United States
    Posts
    1,729

    Default Re: How to: Working with electronics

    Nice additon xmastree! Mind if I add that to the article as well?
    Typo:
    Quote Originally Posted by DaveW View Post
    Jon has altered his cock to compensate.

  3. #13
    SOB Fettler xmastree's Avatar
    Join Date
    Mar 2006
    Location
    Burnley, Lancs. UK
    Posts
    1,704

    Default Re: How to: Working with electronics

    Quote Originally Posted by XcOM
    Some irons have a bimetallic strip thermostat built into the handle which gives an audible "click" in use: other types use all-electronic controllers, and some may be adjustable using a screwdriver.
    Another technique, used in Weller irons, is to use a magnetic tip. The magnet pulls in the connection to power the element. Once the tip reaches its curie point, it loses its magnetic properties and releases the switch. Upon cooling a little, the magnetic properties are restored and it switches on again.

    This means that the operating temperature is controlled by the tip, which is easily changed should one require a different temperature. See this for an example of different tips and temperatures available. The tips are marked on the back with either 6,7 or 8.

  4. #14
    SOB Fettler xmastree's Avatar
    Join Date
    Mar 2006
    Location
    Burnley, Lancs. UK
    Posts
    1,704

    Default Re: How to: Working with electronics

    Quote Originally Posted by tybrenis
    Nice additon xmastree! Mind if I add that to the article as well?
    Feel free, and the next one too. I'll probably add some more tips as I think of them. Anything I post here is for the good of the community, so may be used as you wish.

  5. #15
    SOB Fettler xmastree's Avatar
    Join Date
    Mar 2006
    Location
    Burnley, Lancs. UK
    Posts
    1,704

    Default Re: How to: Working with electronics

    Quote Originally Posted by tybrenis
    Looks good, but you really need to change that illminated case pic... Light sources confuse the hell out of autofocus cameras, but your Kodak CX6230 doesn't have a manual focus option. Kinda difficult under the circumstances.

  6. #16
    Woodworking unicycling bodybuilder tybrenis's Avatar
    Join Date
    Sep 2005
    Location
    Doylestown, PA, United States
    Posts
    1,729

    Default Re: How to: Working with electronics

    Quote Originally Posted by xmastree
    Looks good, but you really need to change that illminated case pic... Light sources confuse the hell out of autofocus cameras, but your Kodak CX6230 doesn't have a manual focus option. Kinda difficult under the circumstances.
    Lol, yes, that case isn't even existant anymore... scraps and parts of it are now laying around, my Cirque du Soleil case is now finished and my current case. I now have a Sony Camera that I use... 5.0 megapixel, any feature I could ever want. BTW, how did you know what type of POS camera I had? Good eye.
    Typo:
    Quote Originally Posted by DaveW View Post
    Jon has altered his cock to compensate.

  7. #17
    SOB Fettler xmastree's Avatar
    Join Date
    Mar 2006
    Location
    Burnley, Lancs. UK
    Posts
    1,704

    Default Re: How to: Working with electronics

    Quote Originally Posted by tybrenis
    BTW, how did you know what type of POS camera I had? Good eye.
    Heh, that's easy. Download the picture and examine the EXIF data.
    You took it on January 22, 2003 at 08:48. 1/2 sec @ f/2.7
    (BTW, check ur PM...)

  8. #18
    SOB Fettler xmastree's Avatar
    Join Date
    Mar 2006
    Location
    Burnley, Lancs. UK
    Posts
    1,704

    Default Re: How to: Working with electronics

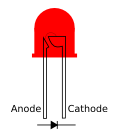
    Here's more. LEDs. Having worked in the elecronics industry for a long time, I know that there's only one sure-fire way to know the polarity of an LED (apart from using a tester, and that can sometimes be misleading). It used to be that the long lead was the cathode, or was it the anode? Anyway, different manufacturers had different standards in this respect, so that method isn't reliable unless you know the manufacturer and have access to the data sheet. And what if the leads have been cut?

    So, another method, the flat on the package. This usually denotes the cathode. I say usually because again, different manufacturers have different standards. So, you can't use that method either.

    It seems that getting manufacturers to agree to a simple standard is like herding cats.

    No, the best way is to look inside the LED itself (easier with the high brightness ones as they're usually crystal clear) and look at the construction.


    Inside there is a cup, containing the chip itself (and usually a reflector) and alongside that is a smaller post with a tiny wire connecting to the chip.

    The Cup is the Cathode. That's the one which connects to the negative of the supply.

  9. #19
    Woodworking unicycling bodybuilder tybrenis's Avatar
    Join Date
    Sep 2005
    Location
    Doylestown, PA, United States
    Posts
    1,729

    Default Re: How to: Working with electronics

    Quote Originally Posted by xmastree
    Heh, that's easy. Download the picture and examine the EXIF data.
    You took it on January 22, 2003 at 08:48. 1/2 sec @ f/2.7
    (BTW, check ur PM...)
    Wow, you seem like a very extensive kinda guy, that's very interesting.

    BTW, great addition to the guide.

    Check your PMs.
    Typo:
    Quote Originally Posted by DaveW View Post
    Jon has altered his cock to compensate.

  10. #20
    Ceann na Drochaide Bige! XcOM's Avatar
    Join Date
    Mar 2006
    Location
    Sheffield (UK)
    Posts
    2,990

    Default Re: How to: Working with electronics

    Time for an update,

    ok by request i will explain heat shrink:

    Basic Understanding of HEAT SHRINK TUBING
    Heat shrink tubing is made up of plastic that is only partially polymerized. (Polymerization is a chemical reaction which forms polymers by sticking a group of monomers together. A monomer is a group of atoms that are stuck together.) Heat is what's necessary to complete the chemical reaction. You can think of it as if the plastic is only part-way formed before exposed to the heat.

    As the seperate monomers in the plastic are polymerized, they get closer together, making the plastic denser, which causes the tube to shrink. But because the polymerization reaction is one-way, the tube won't expand again once it cools down.

    How it worksPlease excuse me if i repeat my self from here on

    Heat shrink tubing is placed over the connection to be protected and then heated with a hot air gun or similar tool (in desperate times, I have been known to use lighters). When the tubing is heated, the material polymerizes further, which changes its physical properties (most importantly, an increase in density). The heat causes the tubing to contract as far as one half or one third of its original diameter, providing a snug fit over irregularly shaped joints. This provides good electrical insulation, protection from dust, solvents and other foreign materials, as well as strain relief. But, if overheated, heat shrink tubing can melt or catch fire like any plastic.

    Some types of heat shrink provide an adhesive surface on the inside to help provide a good seal, while others rely on friction from the closely conforming materials.

    This is what it looks like:


    Ok, here we go:
    1: Select proper size of tubing. The tubing's published recovered diameter must be less than the diameter of the area to be insulated to allow for a secure, tight fit and the expanded diameter (as supplied) must be large enough to pass over the existing insulation and/or connectors.

    2:Cut tubing to length, allowing for a minimum overlap of 1/4" over the existing insulation or connector. Also allow for approximately 5-7% shrinkage in the axial (cable) direction.

    3:Slide the cut tubing over the existing insulation.

    4:For splicing, slide the tubing over the center of the splice, with equal overlap on both sides

    5:If you have a long cable to shrink over, start at one end and rotate while applying heat. This will give a uniform shrink with no air bubbles between the shrink tubing and the rod or cable.

    6:Apply heat evenly over the length and outer diameter of the tubing, until it is evenly shrunk and conforms to the shape of the splice. Immediately remove the heat source. Allow tubing to cool slowly before applying physical stress.

    7: See individual tubing specifications for recommended heating temperature. Any commercial heat gun can be used, or shrinking can be done in an oven. Use of open flame is not recommended, as the uncontrolled heat may cause uneven shrinkage and/or physical damage to the material causing insulation failure.

    And the rule that MUST BE FOLLOWED!
    8:Avoid overheating the shrink tubing or it will become brittle and/or char.


    And there you go, the above is normally used to tidy up cases and used when making a wire to wire connection which i will do at a later point.


    Mary had a little lamb. It bumped into a pylon. Ten thousand volts went up its arse and turned its wool to nylon!

Similar Threads

  1. working with sheet metal
    By Slug Toy in forum Metal Musings
    Replies: 35
    Last Post: 12-24-2010, 08:46 AM
  2. Consumer Electronics Show 2k7
    By nil8 in forum Technology Talk
    Replies: 0
    Last Post: 01-08-2007, 04:15 PM
  3. Looking for info on working with more plastics
    By Cannibal23 in forum Modding Q&A
    Replies: 9
    Last Post: 09-02-2006, 07:59 PM
  4. hard drive and dvd drive not working
    By leprosy in forum The Rookie's Nook
    Replies: 7
    Last Post: 06-09-2006, 12:27 AM
  5. my wiring job, does it need working on?
    By ForceFedFlesh in forum The Rookie's Nook
    Replies: 6
    Last Post: 02-24-2006, 08:40 AM

Posting Permissions

  • You may not post new threads
  • You may not post replies
  • You may not post attachments
  • You may not edit your posts
  •