this is absurdly beautiful


this is absurdly beautiful
Arctic Cat * Maximum Security * Cribbage Board * Rockin Case * Armor Redux
Tempest SXR * Power House * Red Comet * ICHIWZ * Acrylic Headphone Hook
Continuing sponsorship support from PCBoard.ca

Originally Posted by SXRguyinMA

Thanks SX, appreciated.
Will update later, today is a good day to dye.
my 1st scratch case made july 2008 (finding my feet)
Air Cube prototype (fin jan 2009) (still finding my feet)
Air Cube v2 now with added cpc stack (fin aug 2010) (getting better)
Project Stealthlow (fin sep 2011) (much improvement)
Lean and Green - modular dual PC scratch build - Paused
Midlag Crisis

Awesome the dye is happening

Oh yeah. I'm excited for this.
Been a while in the making
Sorry about not updating yesterday, happy face turned to sad face with the result on the actual project due to lacquer application so I climbed in bed to sleep it off to let me wake up with fresher mind to let me tackle it right, the timing test left me feeling quite excited & happy lol, enough to post a picture of the result with it being pretty nice so figured I'd be able to post some good results later in the day.
But ouch, I was wrong & made a horror show instead, should probably censor these gruesome pictures lol, I've seen them up close in person & on full zoom in the pictures, nasty compared to the test pieces.
If lacquer application was good it would have looked as nice as this.
Not this time.
Not to worry though, the stainless steel countersunk & button head screws turned out mostly awesome, typical.
Was meant to be like this but I done the colour saturation level 100% instead of 30% & it's got a smidge too much red so was quite badly miscalculated, shorter dips are horribly orange instead of a nice light brown/beige.
This is how I got the colour wrong, it's the right colour but the wrong saturation level.
Colour wheel helps show the other colour to mix to the main colour, guess the diference, I'd say a tiny pinch of red to orange making hot orange.
For 9 litres water 30 grams seems good but only 1/3 of that should have been hot orange & the 2/3 black.
So I have to strip all the lacquer off every single piece of the project so I can reapply it better, I'll try brush again but without the tiptoeing around detail cuts & instead carefully clean up any excess mess with the makeup brush after a good single straight 1 direction soaked brush stroke covering the full piece fairly quickly.
If that fails there will be a way to do it perfect & I'll find it, has to be perfect or very close to it if I'm to use this method on any future projects.
I also had to use the big pan with not having a perfect sized pan for this, it needs 9 litres to fill it to 50ml deep, I had 3 restarts on the timing tests adding 9 grams of mixed dye with each test ending up with 27 grams so managed to figure out how to make correct colour saturations & brightness in any mass of water, I got solid figures I can work with now to tweak for smaller or larger amounts.
I designed some water mass filler weights held together with screws, bit of square bar, 1mm aluminium, filled with gravel & sealed with high temp silicone, will reduce needed mass which would reduce needed dye also.
Want to make a multi level dunking jig for placing parts well & removing them easy with a handle which could also be used to lift up/down to keep the mix lively.
I'll cover everything properly once I complete this process successfully, until then I'd just be rambling & thinking out loud so more as soon as I make good progress, firstly I need to strip all the lacquer off everything so I can restart & need to find the best solution for stripping it off easy so it could be a while again or less if I get lucky, didn't bother dying the other pieces because I expected same kinda fail rate.
Awesomeness doesn't come easy but when it does & I totally know what I'm talking about I'll post an understandable guide (hopefully) lol, really have no idea if this will be a popular finishing choice but anyone who was wanting to do anodising but didn't fancy the hazardous chemicals I think this will really appeal to them, I'd have loved to have found a guide on what I'm doing lol.
More soon but hopefully the results I was going for.
my 1st scratch case made july 2008 (finding my feet)
Air Cube prototype (fin jan 2009) (still finding my feet)
Air Cube v2 now with added cpc stack (fin aug 2010) (getting better)
Project Stealthlow (fin sep 2011) (much improvement)
Lean and Green - modular dual PC scratch build - Paused
Midlag Crisis
Well, this build just changed to a post-apocalyptic, cyber-punk, rust case. There! No need to re-lacquer anything!
But seriously, that's a real bummer. I thought you were calling the test pieces horrific, and I was like, "maybe I'm not seeing something there." But then you showed the pictures of the actual pieces. No need for full res on those. Ouch!
Well, we're still all behind you!
Thanks d.
A good google & there are strippers available at shops that are meant to be easier solutions but this home solution I came across doesn't sound a tiny bit difficult.
1 Tablespoon of Baking Soda to each Quart of Water, boil, throw parts in, 15 minutes later it should peel off, any stubborn leftovers clean off with the type of stuff I do for stickers, white spirit.
Sounds great
Be funny & awesome if I got it all off before I go bed.
--
It's removing it pretty good, think I'll have a late one tonight, worth it to put me back to just before lacquering stage.
Could do with more baking soda though for the amount I have to do.
Last edited by Waynio; 05-09-2013 at 09:52 PM. Reason: micro update
my 1st scratch case made july 2008 (finding my feet)
Air Cube prototype (fin jan 2009) (still finding my feet)
Air Cube v2 now with added cpc stack (fin aug 2010) (getting better)
Project Stealthlow (fin sep 2011) (much improvement)
Lean and Green - modular dual PC scratch build - Paused
Midlag Crisis
Where do you live? Where do you live? I'm on my way!
The boiling water with baking soda did a pretty nice job of turning the lacquer to easily removable mush that could be wiped off but it would have been better to have double the potency of baking soda but would still need a few dunking runs, I only did the 1.
You can see on the screws how it stripped a fair bit of colour out & reduced some lacquer, the screws cleaned up easy with satinising pad.
Still had a lot to remove, I tried satinising pad at first but wasn't getting far enough for the amount of elbow polish I was putting in so resorted to using the metal scrubber shown in this picture.
How they looked after the baking soda & some scrubbing.
So ended up switching to 220 grit submerged wet sanding which helped it go a lot faster, after that I used satinising pad to pretty much get back to pre lacquered state.
Still a bunch of panels to do but I am onto it all, all this will be excellent supplementary info for the guide I make too.
my 1st scratch case made july 2008 (finding my feet)
Air Cube prototype (fin jan 2009) (still finding my feet)
Air Cube v2 now with added cpc stack (fin aug 2010) (getting better)
Project Stealthlow (fin sep 2011) (much improvement)
Lean and Green - modular dual PC scratch build - Paused
Midlag Crisis
Woo hoo, TBCS is back.
Time to post the missing progress made since last post, brushing lacquer on just never quite worked out.
Another effect I thought looked good if used right.
Best I managed with brushes.
Now then, this is where I tried a spray gun to apply the metal lacquer.
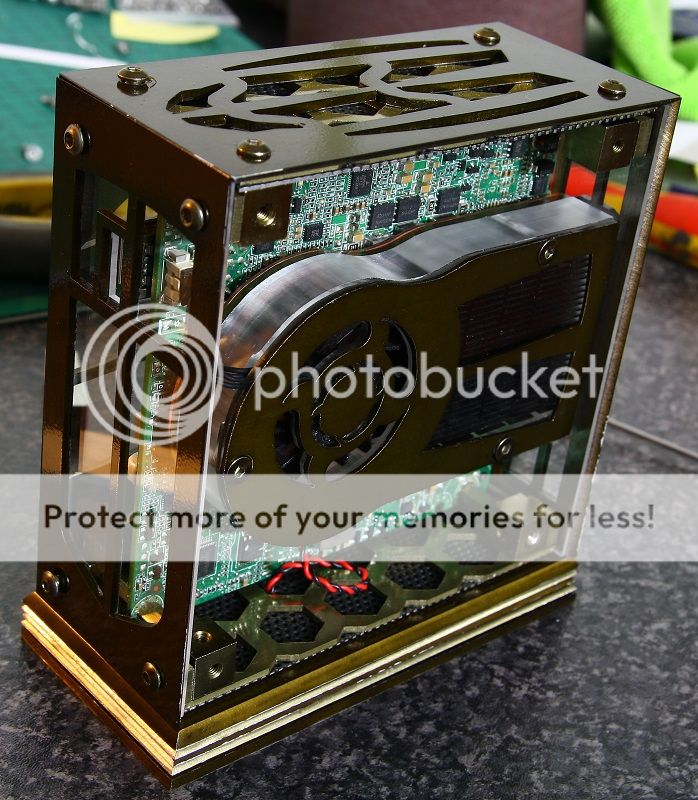
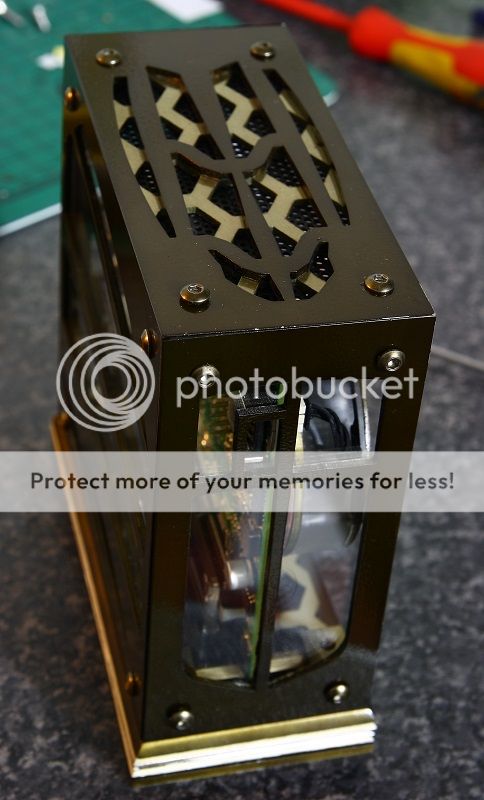
Over to the latest.
Lacqodised the same dark brown, internal pieces 15 minute dunks, external 60 minutes, front layers 15, 25, 35, 45 minute dunks, all at 80c.
Been tied up doing this Intel NUC project which is almost complete.
Just need to complete the Intel NUC & then I can get back onto doing Midlag & then Lean & Green, I'll post the log to the NUC once the competition is over, not been told I have to keep it exclusive but am doing at least until it's over but what you see in those shots is what I did yesterday with the lacqodising.
my 1st scratch case made july 2008 (finding my feet)
Air Cube prototype (fin jan 2009) (still finding my feet)
Air Cube v2 now with added cpc stack (fin aug 2010) (getting better)
Project Stealthlow (fin sep 2011) (much improvement)
Lean and Green - modular dual PC scratch build - Paused
Midlag Crisis
 Posting Permissions

 Reply With Quote