that is ubs. (oohbs)
definatly like the water block.
i dont know jack crap about water cooling so this is very interesting to me. keep it up.


that is ubs. (oohbs)
definatly like the water block.
i dont know jack crap about water cooling so this is very interesting to me. keep it up.
"you must be the change you wish to see in the world"
-ghandi
Neither did I when I started, this is my first watercooling experience. I'm letting my system run right now as we speak, I was so impressed with how quiet it is once I let it run and get some of the air out!! I had heard that thsi pump was quiet when it was on setting 1-3, but got noisy when it was cranked up to setting 4-5. So I decided to crank it up and see, well when I went to the dial I found out it was already on setting 5, hah! I still have tiny micro-bubbles, but from what I'm reading those will work themselves out.Originally Posted by Maz

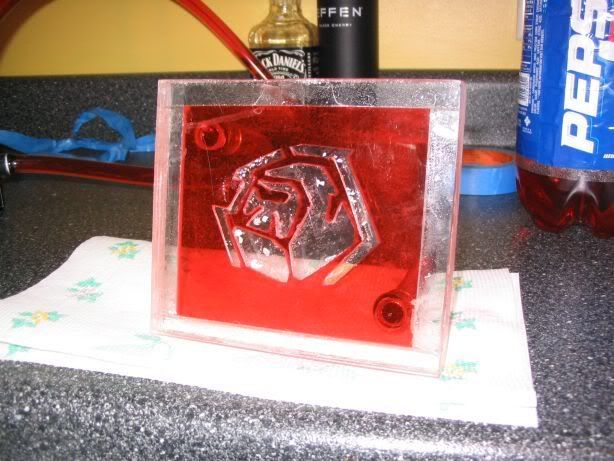
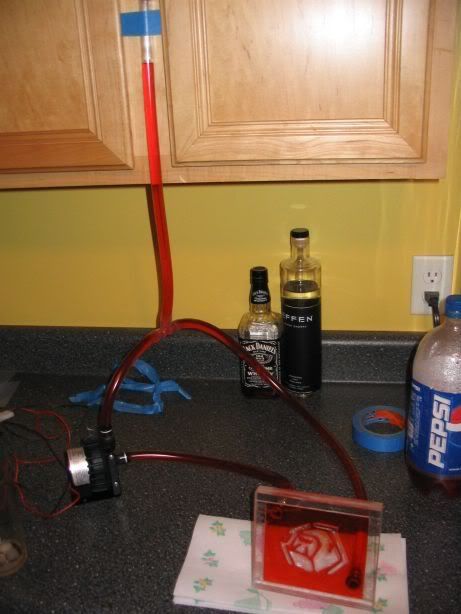
I also have a very very tiny leak in my water-cooling window. This one is very very small, I let it run overnight and only had maybe a few drops worth of leakage. I'll apply more weld-on once I take the test rig apart and it should be allright. However it did concern me when I started to think about how I'm going to attach this to my PC. My first thought was to screw it into some square brackets mounted in the 5.5" bays. But now I'm thinking I'll still use square brackets, but attach with some heavy-duty double-sided tape.
Project: Savage (in progress)
Lian-Li PC-70 | Intel Core2Duo E6600 | Swiftech Storm w/ MCP655 Pump | P5W DH Deluxe | 2GB Corsair DDR2-800 | X1900XTX 256MB w/ Maze4 Waterblock | Audigy 4 | WD Caviar 300GB HD | WD Raptor 36GB HD | 2xslot-load DVD+RW slim drives


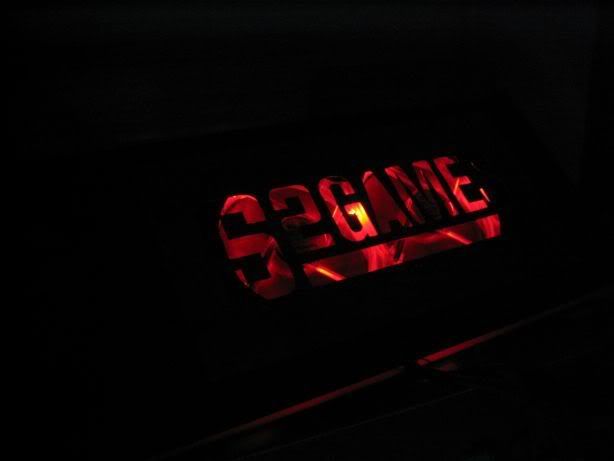
The S2 Games cutout looks great. The waterwindow looks like it worked out well too. You gonna put some light behind that once it's mounted in the case?
First time water is really scary, especially with custom made parts thrown in. My first watercooled rig was the Matrix Regenerator, with custom made res. Crazy, but its the risks that make it fun sometimes.
Last edited by Crimson Sky; 10-25-2006 at 11:38 AM.
In a time of chimpanzees I was a monkey.
I'm going to red UV dye the water, and I've got a couple ideas for lighting.
1) Put a short 4" UV cathode INSIDE the acrylic air duct I have. I've already given it a light frost with 800 grit sandpaper and I think if I put a UV cathode in there it will light up the whole duct almost like it's "glowing", but I might need to give it a heavier sand (600grit) to make sure. I know UV lights are pretty powerful so I think that will still light up all my tubing, and since the water-window is right in front of the duct it will get plenty of light.
2) Mount the same 4" UV cathode behind the frame that the 5.5" bays usually mount into near the top, directly behind the water-cooling window again. This way it could light up the whole duct (due to the sanding), the water-cooling window, AND the rest of my tubing. The only reason I shy away from this one is that the source of the light will be plainly seen and you would see the cathode from the front of the case clear as day. For some reason I don't like that. I think maybe the duct will have a "faded" lighting to it as you get further away from the cathode.
I can easily experiment with both once I get this baby put together. Although I'm groaning already @ the amount of wetsanding and painting I have yet to do =/, haha.
I agree with the risks thing as well. This is my first mod and I could have kept it a LOT simpler (and cheaper) but something about that just didn't appeal to me. I really enjoy a challenge, and so far this case hasn't let me down
Project: Savage (in progress)
Lian-Li PC-70 | Intel Core2Duo E6600 | Swiftech Storm w/ MCP655 Pump | P5W DH Deluxe | 2GB Corsair DDR2-800 | X1900XTX 256MB w/ Maze4 Waterblock | Audigy 4 | WD Caviar 300GB HD | WD Raptor 36GB HD | 2xslot-load DVD+RW slim drives
small update, forgot my camera when i went to work today.
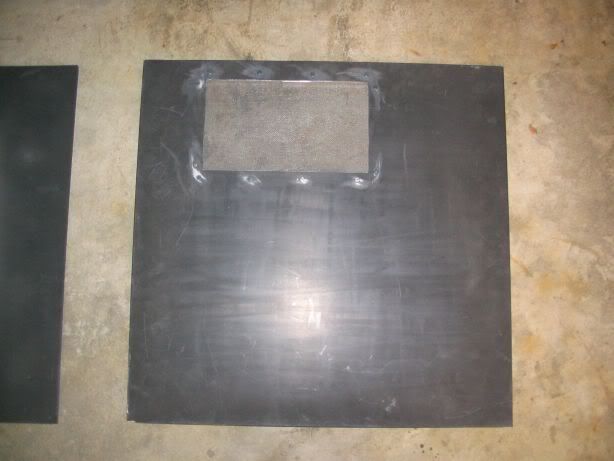
I put a small framing up on the right side panel around the hole i made for the duct. I also used bondo to lay some mesh down across that hole. The framing will hold down an air filter I'll install later.
Here's pics from the top fan grill, didn't come out QUITE like I wanted. The full logo isn't lit because the grill is wider than the fans =/. If anyone has any ideas how to light up that whole grill, I'm open. The only thing I can think of is to use some frosted plexi and mount the grill and inch or so off the top of the case. However, this would restrict air flow and be a bit louder =/.
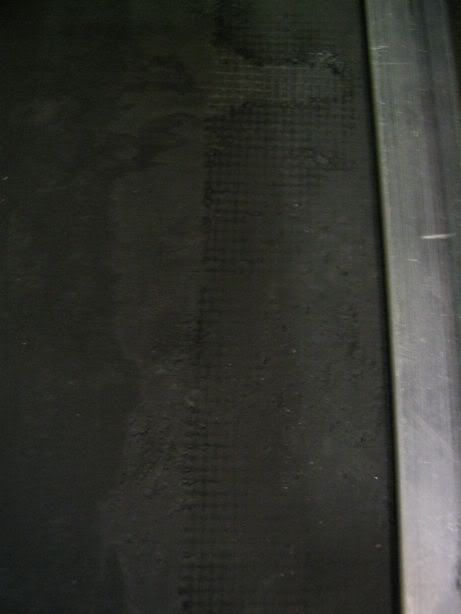
I also threw in some pics when I was testing my custom window for leaks.
Project: Savage (in progress)
Lian-Li PC-70 | Intel Core2Duo E6600 | Swiftech Storm w/ MCP655 Pump | P5W DH Deluxe | 2GB Corsair DDR2-800 | X1900XTX 256MB w/ Maze4 Waterblock | Audigy 4 | WD Caviar 300GB HD | WD Raptor 36GB HD | 2xslot-load DVD+RW slim drives


Your custom window is excellent. The letter look nice lit up to.
Need a sig

Wow looks awesome. Love the idea you have going with the water cooled window
My lights/fan controller arrived the other day. The only part I'm really waiting on is my slim slot-load DVD+RW drive. I need to look up some instructions on how to replace the blue LED's in my fan controller with Red ones. Is this going to be difficult? does anyone know?
Our last Rugby game of the season is tomorrow which means next week is paint-week. I ordered my laser-etched window from hyperkore and I'm debating whether or not to go with the vinyl decal I was considering at the start of this project.
Regardless, I simply need to mount the WC window, make a fan grill for the PSU, figure out how to light up that top fan grill for the rad, and paint the damn thing.
Then I've got LOTS of wire-shortening and cable management to deal with
Project: Savage (in progress)
Lian-Li PC-70 | Intel Core2Duo E6600 | Swiftech Storm w/ MCP655 Pump | P5W DH Deluxe | 2GB Corsair DDR2-800 | X1900XTX 256MB w/ Maze4 Waterblock | Audigy 4 | WD Caviar 300GB HD | WD Raptor 36GB HD | 2xslot-load DVD+RW slim drives
**UPDATE**
Hopefully this will be my last 1.5 weeks of case-construction. Currently the case is at my relative's house because they have a nice garage full of great tools, which is way better than my downtown Chicago apartment.
All I have left to do is to mount the slim-drive bezel, the water-cooling window, and that's about it. Once those are in, it's just a matter of hooking everything together.
Hyperkore.com sent me an email today saying they have sent my laser etched window. That will be here Friday. I'm still unsure whether or not to get a vinyl decale of the "SAVAGE 2" text with the sword behind it. It'd be extra money for them to edit just that text and sword out of the picture. I already have a big enough file I just need to trim that thing out, and I'm lazy and don't have the necessary tools or time.
Here's today's update, which includes some pics of the work I did last week (I forgot to take my camera with).
I cut the hole in the side-panel for my custom ducting. It came out pretty good, I didn't have to bother making extra cuts to make it fit right. I decided to go with something relatively plain.
You'll see what the bolts are for in a minute.
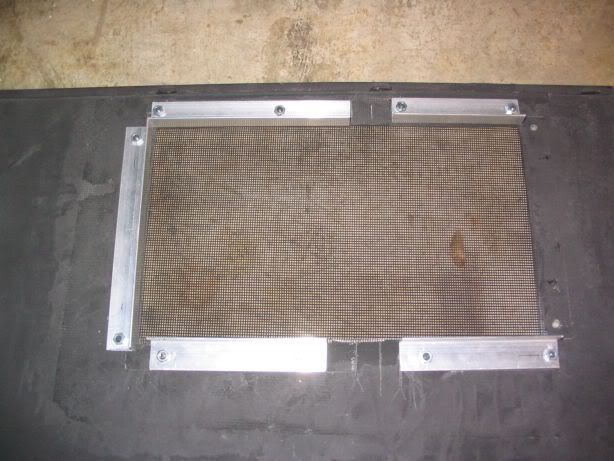
Here's the backside of it. I attached those square brackets to make sure I get a decent seal to the side panel. The gaps are there to make room for the vertical support bar in the case. The mesh I held down by hand and used bondo to attach it to the side panel, man that is AMAZING stuff. I also used it to patch some holes that I ended up not using in the top panel.
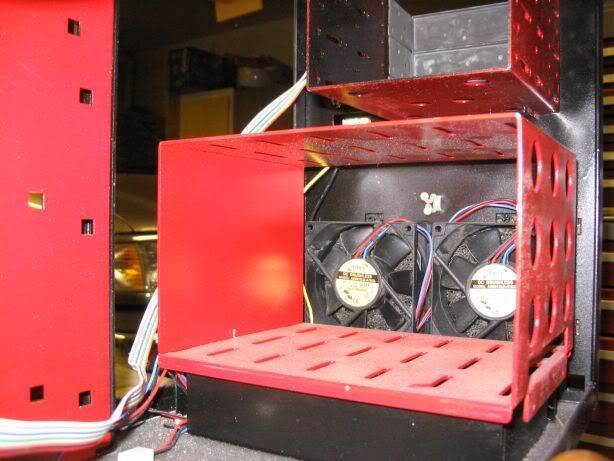
Also, the advantage of the little L-brackets is that I plan on pinching some sort of air-filter in there as well so I don't clog the radiator/dirty up my duct. I'm thinking women's pantyhose work the best, so I'll probably go with that.
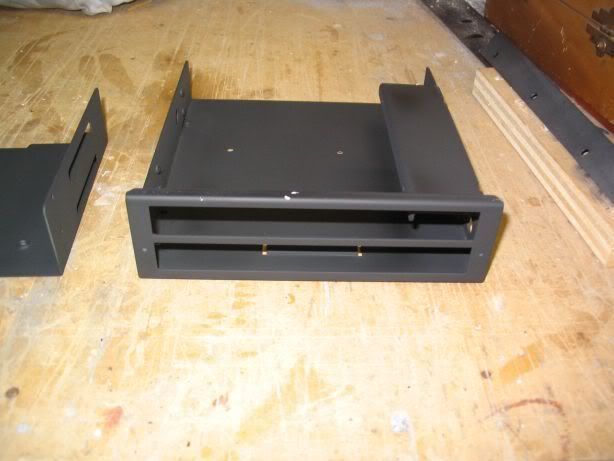
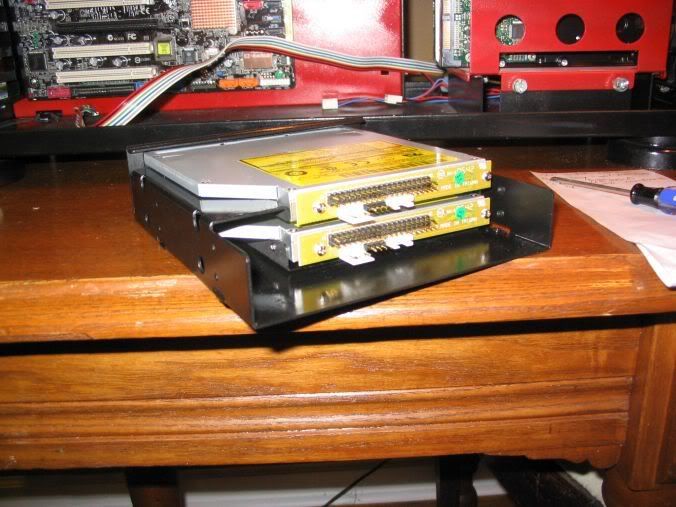
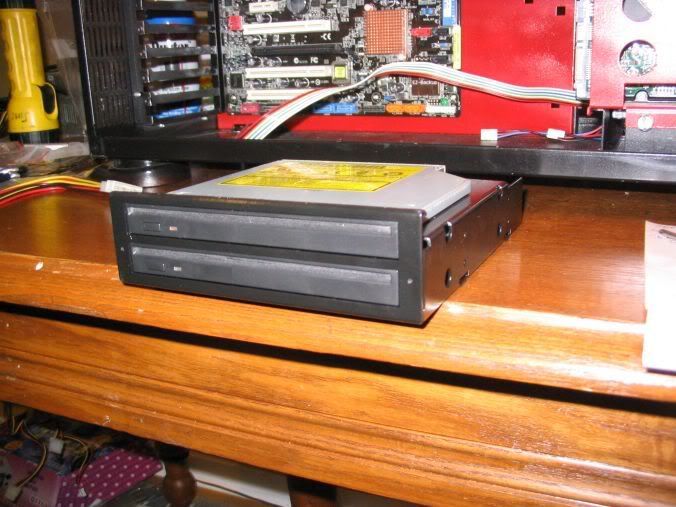
I decide a long time ago to use slot-loaded slim-drives. Just because I knew my water-cooling window would take up a lot of room, and because I liked the look of slot-load. So I had to order a bezel that would fit two slim-drives in one 5.25" bay. I just primed it and I'll paint it on Saturday when I go to do most of my painting work.
I'm still a little unsure how to mount my water-cooling window. I drilled these holes in the side to attach L-brackets to. I then planned on using tiny screws into the window. However, I don't think I want to do that anymore for fear of risking some more leaking. I think I will just end up installing the square brackets and using some heavy-duty double-sided tape.
And here are just some random pictures of the case. I know it looks dirty, there's a lot of dust and particles in there from various projects going on in the garage, not just mine. I'll be blowing it all out and cleaning it before it comes time to bring it home to my apt. and start my wiring/hardware install.
I've got this big open area under my PSU now that I moved it. I have no idea what to use it for, probably to hide cables in I think. Anyone have some ideas?
Just painting the side-panels and wet-sanding them. that will take 2 days between each coat of paint because you have to wait for it to completely cure before wet-sanding again. (day 1) So I will wetsand the primer coat, and paint before I leave. (day 2) Wetsand 1st paint coat, apply 2nd coat before I leave. (day 3) Wetsand 2nd paint coat, apply decal (if I have one), apply clear-coats. (day 4) Wet-sand clear-coats, apply rubbing compound, done.
So it looks like 4 days of work, which means a little over a week. Saturday, Monday, Wednesday, then Friday/Saturday/Sunday, whichever day my new ladyfriend let's me have free.
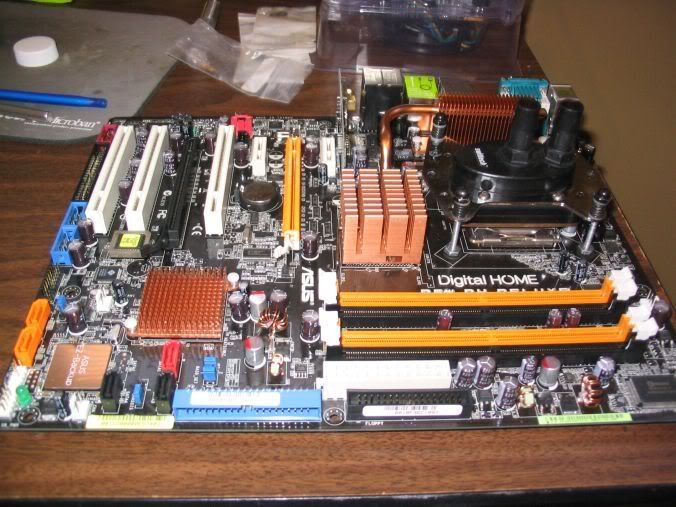
Then another week or so of installing the components, shortening my wires, applying new molex connectors, cleaning off the mobo and heatsinks, etc. etc. 2 more weeks, I hope. Then it's Windows XP and overclock time!!
Project: Savage (in progress)
Lian-Li PC-70 | Intel Core2Duo E6600 | Swiftech Storm w/ MCP655 Pump | P5W DH Deluxe | 2GB Corsair DDR2-800 | X1900XTX 256MB w/ Maze4 Waterblock | Audigy 4 | WD Caviar 300GB HD | WD Raptor 36GB HD | 2xslot-load DVD+RW slim drives
**UPDATE**
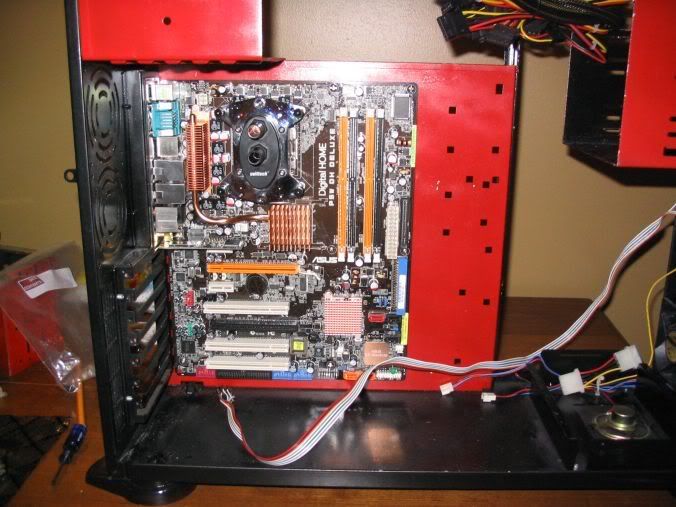
Started assembly. Forgot to bring home my dremel from my workshop (aka relative's garage), so assembly was halted for the day. Here's what I got so far.
I also started painting the side-panels. The first sanding-paint job looked really really good, only 3 more to go. I'll remember to bring my camera for pictures next time. I won't bother with descriptions/commentary.
The plan is to assemble it without the side-panels. Let it run/leak test/install windows/programs, etc. etc. while the side panels are being finished this week. Then it's done.
Project: Savage (in progress)
Lian-Li PC-70 | Intel Core2Duo E6600 | Swiftech Storm w/ MCP655 Pump | P5W DH Deluxe | 2GB Corsair DDR2-800 | X1900XTX 256MB w/ Maze4 Waterblock | Audigy 4 | WD Caviar 300GB HD | WD Raptor 36GB HD | 2xslot-load DVD+RW slim drives
 Posting Permissions


 Reply With Quote