Not too shabby.


Not too shabby.
Guess what happened man... HEADSHOT!
Looking good, nice to see blue flames for a change!
hell man thats very cool
Frikin Sweet!!!!!!!!!!!!!!!
thanks, sorry that there is not updates....i've been sooo busy
however, on a happier note, i have holidays coming up in which i will be able to finnish this for good
My Modd, enjoyo
http://www.thebestcasescenario.com/f...ead.php?t=2771
Modding Genius is on the tip of you dremmel
yay!
Anyway, i have started producing the water cooling system for falmed, and as it is going to have a few custom bits and pieces in it, i thought i would start a clean new thread.
PART 1 : T[h]e [R]adiator
I have made Water cooling systems before, but my last one, The compressor was very large, effective but large. THis mean't that it wouldn't fit into any sort of computer case.
For flamed however, i wanted something that i could intergrate seamlessly into the case. Oh, and thanks hillbilly for the Rad guide, followed the first bit then went my own way.
Firstly, i went to the local wreaker, and got a Toyota Corolla radiator, with a copper core. I can see now why this is one of the preffered rads, it seems made for water cooling.
The first thing i did was to design on paper, the plexi top, onto which i will attach the fans. I just put the fans onto it, then traced around them. THen i measured up the rad, put the data in and cut some round holes out. The holes will be where the fans will go
I then had a look at said Heater core (radiator) and saw that it was very dirty, all oxidised and brown. It also had this layer of what looked like prehistoric foam on it, which was quite firmly stuck. So i gave it a bath, and a soak to loosen the stuck foam.
After it's luxuriating soak, the layer of foam came off relitivly easily with a spatula (mum will kill me). After it was off, i was able to start sanding and buffing the two ends. I was actually surprised to see that it was a mixture of metals, like it had been repaired..hmmm
Anyway, i actually came out quite nicely after many hours of sand and cut and polish
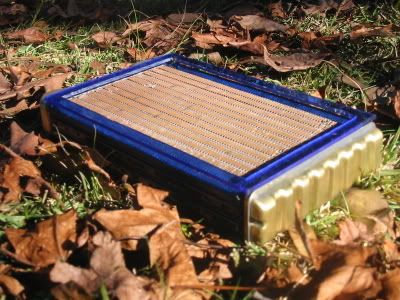
However, the side rails, that you can see with the many holes are made from steel, They may have in a past life been coated with zinc, but i destroyed all that with my vigorous sanding. I decided to paint them black. Unobtrusive and sublime i thought it would contrast nicely with the shiny ends. I taped up all the bits i didn't want painted, and let fly. it came up alright
THen i cut off the ends of the pipes, to the length that i wanted, i also cut them at a slight angle so to make it easier when i'm putting on the hoses as i don't use barbs. THey were then sanded all straight and nice with my engraver.
Here are a few final shots of the Radiator, finished and ready for the plexiwork
Till next time
shiks
My Modd, enjoyo
http://www.thebestcasescenario.com/f...ead.php?t=2771
Modding Genius is on the tip of you dremmel
ok, this punning is getting out of control, anyway, i have made the base shroud for the radiator, this will contact the floor and is mainly there to help with securing the radiator to the case
I started by cutting the desired shape out of perspex, i did this with a saw, and it came up alright, no cracks at least
I then measured up 1cm from the outside border, to be my hole, i employed a couple of different methods for cutting this as i cant cut straight away with a saw, i started with a cutting piece on the engraver.
Good results, but unfortunately i can't be bothered spending so much time, as this was taking ages, so i took up a hacksaw, drilled some starting holes, and away i went. THe hacksaw was alot faster, but it resulted in the plexi getting bashed around alot...i'm not sure whether i will sand it back and polish of not, afterall, it won't be very visable
Anyway, this is what i ended up with
cheers and enjoy
My Modd, enjoyo
http://www.thebestcasescenario.com/f...ead.php?t=2771
Modding Genius is on the tip of you dremmel

wow. me likey. Lookin good. Keep up the good work.
Oh and yes, Blue flames rock.
thanks Aero, blue flames rock, but would red lightning?
My Modd, enjoyo
http://www.thebestcasescenario.com/f...ead.php?t=2771
Modding Genius is on the tip of you dremmel
 Posting Permissions


 Reply With Quote