Awesome. Pure awesome.
Completely Dugg. +rep to you too.


Awesome. Pure awesome.
Completely Dugg. +rep to you too.
RIP Bucko

Thank you very much for your replies, I'll try to finish another update today.
I was working on it yesterday but My girl got angry because "I didn't give enough attention"
wheheh

Nice job on the foam! This is definitely a watcher.
Oh yeah, and I like the flames too.
+rep
+digg
Honey Roasted Peanuts Ingredients: Salt; Artificial honey roasting agents; Pressed peanut sweepings.
Update 2 - Temple of NOD - January 10 2007
further sanding, plastering and making the molds
I got rid of the square look , by removing some of the sides and then sanding it down.
This is how it looks on top of the rest.
Here I cut away some foam to create nice curves as seen in the pictures.
Then I removed the parts where the windows would be.
You can see the back of the model here.
This foam has one drawback, It reacts to epoxy resin so I have to protect it.
I do this by applying a layer of plaster.
I use various roughnesses of plaster, I begin with the roughest as the base layer.
You can see the mix here.
I am smearing it all over the model.
Now letting it dry ... it dries soooo slow
Showing the side of the mod.
And the back.
Now that's dry I apply a thin layer of plaster on the bottom of the model, just to be sure.
now It is covered, this method has one other advantage, It makes the edges of the model stronger and thus the model better to handle later.
Now again my friend the sanding paper... It has to be as smooth as possible because this model will transfer anything that is not smooth into the negative mold, I'll make from it.
And now showing the back
Now the model is smooth I am covering it in bee wax to guarantee an easy release when my negative mold of fiber glass is hard.
This is an intensive job as I have to rub every part for some time for the smoothest result.
the tower and the inner beck has to be done too
Now we are mixing Gel coat, this is some sort of epoxy resin with the difference that this is softer so you can easily sand it later.
adding the activator part.
And now it is time to apply the stuff on my molds, this process has to be repeated 2 or 3 times.
waiting to dry.. ready in about 30 minutes...
Next step is applying the real fiber glass and the resin.
This is a batch of resin, be careful of the amount of activator
Now I tare off small pieces of fiber glass and drown it in resin, it is better to use smaller parts of fiber glass as this will make is easier to remove air bubbles.
A foto of the mold covered in fiber glass.
And now again for the whole picture.
As I have a difficult mold which can not be released in one piece, I had to divide the mold in 6 pieces.
I did this with a normal saw.
another piece, I can tell you this process hurts if you spent 3/4 year modeling the Styrofoam plug
releasing the actual negative mold.
the tower in 2 parts.
Showing its insides.
well THERE is your problem
The inner beak's negative mold.
I attached wooden blocks to my mold's pieces and bolted that together.
The old foam blocks... useless now..
To get the correct shape again I build a skeleton around the mold to tension the pieces.
These wires are pulling certain parts of the mold into shape. (can be adjusted with a bolt)
This is how it looks now, almost ready...
Now again I coated the mold with gel coat, this also fills up the gaps so it can be sanded later.
Another layer of Blue gel coat with on top the first layer of fiber glass.
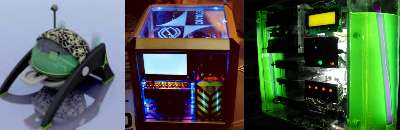
YEEEHAAA my temple released from its negative molds, now just some sanding and we are done
How do You like this?
End of Update 2

That looks sooooo awesome, great job.
Project: Elegant-Li *NEW*
Project: Alpha FINISHED
Project: LEXA Revival FINISHED
Project: LEXA FINISHED Bit-Tech MOTM Nominee October 08

Nice!
- Computer-Geek

That is amazing! The pyro in me loves the flamethrower. Keep up the awesome work.
Subscribe.
Cynicism is a bunch of people who aren't as talented as other people, knocking them because they make them feel even more untalented.
-Ewan McGregor

It is not the first time I worked with these materials, but it is the first time ever I tried to make a mold with a mold of foam.Originally Posted by |NQ|Squelsh

And my sponsor supplied me with materials and some knowledge, but with this mod even their knowledge often wasn't enough.
So we did some trial and error, but eventually we got a nice result.


looking sweet and sweet dude!
Mary had a little lamb. It bumped into a pylon. Ten thousand volts went up its arse and turned its wool to nylon!
 Posting Permissions

 Reply With Quote