|
||||||
|
Welcome to the TBCS Community Forums forums. You are currently viewing our boards as a guest which gives you limited access to view most discussions and access our other features. By joining our free community you will have access to post topics, communicate privately with other members (PM), respond to polls, upload content and access many other special features. Registration is fast, simple and absolutely free so please, join our community today! If you have any problems with the registration process or your account login, please contact contact us. |
![]() |
|
|
Thread Tools |
|
#1
|
||||
|
||||
|
Back again after 2 months to piece all random images in my head for this. Matriarch came along with Paperazzi but opted to work on Paperazzi first. Nearly started it while in the early stages of Paperazzi but went against the idea. Paper is the main sculpting material again but won't be used on the whole case. Same case as the one in Paperazzi. Got scratched quite badly so my friend offered it to me for only 35 bucks (12 USD) instead of 110 that I paid for the first case. Wanted an ASUS case (not those fugly shaped ones) which is uber simple and nice to cut, but doesn't have any stock from the supplier.
![]() ![]() This what its going to be like, so you figure it out in your head. I don't do renders since its all in my head and I have problems putting ideas onto paper or softwares. The in/out airflow will remain the same as my last 2 mods are except this time the HDD will be moved to the top panel, outside of the case. ![]() These will go to the left panel and the front panel. I still haven't done any for the top panel, not sure if I want to. ![]() ![]() Base extension will be using 5 of these. Keyboard and mouse slider will be underneath the case on some UV green AcrylPanel. Will be getting them legs from another friend's shop for 50 bucks (about 15 USD). Customer accidentally broke his glass stand few months back. Well, my gain. The screws fit perfectly into the holes on the bottom panel. ![]() Got my prize pack for July MoTM courtesy of AC Ryan (a big thanks to them and those who voted for Paperazzi). There are 2 AcrylPanel (UV Green & Blue) and 2 AluPanel (brushed green and gold) but going with UV Green and brushed green panels for Matriarch. So yeah, its gonna be black with green for the whole theme. Just stripped some parts off last nite, wanna cut into the chasis first before stripping the rest. Scroll on. ![]() 
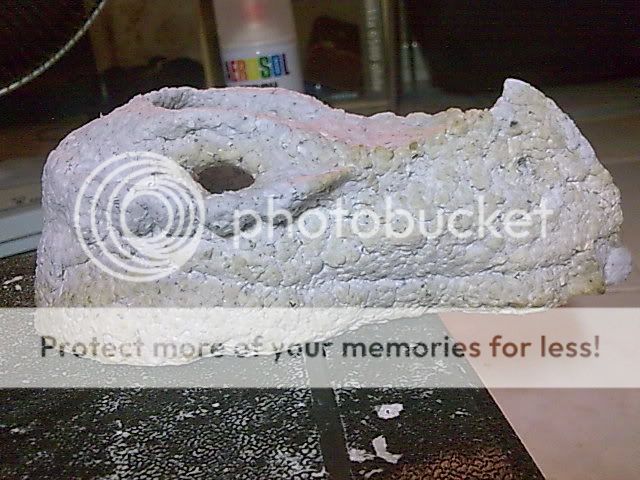
This is where most of 5-litre worth of paper go to. This is the first sculpt I made for Matriarch. Its the chest and neck. Will be mounted/glued to the left panel after its done. Inserted 2 tubes to allow wires to run all the way up for a simple LED set up. My chair actually squashed the thing once when it slipped, so had to redo it, after the chair has its share of bouncing off the walls a couple of times. ![]() ![]() ![]() ![]() ![]() |
|
#2
|
||||
|
||||
|
+1 black dragon, the Matriarch herself. Since its a she, I won't give it an "im-gonna-eat-your-momma" look. She'll have a proud/cocky look instead. Had to leave the gap open to run the LEDs in and then cover it up, leaving a gap for the glow. More or less based on this red dragon sketch from D&D (I don't play it, I know nuts about it, don't ask me about it)
![]() ![]() Goin up slowly ![]() ![]() ![]() Additional minor details ![]() ![]() ![]() There will be 3 lines for LEDs in her head, the permanent running ones will be the on/off indicator LED and the line for another single LED. The third line of 2 LEDs will serve as a backup, well, just in case (idea credit goes to p0Pe). Two small piece of slightly-bent UV green AcrylPanel will be her eyes. Still a lot of detailing to do for both the chest and neck right now. ![]() ![]() ![]() The whole idea is to have Matriarch popping out of the left panel, claw marks and claws next to it to reveal a bit of the insides, and one wing and tail for the right panel. Another set of claw marks and claw will be on the front panel (that's why I didn't karate the doors off the panel this time) for top-front intake. Instead of working on the exterior of a stock keyboard, gonna strip it, take the insides, and build my own keyboard that will be part of the case along with the mouse. That will be worked only at the end of the mod. The keyboard and mouse panel will be stuffed under the case itself with an extension to the base. Thats all for now. Be back soon. |
|
#3
|
||||
|
||||
|
man you got that paper stuff down to an art... very nice ..... ill be watching
|
|
#4
|
||||
|
||||
|
Sweet more paper work from Acey. Can't wait for more.
__________________
Project: LEXA FINISHED 30/11/08 (16 months 14 days) Bit-Tech MOTM Nominee October 08 Project: LEXA Revival FINISHED ![]() |
|
#5
|
||||
|
||||
|
the paper makes it look like scales! love it!
__________________
Completed Project: Rockin Case Completed 12/23/2009 Sponsored by PCBoard.ca Work in Progress: Project: Monster ON-HOLD Check out MySpace and Facebook |
|
#6
|
||||
|
||||
|
Nice. Can't wait to see the finished dragon head.
|
|
#7
|
||||
|
||||
|
Very very nice detail in the paper work, didn't even see that as an option before. Love thinking outside the box.
__________________
There's no place like 127.0.0.1 |
|
#8
|
||||
|
||||
|
we want more!!!
|
|
#9
|
||||
|
||||
|
Quote:
Quote:
|
|
#10
|
||||
|
||||
|
oh snap.... say ya car broke
try get another one man... |
![]() |
«
Previous Thread
|
Next Thread
»
| Thread Tools | |
|
|
Powered by vBulletin® Version 3.6.8
Copyright ©2000 - 2010, Jelsoft Enterprises Ltd.
thebestcasescenario.com


try get another one man...
