Results 1 to 9 of 9

Thread: My full desk "mod"... lots of pics & very long :)

  1. #1
    Fresh Paint
    Join Date
    Apr 2008
    Posts
    8

    Default My full desk "mod"... lots of pics & very long :)

    Afternoon all. I'm fairly new here, so I'm sure most of you have no idea who I am . I have been planning on redoing my desk ever since I bought it. As of today I finally got a lot of it together and now need to put some finishing touches to it. I posted this on another forum as well, but I really enjoy this forum so I figured I'd share with you guys

    Some backstory. Found out the wife was pregnant. We have a 2 bedroom condo. The second bedroom was essentially my "man-den". Had my big screen, home theater, and computers. However now that has since become the nursery and every room in our condo has had to get redone to get ready for the baby.

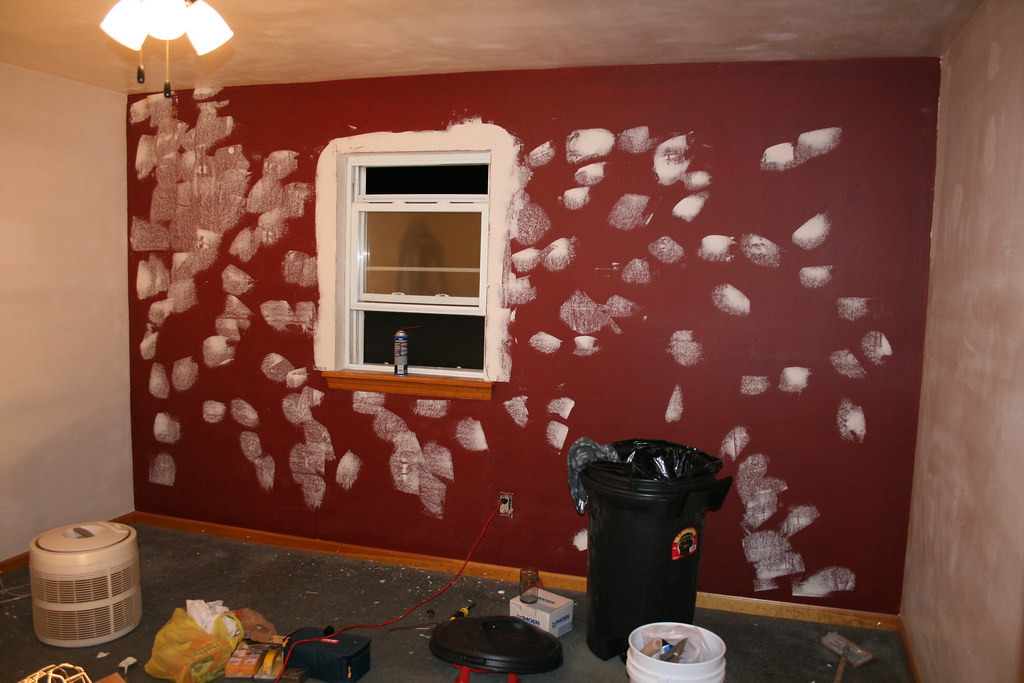
    Nursery before. Don't have a great before pic, so this is it spackled. (why not, pictures are fun)


    Nursery after. The stripes are all hand painted. Took my grandfather and I about 12 hours to complete. The wall on the right is the red wall you see in the before.


    So since my man-den had been all baby'ed up, I was forced to bring my computers out to the living room. Given the space I was "allotted" I had to find a corner desk. My wife and I went to about 8 different furniture places and I couldn't find anything that fit and was what I was looking for. One night, perusing CraigsList in my area I saw someone selling a corner desk for $25 bucks. Measured up alright. Saw that it was structurally in decent shape (aesthetically it was quite worn), but for $25 bucks it was well worth it.

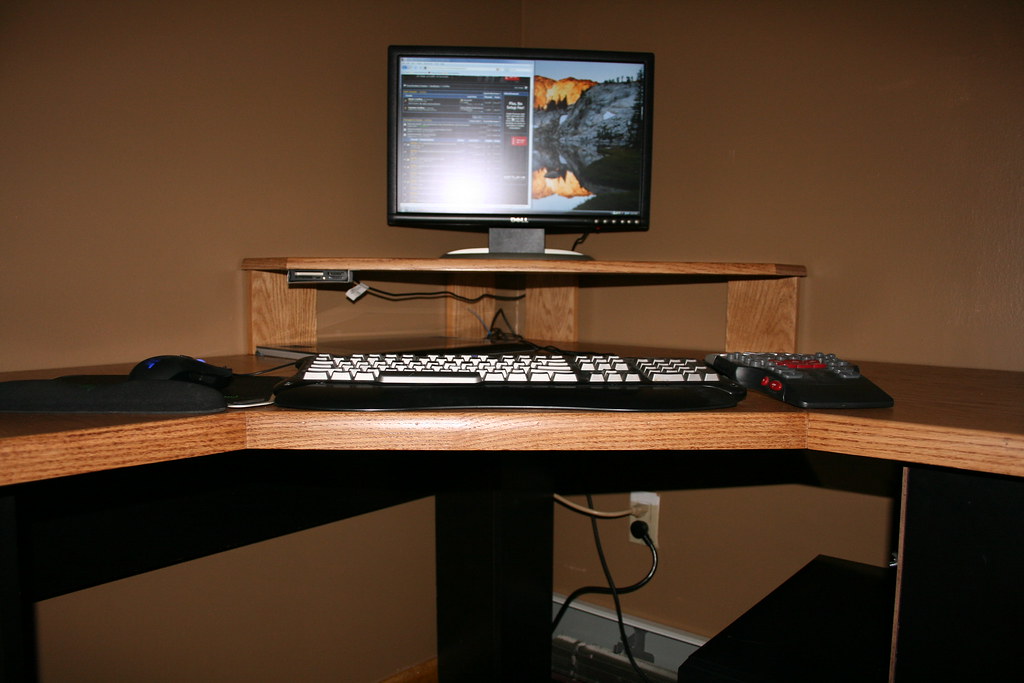
    Here are a couple shots of the desk after I put my stuff on it. Make sure to note the front of the desk where the entire trim was so kindly removed. Also, apparently mousepads were optional on the right side. Then again if you look at my mouse, I had no room to place a decent pad on the left side either.


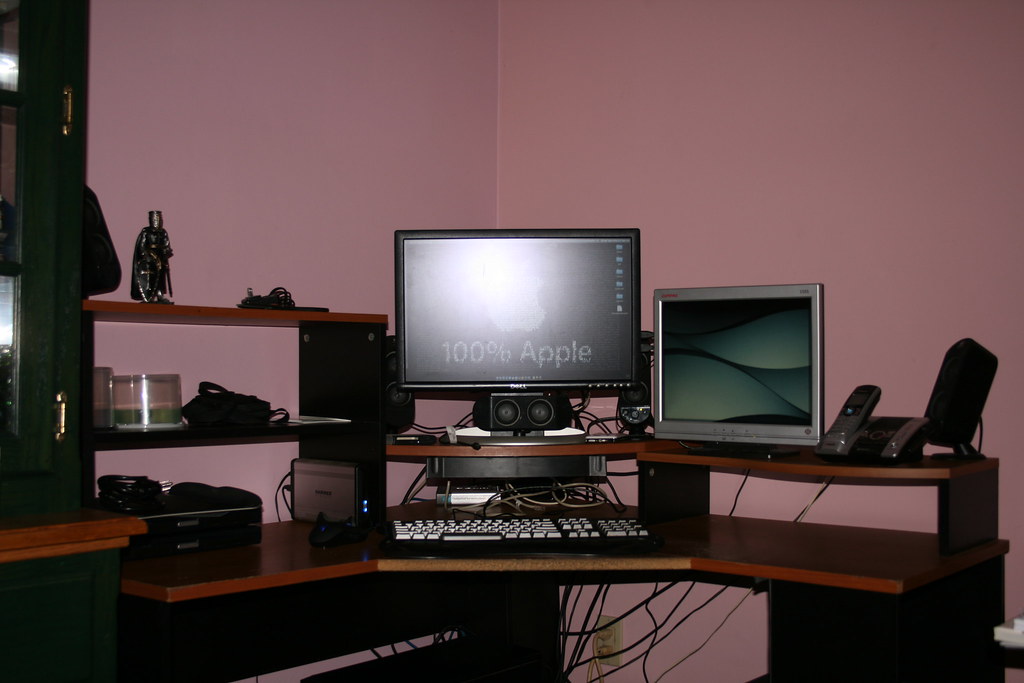
    Head on you will see the sea of cabling coming down from the desk. Also behind the monitor stand if you look close you will see that it was my router / modem dumping ground. Sea of wires and clutter.


    Another head on shot. As you can see it was really close to our china cabinet.


    Just a side note, the computer is actually the same terrible case I'm using for my Q6600, but for those pictures it was my AMD computer which is currently sidelined at the moment awaiting some sort of HTPC project.

    From that point I was planning out how to make the desk not suck. I wanted something that would give me ample working desktop space, I wanted it to be as neat as possible, and less of a eye sore. First I debated building one from scratch. I started figuring out the plans and planning the project. Then it actually struck my grandfather that the one thing that is good shape on the desk the the actual flat top and the legs.

    Well its a perfect starting point!

    I wish I had actual "doing the work" pics. However honestly I really didn't even think about posting it at that time. After all the work, I then figured I might as well show it a little so I am sorry for the lack of work pictures.

    I decided on going with a flat desk top with only a monitor stand attached to it. I hated all the other useless shelves on the desk so they all had to go. I decided to go with a Oak finish for the wood, since that has my favorite grain look. I picked up a 4x8 piece of 3/4 Oak veneered plywood. For those of you not familiar with it, it is essentially a 3/4 piece of plywood with the top and bottom finished with a thin layer of real oak.

    Total cost of 4x8 plywood was ~65 compared to probably somewhere around 200 for a piece of solid oak and it stains identically. I decided to shorten up the left side of the desk 2 inches and extend the right side about a foot. This would give the desk some breathing room from the curio cabinet and some extra desk space on the right side.

    Note to the unhitched readers... when your wife says you can have more space, you take it!

    The one thing that really urked me about the original design of the desk is that the monitor stand stood over a foot from the back of the desk. Causing a ton of wasted space behind the monitor. I threw my modem and router there to try to justify the space. With the new desk design, I wanted the monitor shelf sucked up to the back of the desk. The stand was cut essentially from the leftover piece of the plywood. Along with the support for it.

    Once all the pieces were cut, they were stained the same color as the woodwork in our condo. For the clear, water based varnish was used. 3 coats of varnish were applied with a light sanding after each coat to give the desk a nice smooth finish.

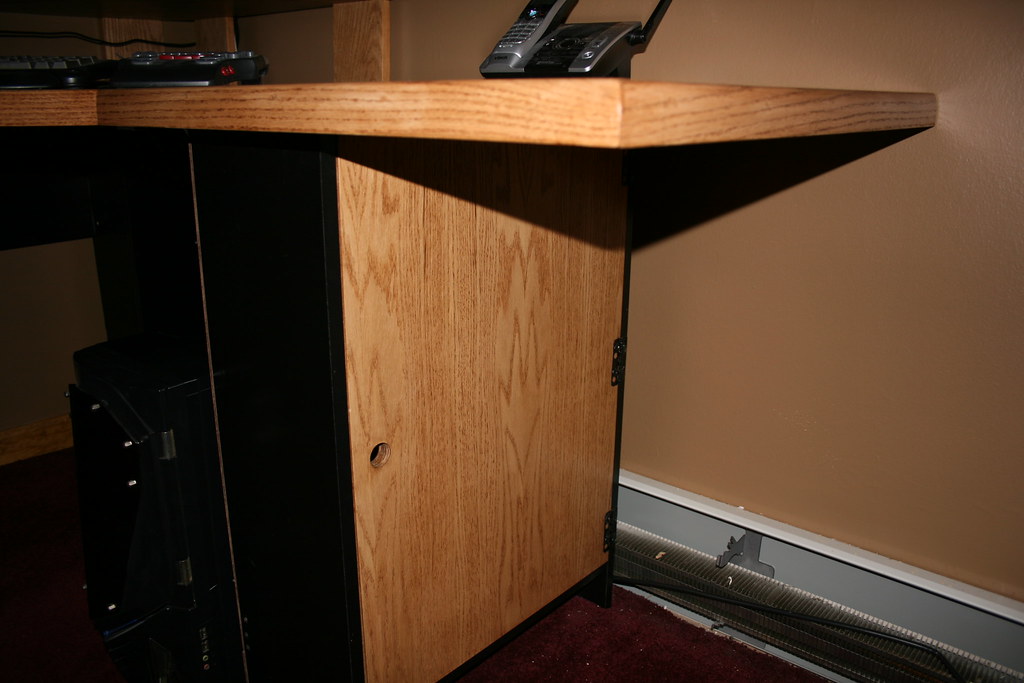
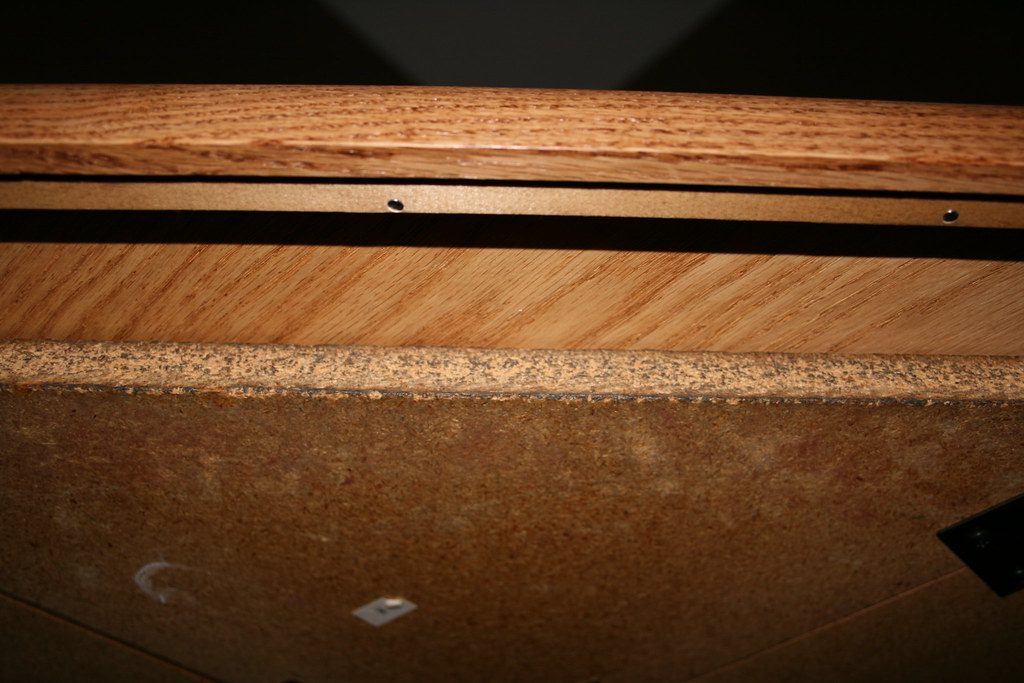
    Now as you all know, the side of plywood is hideous. It shows all the layers of the wood pressed together unevenly. Pretty much not "good eats". To remedy this, I picked up solid oak door trim. This was perfect for covering the front edge of the desk. It's other function was to completely block out of site the old desktop that we would be mounting this new desktop to.

    For the monitor stand, we used the same door trim, however trimmed it flush to the plywood since there was really no need to have the lip hang down.

    Here's a shot of the top with lip placed over the desk. As you can tell the new desktop has a 2 inch overhang. This is where the front edging wore off on the old desktop as I pointed out in a earlier pic.

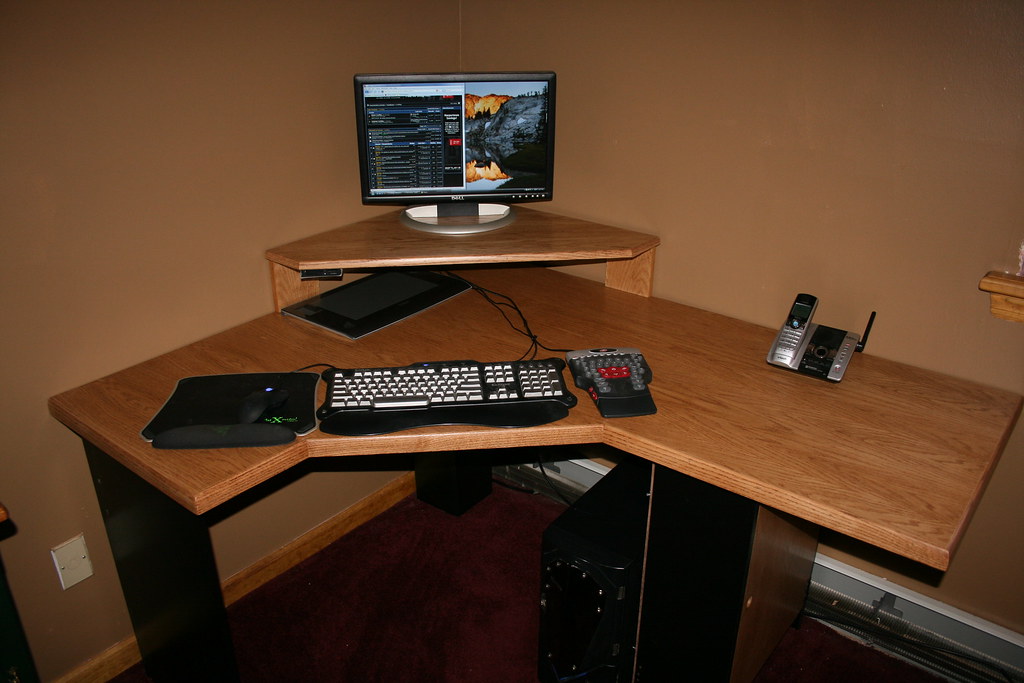
    Here are some shots of the desktop as it is now fully installed.

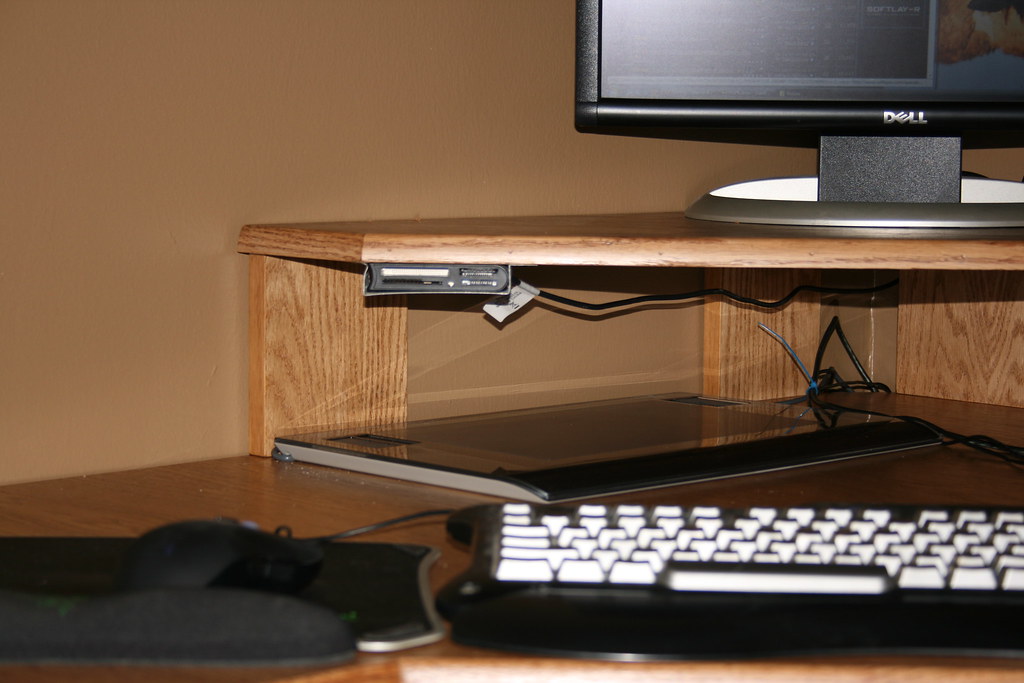
    Overhead shot of the desk. As you can tell, I am trying to go with the whole "less is more thing". On the desk I have my Razer Lachesis mouse , Saitek Eclipse keyboard, Zboard Fang, telephone, and my Wacom Tablet. On the monitor stand currently only the monitor is there, however speakers will be making their way up there shortly.
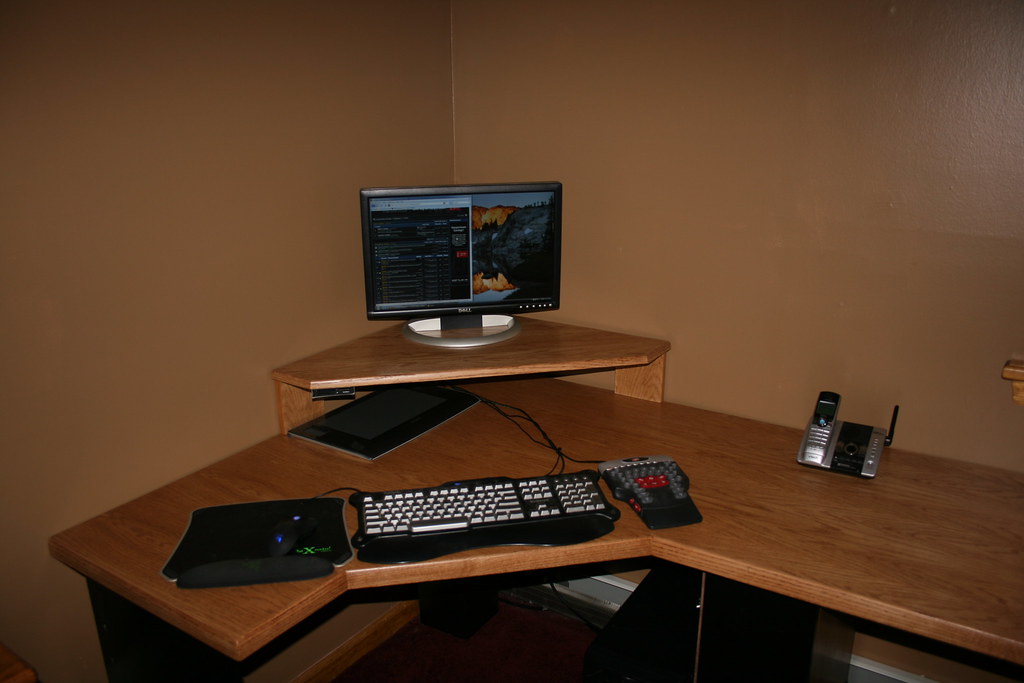

    Wider angle


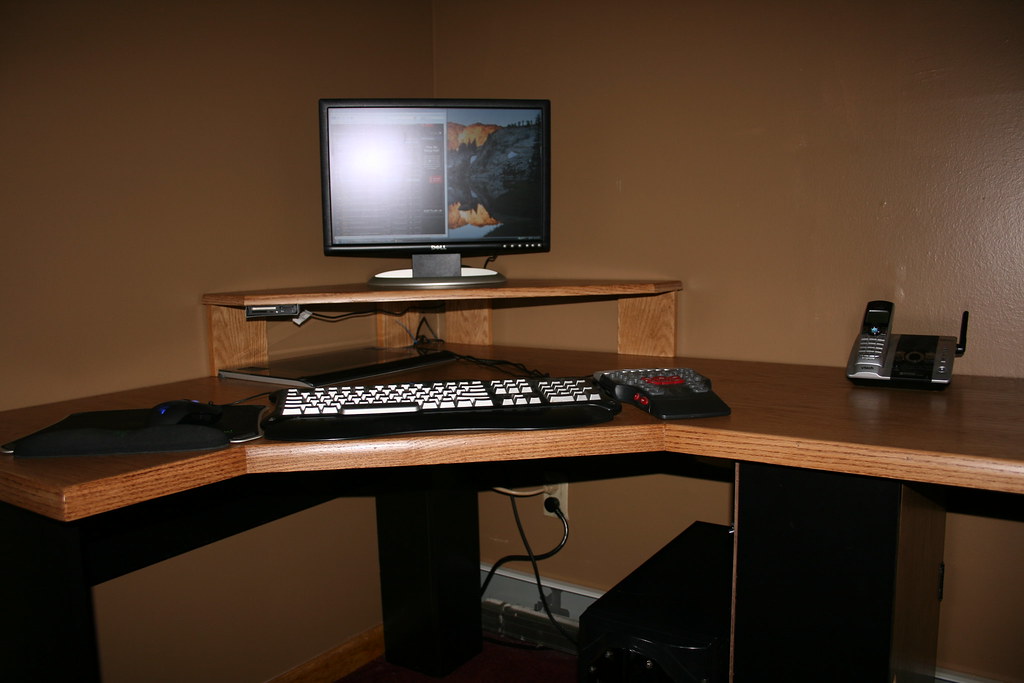
    Lower angle. You will start to see the lack of cables around. I will get into that shortly . PS: Yes I know my baseboard has no cover. I have to install that this week. It was just put in prior to me painting and didn't have the correct covers for it yet. Yes also the room was painted before I put the desk in. /Wave hideous pink walls :bang head


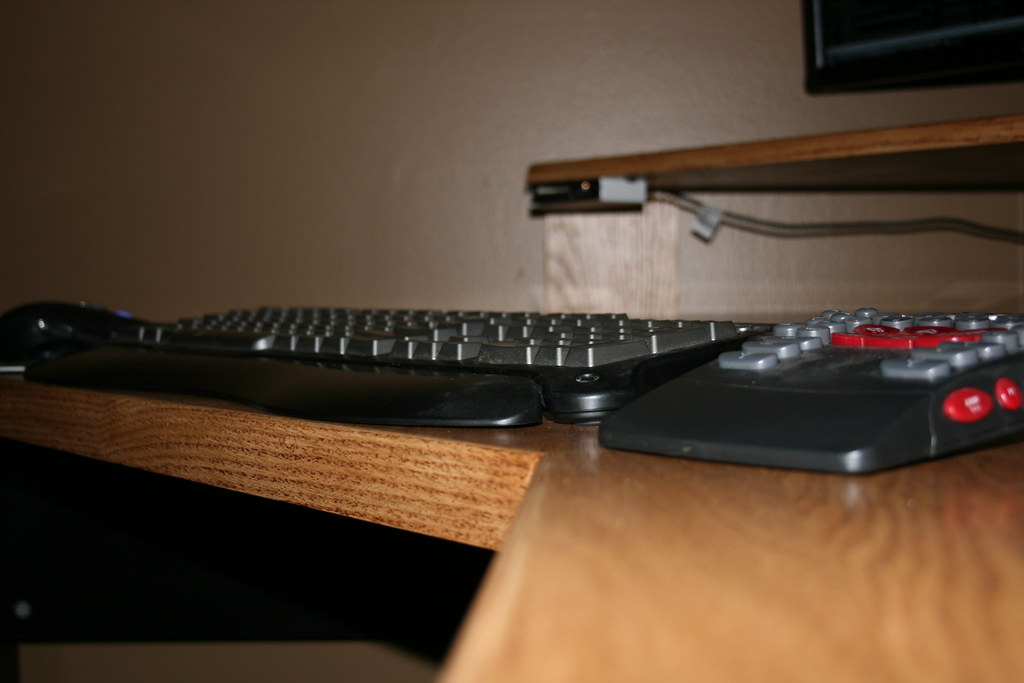
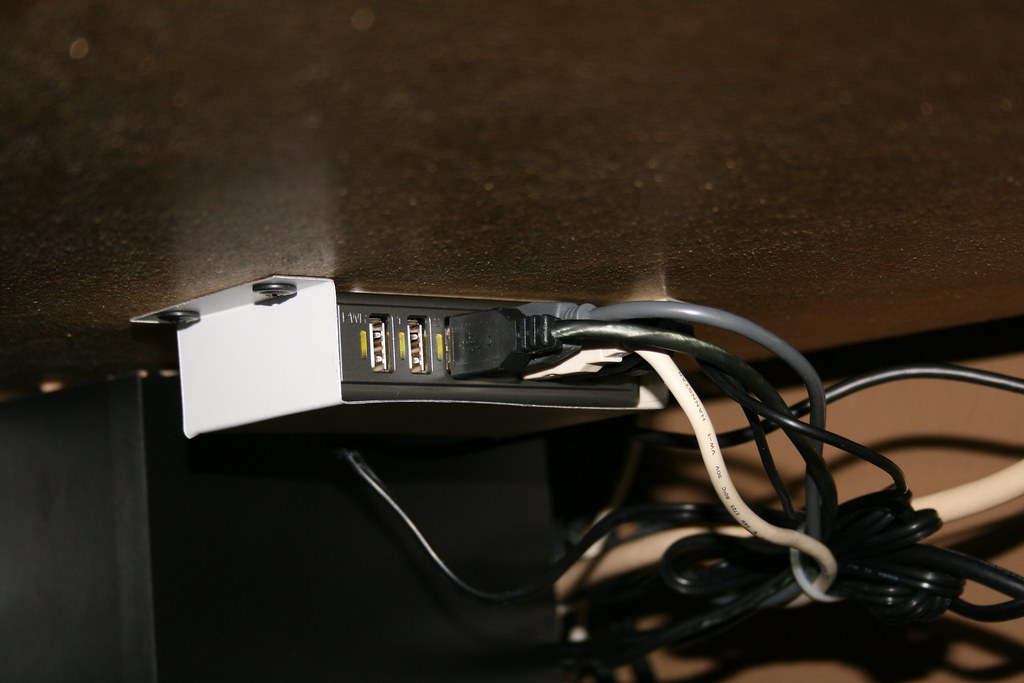
    Now to get to some of the goodies I put on the desk. Features if you will. Cut out some aluminum and made a bracket for my card reader. This will be taken down, straightened out a bit, and painted black. The wire hanging also will be properly routed under the monitor stand with 2 small hook screws. The USB cable is wired to the bottom port of the monitor (Dell 2005FPW, it has 4 usb ports. Two in the back & two on the sides).


    Trim / peripheral closeup. Keyboard and Fang are going to be taking a ride down dishwasher lane this weekend. I would have done it before mounting, but there are dirty dishes in there


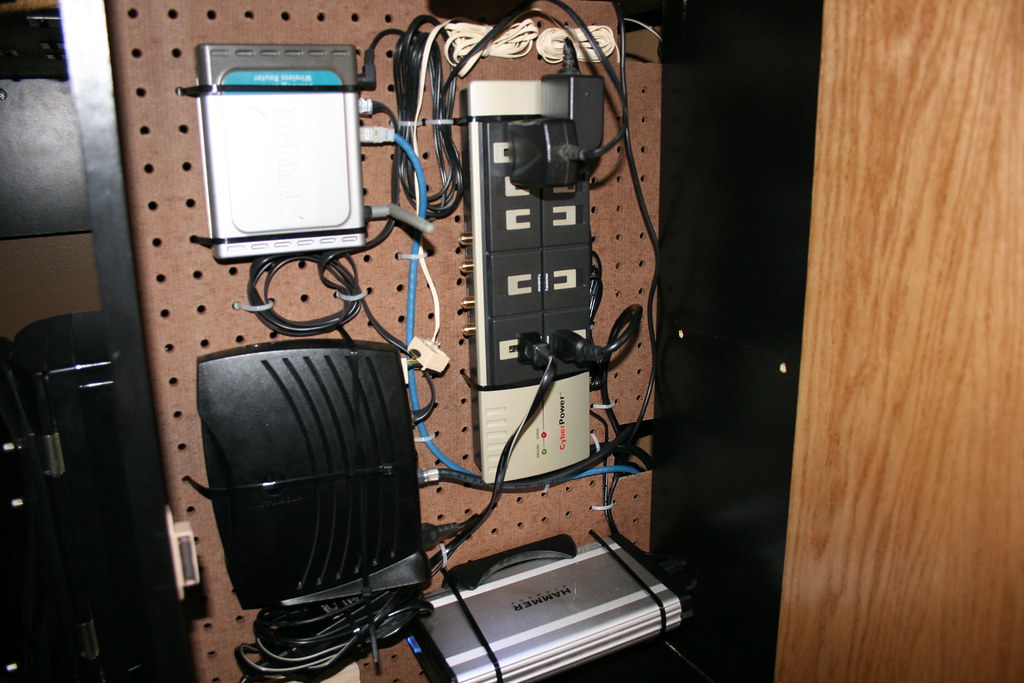
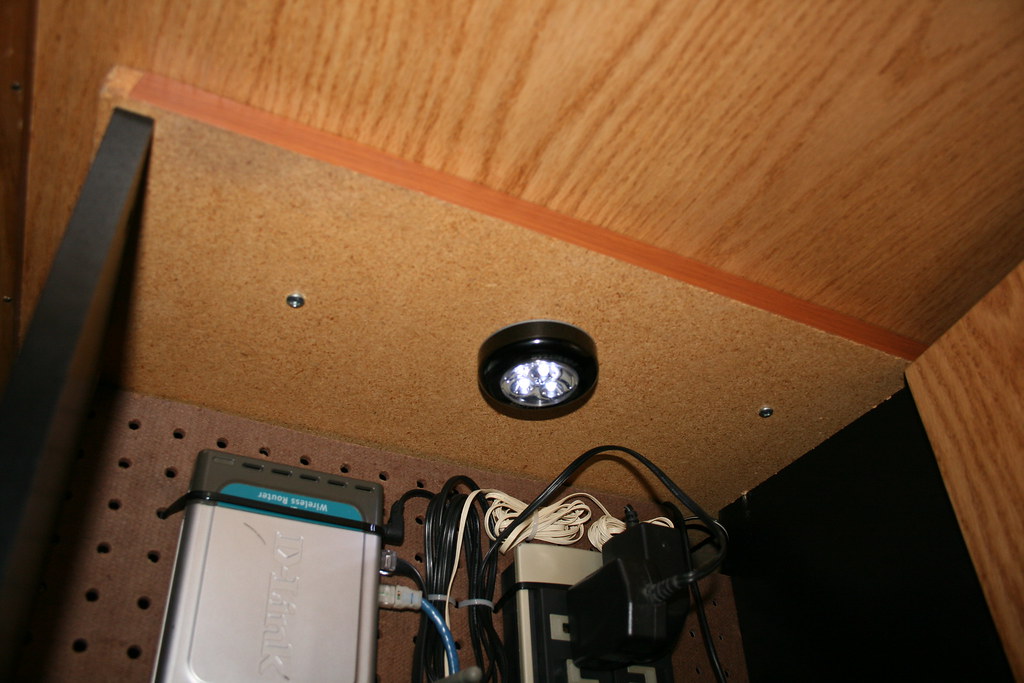
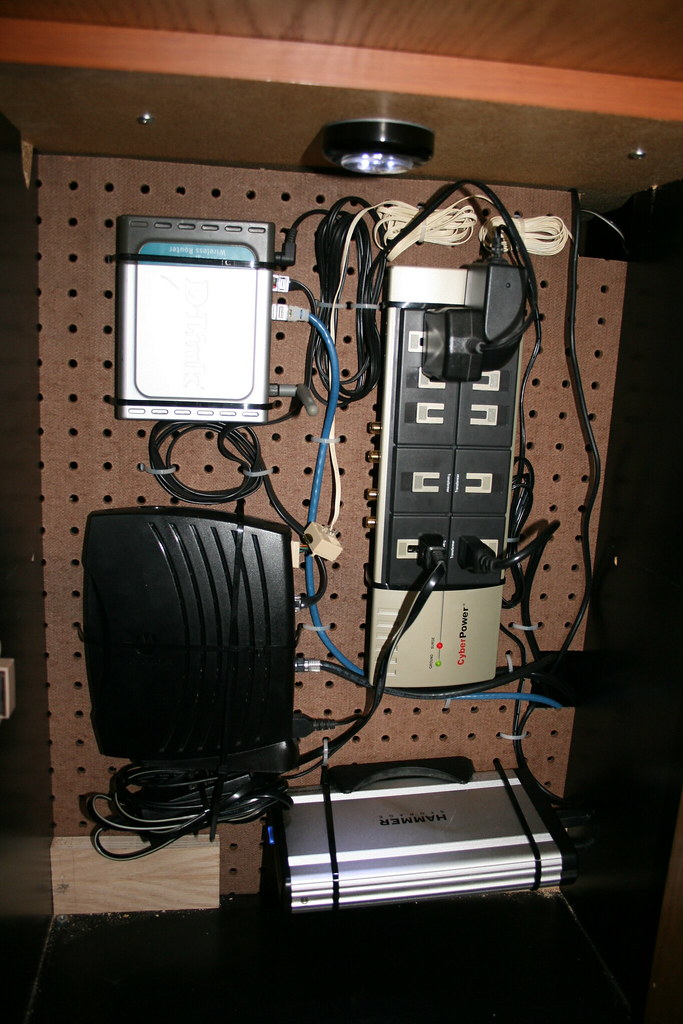
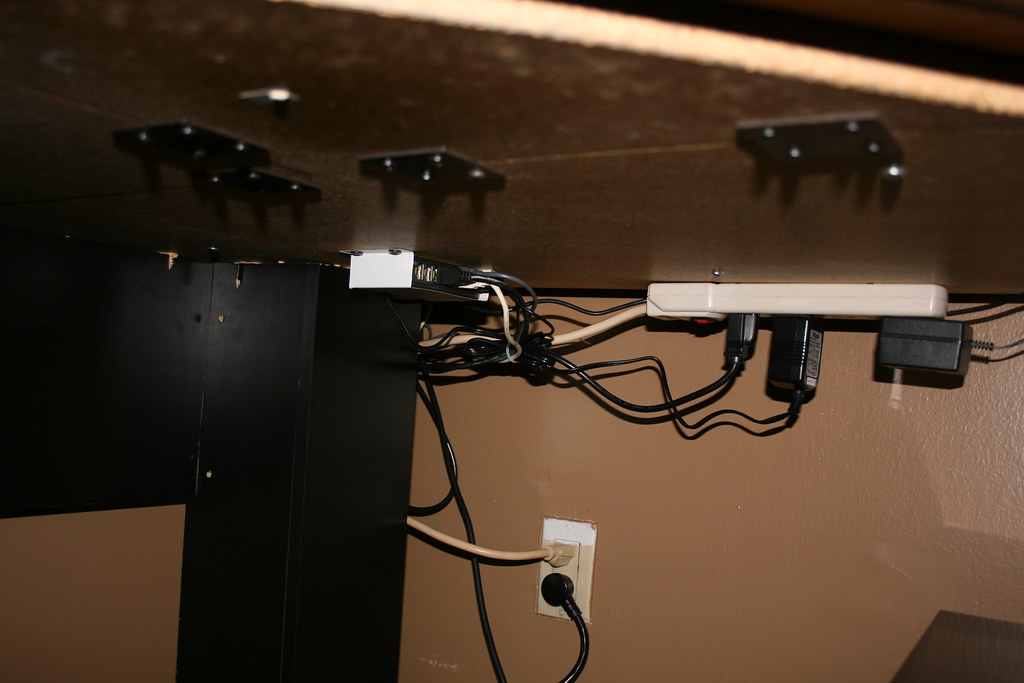
    I call this cable management part 1. Underneath the desk by the corner of the wall, there is a mounted surge protector & a 8 port USB hub. The surge protector is being used by devices that need to be plugged in on or around the desk. Currently it's just the monitor, USB hub, and telephone. The USB hub is being used for anything connected to the desk. Currently its the keyboard, mouse, Fang, Wacom, and the Dell monitor (which if you remember currently has the card reader). This part is definitely part of the remaining 10%. Right now the cables are sorta just tossed there. They will all be mounted with proper hook screws, cable ties, and cable tacks.


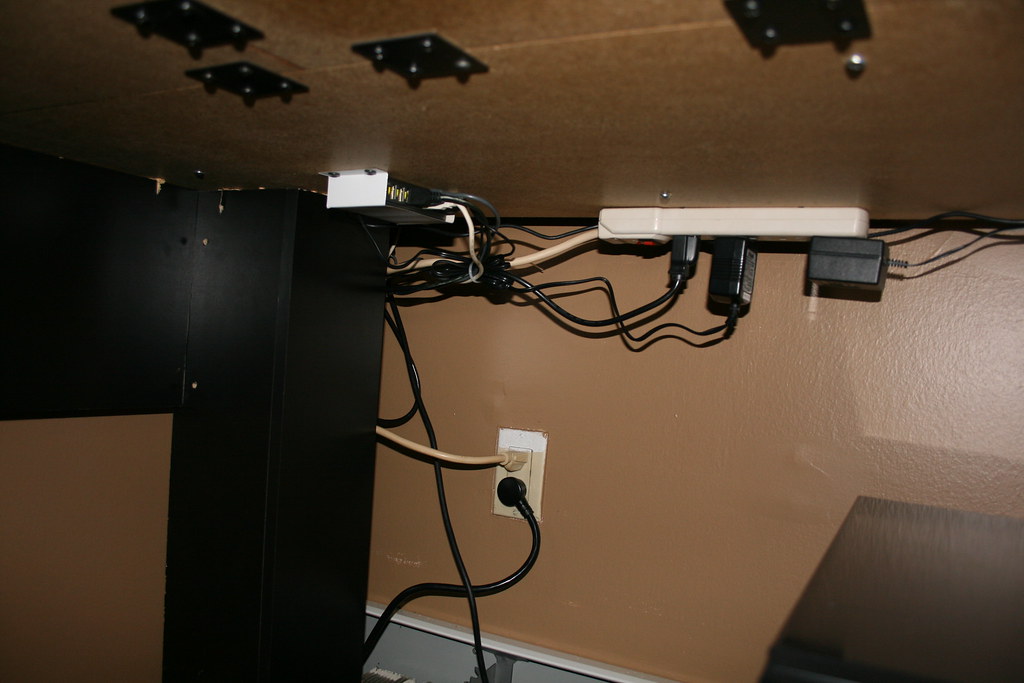
    Another shot of underneath. Little farther out.


    USB hub up close, showing bracket... and messy cables. That will be fixed!

  2. #2
    Fresh Paint
    Join Date
    Apr 2008
    Posts
    8

    Default Re: My full desk "mod"... lots of pics & very long :)

    Alright so now you have seen most of the desk. Naturally I have saved the best for last. I take absolutely no credit for this idea what-so-ever. I got the idea from www.lifehacker.com (excellent site, if you aren't familiar with it, certainly check it out) who got it from http://www.decluttered.com/. In the very first picture of the old layout desk you will see that the right legs had a opening and was actually a shelf. Well as I said before shelves can become a clutter magnet. Especially for myself so I decided to put together a version of the pegboard mounting for this project. The one flaw in my opinion for a lot of people posting pictures of their pegboard mounting is that they don't actually conceal their pegboard. So essentially it becomes viable mounted clutter in a slightly different place. The solution for this... take out the shelving (remember I used all the original legs / supports) and make a door!


    The contents of the pegboard are:
    Cable Modem
    Wireless Router
    Surge Protector
    External hard drive
    PC plug
    Network cable routed out to desktop.
    Phone cable coming out from cable modem out to top of desk for phone.
    Two different blocks of wood, placed in there and secured down with 6 screws each to reinforce the extra weight from the longer top.

    I think it came out good. This took a while to position everything.


    Of course, we need to add a little "flair" to it... with a LED light You can also see where the old top ended and where the new top extended.


    All together now.


    Phew. Pretty much done. Don't say I didn't warn you that this would be long . All in all it was a lot of fun to plan and put together. My grandfather and I did all of the work and it's been a really rewarding process, so I figured I'd share it with the community.

    There are a couple more things I'd like to do and could perhaps use some suggestions. The cables coming from the peripherals & under desk plugs are going to get organized and properly cleaned up. The card reader bracket is going to be painted and the cable is going to be ran correct. My hideous NZXT Nemesis case will be getting replaced in the near future (next project upcoming... all I will say to that is its tentative name is "Stewiefish".

    The only thing I am sort of stumped on is I have a 15 inch LCD that you saw in the original desk pictures that I have no idea what to do with. It doesn't match and looks like crap, but I love the 2nd monitor for secondary stuff such as iTunes, temp monitoring, etc. Any ideas how I can incorperate that into this desk would be a great help.

    I was thinking a "floating drawer" in the center of the monitor stand. Somehow trimming it with the same oak finish as the desk, but have it fold out to a \ angle to reveal the monitor when being used. I'm not sure.

    Well that's it. My first project mostly complete. Please comment on it, I'd love to hear what you guys think about it. I'd also love to hear what you guys hate or think should be changed about it!

    On a parting note... the farewell shot.


    Regards,
    -Evo-

  3. #3
    ATX Mental Case tinker's Avatar
    Join Date
    Nov 2007
    Location
    ohio
    Posts
    167

    Default Re: My full desk "mod"... lots of pics & very long :)

    Looks much better!

    I really need to do a cable management system like yours.
    The problem is that I move my computer too often to make it practicle.

    Good work though.

  4. #4
    ATX Mental Case
    Join Date
    May 2007
    Location
    Florida
    Posts
    103

    Default Re: My full desk "mod"... lots of pics & very long :)

    That's sweet! I really need to get me a new desk.
    E2180 (2.0ghz) | 2GB DDR2 800 Tracers | 8600GT 256mb | XFX 610i nForce mobo | Lanbox Lite
    Intel Atom 230 - 1.6ghz | 2GB DDR2-667 | 945GCLF Mini-ITX | Apex MI-100 case

  5. #5
    I've got the madcow, what's your excuse? Bopher's Avatar
    Join Date
    May 2007
    Location
    Carlisle, PA
    Posts
    980

    Default Re: My full desk "mod"... lots of pics & very long :)

    Nice. This I may need to refer back to at some point. My desk is not doing to well being moved as often as it has and may need a makeover sometime in the future.

    "Technical neglect is one of the worst kinds of neglect, won't you sponsor an octal or adsl2 card so they can someday grow up into big capable adsl2+ cards? random celebrity does."

  6. #6
    A big old Tease Apparently DonT-FeaR's Avatar
    Join Date
    Sep 2006
    Location
    Australia, south australia, Gawler
    Posts
    2,939

    Default Re: My full desk "mod"... lots of pics & very long :)

    wow thats great good work mate
    Quote Originally Posted by Drum Thumper View Post
    you tease!

  7. #7
    Fresh Paint
    Join Date
    Apr 2008
    Posts
    8

    Default Re: My full desk "mod"... lots of pics & very long :)

    Thanks for the kind replies. It means a lot to come from such a talented group of people There's still some more work to do. I'm still trying to figure out how I want to incorporate my second monitor, but given how ugly it is (15inch older compaq analog lcd). I'd like to find a way to conceal it somehow but I am completely out of ideas.

    Also another possible idea is a keyboard tray for the Wacom to get it off the desk and have it in a little better position for working. Along with potentially drilling a hole under the keyboard to run the mouse, keyboard, and fang cables under the desk for the appearance of being "wireless'.

    Side rant: Damn companies for not making a decent left handed mouse in wireless form. we are people too!

  8. #8
    Custom Title Honors chaksq's Avatar
    Join Date
    Mar 2007
    Location
    NJ
    Posts
    1,277

    Default Re: My full desk "mod"... lots of pics & very long :)

    Dude I am totally feeling this! If you don't mind I may try and use your idea for the cable management box, cables aren't cool hanging off a glass desk.
    In Progress An Updated (Mac) Classic
    Completed Performa, BOX
    Hiatus Highrise
    Upcoming NightShift
    Cancelled Dell XPS, Framed, Busy

  9. #9
    Fresh Paint
    Join Date
    Apr 2008
    Posts
    8

    Default Re: My full desk "mod"... lots of pics & very long :)

    By all means go for it. I love how it came out. It took about 1 1/2 hours or so to get everything laid out and tied down, but well worth it in the end. Like I said this was by no way my idea, I snagged it from Lifehacker.com who took it from decluttered.com. I just went a tiny step further by closing it in.

    Don't worry about temp either. I can't even feel a difference in temperature from ambient to right up against the pegboard. Just make sure you tie everything down tightly and make it so that it is at least relatively easy to remove. Mine is mounted with 4 wingnuts.

Posting Permissions

  • You may not post new threads
  • You may not post replies
  • You may not post attachments
  • You may not edit your posts
  •