Page 3 of 17 FirstFirst 1234567813 ... LastLast
Results 21 to 30 of 162

Thread: Project: Reality Bytes

  1. #21
    Wet Paint Xperiment's Avatar
    Join Date
    Sep 2007
    Location
    UK
    Posts
    287

    Default Re: Project: Reality Bytes

    I brought my Nvidia 8800GTS around 3 months ago and put quite simply, she was my baby. I had never owned a 'good' graphics card before and this one was a huge step up for me. However even though the performance was more than I needed, being only human, I wanted to push it that little bit further. The only limitation to this was the temperature, it ran so hot. Under a full load it would often reach 80'c. This to me was unacceptable so the best option would be to add it to the watercooling loop.

    There are so many waterblocks on the market nowadays it took quite a while to decide which one to go with. In the end I chose the EK Full Cover Block with the Acetal Top. It seemed to have very good overall performance for several reviews and also IMO looked the part.

    And here it is a couple of days after being ordered


    And here is my beloved card (I couldn't help thinking the man on the graphic was holding his head in a desperate panic seeing me with a screwdriver and a waterblock, having never fitted one before lol)


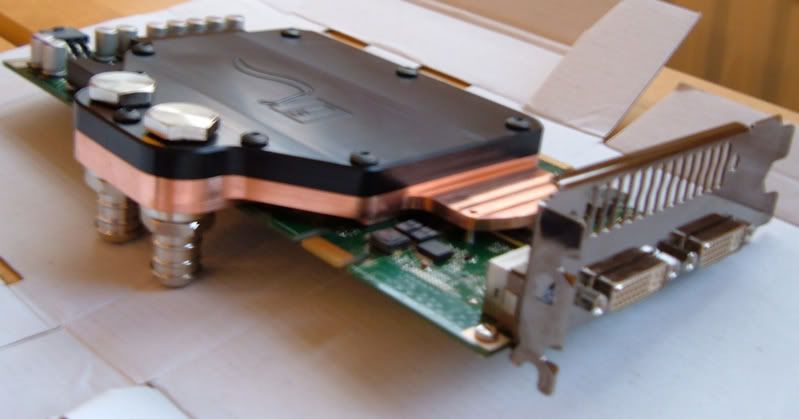
    So anyways after reading the instructions several times over I took the plunge and carefully removed the standard heatsink to expose the bare card.


    After cleaning off the thermal paste from the core and taking the thermal pads off the voltage regulators and memory I began to prepare the waterblock. I had all the nuts, washers and screws laid out before me in the order I would need them in a desperate attempt to make sure nothing went wrong. Applied the thermal paste (Arctic Silver Pro) and placed on the thermal pads with a pair of tweezers, then began mounting the block to the card. I have to say it was one of the single most frustrating this I have ever done. I haven't got tree trunk fingers but they are by no means small and seemed incapable of holding onto the tiny screws and washers. But after quite some time I finally got there and now had a high end graphics card setup for watercooling. Needless to say I was very happy indeed.

    Here it is fitted (apologies for the low quality pictures)


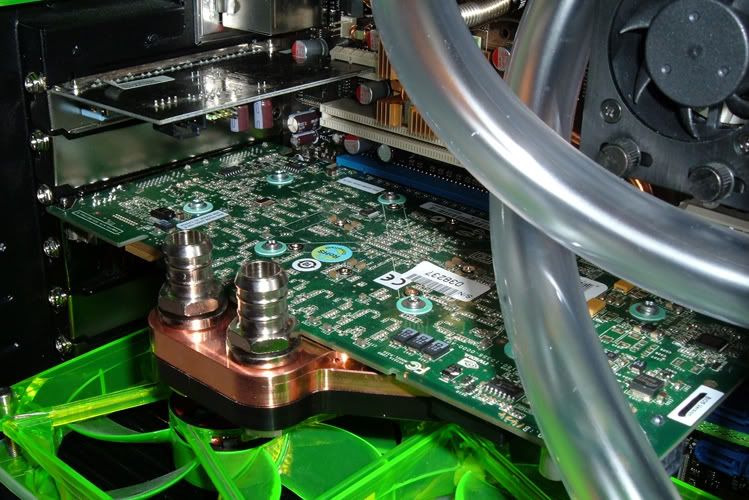
    Last thing to do was to pop it into the PCI-E slot out of harms way.


    Thanks again for reading, Xperiment

    My Worklogs: Reality Bytes / Flux

  2. #22
    Project: Elegant-Li The boy 4rm oz's Avatar
    Join Date
    Mar 2006
    Location
    Balhannah, South Australia
    Posts
    6,411

    Default Re: Project: Reality Bytes

    Thanks for the advice with the cutting, that's pretty much how I was going to do it anyway. Did you polish the cut parts of the plastic, if so how? I will be starting some of my plastics work tomorrow with pretty much the same color plastic, check out my mod (Project LEXA).
    Project: Elegant-Li *NEW*
    Project: Alpha FINISHED
    Project: LEXA Revival FINISHED
    Project: LEXA FINISHED Bit-Tech MOTM Nominee October 08

  3. #23
    Wet Paint Xperiment's Avatar
    Join Date
    Sep 2007
    Location
    UK
    Posts
    287

    Default Re: Project: Reality Bytes

    Quote Originally Posted by .Maleficus. View Post
    This mod is top-notch man. It's actually given me some ideas I might try out (don't worry though, I won't rip off your mod ). That video card cover is so simple, yet so effective.. I wonder why I haven't thought of that before! Also, I really like the idea for the res. I've been trying to think of how to mount one, and that is a really good way! This thing is off to a great start man, +rep.
    Thanks for the kind comments and the rep Maleficus. The GPU card cover, like so many good things, came about by complete accident but yeh it did turn out quite nice. Also feel free to use my project for ideas, I am glad people deem them worthy enough to do so.


    @ The boy 4rm oz - NP, no i didnt polish any of the plastics. If im honest I wouldnt even know what products to use. I just sanded the edges to allow them to difuse more light, this seemed to help alot give the glow around the edge. Good luck with the plastics work, best advice I can give is to take it very slowly.

    My Worklogs: Reality Bytes / Flux

  4. #24
    Project: Elegant-Li The boy 4rm oz's Avatar
    Join Date
    Mar 2006
    Location
    Balhannah, South Australia
    Posts
    6,411

    Default Re: Project: Reality Bytes

    Thanks for the luck lol. I am covering all of my drive bays with the plastic so there is a lot for me to do. Just some advice, if you use some UV CCFL's the green plastic glows more intensely (if you aren't already doing this).
    Project: Elegant-Li *NEW*
    Project: Alpha FINISHED
    Project: LEXA Revival FINISHED
    Project: LEXA FINISHED Bit-Tech MOTM Nominee October 08

  5. #25
    Wet Paint Xperiment's Avatar
    Join Date
    Sep 2007
    Location
    UK
    Posts
    287

    Default Re: Project: Reality Bytes

    Yeah I have a few dotted about the case, they do give a nice effect.

    Also they will be very handy for you when filling you waterloop. (if using UV Dye) they are excellent to look for leaks with, like this ....


    My Worklogs: Reality Bytes / Flux

  6. #26
    Project: Elegant-Li The boy 4rm oz's Avatar
    Join Date
    Mar 2006
    Location
    Balhannah, South Australia
    Posts
    6,411

    Default Re: Project: Reality Bytes

    Thanks for the advice, yeah I'm using UV green coolant.
    Project: Elegant-Li *NEW*
    Project: Alpha FINISHED
    Project: LEXA Revival FINISHED
    Project: LEXA FINISHED Bit-Tech MOTM Nominee October 08

  7. #27
    is never gonna give you up Elenril's Avatar
    Join Date
    Apr 2007
    Location
    Sydney, Australia
    Posts
    481

    Default Re: Project: Reality Bytes

    I really love the look of that watercooling setup, great work you've done so far. +rep

    Click for my dA page

    Quote Originally Posted by DaveW
    Never leave a bright orange case outside. Magpies will attempt to gang rape it.

  8. #28
    Retrosmith Mach's Avatar
    Join Date
    Mar 2005
    Location
    Texas
    Posts
    910

    Default Re: Project: Reality Bytes

    Very clean and professional!

    I'd love to see how you're cutting your plexi and your work area setup.

  9. #29
    Wet Paint Xperiment's Avatar
    Join Date
    Sep 2007
    Location
    UK
    Posts
    287

    Default Re: Project: Reality Bytes

    Quote Originally Posted by Mach View Post
    Very clean and professional!

    I'd love to see how you're cutting your plexi and your work area setup.
    When im next working on some plexi I will be sure to take pics (only a workbench in a garage mind you). Glad you like the build, thanks.

    My Worklogs: Reality Bytes / Flux

  10. #30

Posting Permissions

  • You may not post new threads
  • You may not post replies
  • You may not post attachments
  • You may not edit your posts
  •